Go to the end of this article if you prefer to watch a video instead.
Do you have a Ruby on Rails application using Rubocop? If so, you know how beneficial static code analysis tools can be in keeping your codebase clean and organized. In my personal experience, I’ve seen how static code analysis tools like Rubocop can transform not only your codebase but also your engineering organization.
I recently worked on a Rails project where a less-experienced developer took up most of a senior engineer’s time during code reviews due to inconsistencies and subtle bugs. Once I helped introduce Rubocop into the fold, the developer’s code became cleaner and more organized, leading to shorter review times. Even better, static code analysis became a teacher, teaching her better ways of writing code and automatically improving her skills.
However, one issue I often notice is that developers on these projects don’t fully take advantage of Rubocop during the development process. They don’t run the static code analysis frequently, so they’re not making the most of this powerful tool’s help. In this article, I’ll show you a couple of ways to run Rubocop early and often so you and your team can ensure you’re avoiding inconsistencies and bugs while maintaining your code for the long haul.
Tips for Keeping Your Code Clean and Organized With Rubocop
In my previous article titled Setting Up Rubocop for Legacy Ruby on Rails Projects, I went through the initial process of setting up Rubocop on a long-running Ruby on Rails project I built called Airport Gap. In that article, I showed how to begin chipping away at all those issues that show up when you install Rubocop for the first time on a legacy project, tackling a few offenses along the way. After writing that article, I set up the static code analysis rules I wanted for the project, reviewed the remaining offenses Rubocop found, and fixed them all.
My codebase for the project is well-organized and consistent without any TODO configuration files, and I want to keep it that way. I can run the rubocop command any time I make changes to the codebase to ensure it’s still compliant with the project’s rules, but I know that I’ll eventually forget something that will slip through the cracks. I want to automate this process as much as possible to address any offenses throughout the development workflow and prevent myself and other developers working on this project from committing inconsistent code. Here are a couple of ways I address this in my Rails projects.
Tip #1: Set up Your Code Editor to Use Your Rubocop Configuration
My first tip is to set up your code editor to highlight any Rubocop offenses as you’re working on the project. You can accomplish this through plugins or extensions.
My preferred code editor is VS Code, and one of the best extensions I’ve found not only for checking Rubocop offenses but for working with Ruby projects is the Ruby LSP extension by Shopify. The extension contains a ton of functionality to help you develop Ruby projects, including built-in support for highlighting any Rubocop offenses in your project.
After installing the Ruby LSP extension for VS Code from the Marketplace, it will automatically pick up your Rubocop configuration and detect any offenses right in the editor. For example, one of the rules I set up for the Airport Gap application is to enforce the use of single quotes for strings that don’t need interpolation. If I add a string using double quotes, the Ruby LSP extension will highlight it with a blue underline to inform you about the issue.
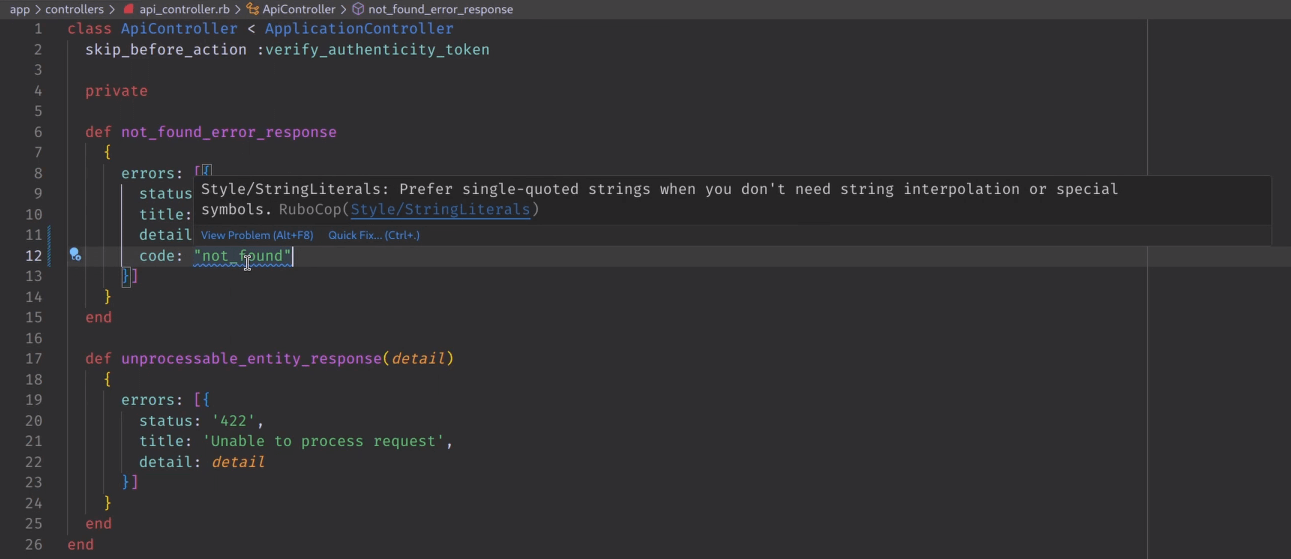
Hovering over the highlighted string will tell you the issue—in this case, that the string is not using single quotes—and you can automatically fix it here without leaving the code editor. The extension can also fix Rubocop offenses that are autocorrectable whenever you save the file, making it dead simple to keep your code up to standards.
This example is simple, but enabling this extension in your code editor is extremely helpful as you go through your day-to-day development tasks. If you don’t use VS Code as your code editor, other popular editors like Sublime Text, Emacs, and Vim have similar extensions or plugins. I highly recommend installing an extension or plugin with similar functionality for your editor because it’ll help you with your Ruby projects.
The Ruby LSP extension will prevent almost all static code analysis issues from sneaking into your commits. But it’s not a silver bullet. It won’t automatically fix all offenses, and if you’re working on a larger team, not everyone will have these extensions set up on their code editor. So, you’ll need another layer to protect this code from slipping into your repository.
Tip #2: Use Source Code Version Control Hooks to Execute Static Code Analysis
I like to use source code version control hooks to prevent static code analysis issues from slipping into the codebase. Most version control systems, like Git, have mechanisms to trigger actions when certain activities occur, like making a commit or pushing code into a remote repository. We can use these hooks to run scripts that prevent a code commit or push to a remote repository if a condition fails.
For example, let’s create a hook on the Airport Gap project so that any time a developer attempts to make a commit, it will run Rubocop. If the static code analysis fails, it will block the commit from happening. This project uses Git as its version control system, and we can use Git Hooks for our purposes.
Git stores all of its hooks under the .git/hooks directory at the root of your project. Any time you initialize a Git repository, it will include some sample hook scripts. These are regular shell scripts, but you can also use Ruby, Python, or other executable scripts. If the script can return a non-zero exit code to indicate a failure, you can use something other than shell scripting if you’re more comfortable with another programming language.
Git has many different hooks to trigger at various times during the development lifecycle. I’m looking to run a hook before a commit occurs, which is the pre-commit hook. This hook gets executed as soon as a git commit command occurs and is typically used as a safety net to catch something you may have forgotten, such as running static code analysis.
To create a pre-commit hook, we create a pre-commit file in the .git/hooks directory. The directory has an example pre-commit hook we can repurpose, but since running Rubocop is a straightforward example, let’s start it from scratch. The shell script will look like the following:
#!/usr/bin/sh

echo "Pre-commit: Running Rubocop static code analysis check..."
bundle exec rubocop

if [ $? -ne 0 ]
	echo "Rubocop static code analysis failed. Please fix errors before committing."
	exit 1
fi
Let’s go through this line by line:
- The first line is the shebang to indicate that this is a shell script.
- Next, we’ll print out a message using
echoto let the developer know that the pre-commit hook triggered the Rubocop static code analysis check. - The following line will execute the
bundle exec rubocopcommand to run the static code analysis check. - The
ifstatement that follows checks if the last command (indicated by the special shell variable$?) was not zero by using theneoperator. If this condition is true, it means thebundle exec rubocopcommand found an offense and returned a non-zero exit code. - When the condition of the
ifstatement is true, we’ll print an error message usingecho. - We also need to return a non-zero exit code after printing the error message so the pre-commit hook doesn’t proceed with the commit, using
exit 1.
After saving the file, there’s one important thing left to do. Git hooks need to be executable shell scripts. We can ensure this script is executable by running the chmod +x .git/hooks/pre-commit command at the project’s root. Once we do this, the pre-commit hook will be active for the repository.
To see the hook in action, let’s imagine we accidentally create a string that uses double quotes instead of the enforced single quotes, and we don’t have our code editor set up to run the rubocop command. If we attempt to commit the file with git commit, Git will automatically run our hook first. Since Rubocop will find an offense, it prints out the error message we set up in the script and won’t proceed with the commit.

Having a pre-commit hook like this for your static code analysis setup will save you a ton of time and rework since it will catch these problems early instead of weeks or months later. Since static code analysis only takes a second or two, hooks are an excellent way to catch any issues early.
While version control hooks are a great way to catch issues from sneaking into the codebase, developers can bypass them easily. For instance, I could use the --no-verify flag when committing on Git, and it won’t run any pre-commit hooks. That means I can commit and push code with Rubocop offenses without being blocked.
Although bypassing any hooks is discouraged for obvious reasons, developers skip these hooks for legitimate and not-so-legit reasons. If you want to encourage your team to follow the coding standards set upon your project, you need another prevention later to block unwanted code from getting into your codebase.
Tip #3: Run Rubocop in Your Continuous Integration Pipeline
My final tip to avoid having non-compliant code merged into your primary branches is to set up Rubocop to run as part of your continuous integration pipeline. Similar to setting up a hook in your version control system, running static code analysis along with other tests in continuous integration will serve as a final security barrier before code is merged into the codebase and deployed to production.
To show an example, I’ll use GitHub Actions to demonstrate how to run Rubocop for a Ruby on Rails application. The Airport Gap codebase is hosted on GitHub, and I’m already using GitHub Actions as my continuous integration service. If you don’t use GitHub Actions as your primary CI service, you can use similar steps for other continuous integration systems like CircleCI or Jenkins.
GitHub Actions looks inside the .github/workflows directory in the root of your project to find workflows to execute. The Airport Gap already has a few workflows for this project, like running unit and API tests and building Docker images. We’ll set up a separate workflow for the static code analysis process by creating a new file in this directory and calling it rubocop.yml. The contents of the workflow are the following:
name: Rubocop

on:
  push:
    branches:
      - main
  pull_request:

jobs:
  static_code_analysis:
    runs-on: ubuntu-latest

    env:
      RAILS_ENV: test
      PGHOST: localhost
      PGUSER: airport_gap
      PGPASSWORD: airport_gap

    services:
      postgres:
        image: postgres
        env:
          POSTGRES_DB: airport_gap_test
          POSTGRES_USER: airport_gap
          POSTGRES_PASSWORD: airport_gap
        ports:
          - 5432:5432
        options: >-
          --health-cmd pg_isready
          --health-interval 10s
          --health-timeout 5s
          --health-retries 5
      redis:
        image: redis
        ports:
          - 6379:6379
        options: >-
          --health-cmd "redis-cli ping"
          --health-interval 10s
          --health-timeout 5s
          --health-retries 5

    steps:
      - name: Checkout code
        uses: actions/checkout@v4

      - name: Set up Ruby and install gems
        uses: ruby/setup-ruby@v1
        with:
          ruby-version: "3.3.0"
          bundler-cache: true

      - name: Set up Node.js
        uses: actions/setup-node@v4
        with:
          node-version: "20.11.0"
          cache: "yarn"

      - name: Install JS dependencies
        run: yarn install --frozen-lockfile

      - name: Run Rubocop
        run: bundle exec rubocop
I won’t give a line-by-line breakdown of this configuration, but this is a basic workflow to get a standard Ruby on Rails application working on GitHub Actions. For more details about this configuration file, please check out the GitHub Actions documentation to learn what each section does.
- We’re calling this workflow “Rubocop” and want it to run whenever we push code to the
mainbranch or when a pull request is open or updated. - The workflow will run on a GitHub-hosted Ubuntu runner and contains the environment variables and services needed by the application, like PostgreSQL and Redis.
- Most steps consist of setting up the Airport Gap application inside the GitHub-hosted runner, such as checking out the code and installing Ruby, Node.js, and their dependencies.
- Finally, the last step will run our static code analysis check using Rubocop.
When running a workflow on GitHub Actions, it considers the workflow run successful only when all steps execute with no issues, meaning they all return a zero exit code. As mentioned, Rubocop returns a non-zero exit code if it finds any offenses. If a developer makes a commit that doesn’t follow the project’s coding standards, the workflow will fail and inform the team of the issue.
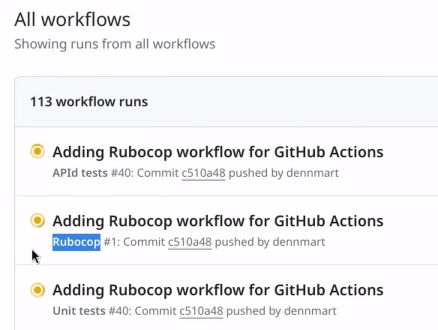
After saving this file into .github/workflows/rubocop.yml, we can commit to the main branch and push the update into the remote repository on GitHub. If we set up the workflow correctly, GitHub Actions will detect and execute the workflow since we specified we want it to run on every push to the main branch. After a few minutes, we’ll have the workflow’s result.
Summary
Having tools like Rubocop in your projects is nice, but it won’t matter if you or your team aren’t using them as early and often as possible. Make it easy to use these processes to keep your codebase in order. Setting up your code editor to notify you of offenses immediately helps you tackle the problem as it happens. Pre-commit hooks catch any issues from those times you forget to run Rubocop. Finally, you can set up Rubocop in your continuous integration pipeline as a final barrier to prevent bad code from getting merged into the codebase.
The three tips described in this article will help you get the most out of your static code analysis setup for your Rails projects. From setting up your code editor to catching bad commits, these tips may only take a few minutes to set up. However, their benefits to your codebase will last years, making your development more efficient and effective.
Do You Need a Helping Hand to Get Your Rails Codebase Clean and Organized?
I know how painful it is for a team to balance the expectations of producing high-quality work quickly while simultaneously managing the health of the codebase. With over 20 years of professional experience working with startups and small tech companies across the globe, I can help your team get your codebase working smoothly and efficiently while delivering at a rapid pace.
If you’d like to chat, I’d love to talk and get to know your situation better. Schedule a time with me today to talk about your company, your current obstacles, and how we can collaborate to make the most out of your Rails applications.
Watch the Video Version of This Article
If you enjoyed this article or video, please consider subscribing to my YouTube channel for more tips on helping Rails developers ship their code with more confidence, from development to deployment.