In the first part of this series, we introduced the concept of using Hugo to build a static website and automating updates to an Amazon S3 bucket using GitHub Actions. In that article, we went through the details of setting up the necessary permissions on AWS to allow GitHub Actions to access the Amazon S3 bucket that will host our static website. For improved security, we’re using GitHub’s OpenID Connect provider as our preferred method of authentication.
In this follow-up article, we’ll continue on our journey of automating updates of a Hugo-backed website to Amazon S3, setting up a GitHub Actions workflow that will handle the process for us. GitHub Actions is a powerful automation tool that can help you set up different workflows to assist you during the software development process. Used alongside GitHub code repositories, you can create workflows that allow you to automate various tasks, from testing to building to deployment.
We’ll create a GitHub Actions workflow that detects changes made to a GitHub repository containing a Hugo website, generates the files for the static website, and uploads it to an Amazon S3 bucket configured to host it. Our automation will continually update our static site without human intervention.
Putting GitHub Actions to work
Besides letting us automate specific tasks, one of the primary features of GitHub Actions is the ability to reuse common procedures provided by GitHub and the open-source community in your workflows. For instance, you can use an action that will set up Node.js for your workflow or automatically build and push Docker images. You don’t always have to reinvent the wheel. There’s a good chance that there’s an action available for most, if not all, of your use cases.
Before setting up our workflow, here’s a list of the things we want to perform inside our GitHub Actions workspace:
- Check out the codebase from our GitHub repo.
- Generate the static website using Hugo using the codebase.
- Configure the AWS permissions needed inside the workspace.
- Upload the generated website into our Amazon S3 bucket.
We don’t have to build these processes from scratch for most of these items. Both GitHub and the open-source community have provided us with the following actions to accomplish the majority of these tasks:
- To check out the codebase and place it inside the workspace, we’ll use the
actions/checkoutaction. - The
peaceiris/actions-hugoaction sets up Hugo inside the workspace to let us generate the static website. - We’ll use the AWS permissions we set up in the previous article with the
aws-actions/configure-aws-credentialsaction.
For uploading the generated website to Amazon S3, the virtual machine we’ll use to run the GitHub Actions workspace contains the AWS CLI installed by default, so we don’t need to worry about downloading and installing it.
Before setting up our workflow…
The example GitHub Actions workflow for this article assumes that we already went through the process of setting up the required AWS permissions that we need to access the Amazon S3 bucket. For more detailed instructions on setting up permissions on AWS for GitHub Actions, please refer to the first part of this series. You’ll find all the necessary information to ensure a smooth process.
The remainder of this article also assumes that we have already set up an Amazon S3 bucket with the correct permissions to serve static websites. Setting up the bucket can be done through the AWS console, but we can also take advantage of “Infrastructure as Code” tools like Terraform to handle the setup and management for us.
Finally, we’ll need to have a Hugo-backed website available on GitHub. We’ll use a GitHub repository containing a basic Hugo setup to set up our GitHub Actions workflow. The Hugo website has a single page, which isn’t helpful for setting up automation in the real world. Still, it will work to demonstrate how we can generate a static website and automatically upload it to Amazon S3.
With our AWS permissions set up, an Amazon S3 bucket ready to host a static site, and a GitHub code repository containing a Hugo site, we can create the GitHub Actions workflow.
Creating our workflow file
GitHub Actions looks for workflows inside of the .github/workflows directory in your code repository. Inside that directory, we can create YAML files that define the steps we want the workflow to take. The name of the YAML file isn’t important outside of providing an idea of what the workflow does, so you can name it anything you prefer. Let’s create our workflow in a file saved in .github/workflows/deploy_to_s3.yml containing the following workflow:
name: Build Hugo site

on:
  push:
    branches:
      - main

permissions:
  id-token: write
  contents: read

jobs:
  build:
    runs-on: ubuntu-latest

    steps:
      - name: Checkout code
        uses: actions/checkout@v3

      - name: Setup Hugo
        uses: peaceiris/actions-hugo@v2
        with:
          hugo-version: "0.111.3"

      - name: Build minified pages
        run: hugo --gc --minify

      - name: Configure AWS Credentials
        uses: aws-actions/configure-aws-credentials@v2
        with:
          aws-region: ap-northeast-1
          role-to-assume: ${{ secrets.IAM_ROLE_ARN }}

      - name: Sync public directory with S3 bucket
        run: |
          aws s3 sync ./public s3://dennis-static-site --delete
Let’s break down each section to give you an idea of what each segment of this file does.
name
The name key lets us set the name of the workflow. You can put any name as its value or leave it out to have GitHub set the name based on the YAML file. To make it easier to identify executed workflows in your repository, it’s best to give them a descriptive name. GitHub will display this name for you later on. Adding a descriptive name makes it easier to follow your automation, especially when you have multiple GitHub Actions workflows operating together in the same repository.
on
The on key lets us define when we want to trigger this workflow. We can trigger a workflow in various ways, the most typical ones being when pushing new code to the repo and when opening a new pull request.
In this example, we want to generate and upload the static website to Amazon S3 whenever we push new code to the GitHub repository. We also filter this trigger further to occur only when we push new code to the main branch on the repository. This filter allows us to push separate branches without triggering the workflow, which is helpful for experiments, in-progress work, or working with multiple team members in the same repository.
permissions
The permissions key is a crucial part of the functionality for this workflow. As mentioned in this article, we’ve configured our AWS permissions to grant access to GitHub’s OpenID Connect provider (OIDC) for authentication. Inside our workflow, we must let AWS request a new token from GitHub’s OIDC provider. To allow this, we need to set appropriate permissions inside the GitHub Actions workflow.
By default, GitHub Actions does not provide access to fetching or creating new OIDC tokens. That’s where the permissions key comes in to help. Here, we can allow our workflow to create OIDC tokens on our behalf by using the id-token: write configuration.
In addition, we also set up the contents: read configuration setting to let GitHub Actions access our repository. This setting is the default for GitHub Actions, but whenever we override default permissions in a workflow, all unspecified permissions are automatically set to none, meaning that it removes all other defaults.
For more details about why setting these permissions are required when using GitHub’s OpenID Connect provider, the GitHub documentation has additional information.
jobs
The jobs key is the heart of a GitHub Actions workflow, where we specify each action we want our automation to take. Each GitHub Actions workflow consists of one or more jobs defined by an ID key. In this example, our workflow only has a single job, with the ID of build.
Inside our job ID, we specify which type of machine—known as a runner—we want to use for executing the workflow with the runs-on key. GitHub Actions allows us to use GitHub-hosted runners that the company builds and maintains, or you can choose to self-host your own runner. Unless you have a specific need for running your GitHub Actions workflows on a self-hosted runner, you’ll almost always use one of GitHub’s systems. Here, we’ll use the ubuntu-latest runner, a virtual machine running Ubuntu 22.04 at the time of this writing.
We have more options to set up our job, such as setting up dependencies on other jobs in the workflow or specifying whether a job should run based on certain conditions. We don’t require any extra setup for our purposes, so we can finally begin defining what actions to take when the workflow gets triggered in our code repository.
steps
In the previous section, we listed the tasks we want the automated workflow to perform whenever triggered. These tasks are necessary to ensure that our static site has the latest updates and is updated accordingly on Amazon S3. The steps section of the GitHub Actions workflow is where we begin to define each task.
Check out the codebase from our GitHub repo
The first step is to bring our code from the GitHub repository into the runner. Even though we’re triggering this workflow inside GitHub’s ecosystem, it doesn’t mean the code will automatically be inside the system where the workflow runs. We must explicitly check out the repo before performing any additional actions in the rest of the workflow.
The actions/checkout action provided by GitHub is a reusable workflow that fetches your code and places it inside the workspace of the runner. By default, the action will check out the commit that triggers the GitHub Actions workflow. In our example, we trigger the workflow when a new commit gets pushed to the main branch. That means the actions/checkout action will grab our repository at that commit’s state. We can then use this version of the code for our subsequent steps.
One thing to note is that whenever we use a reusable set of commands like the actions/checkout action, we use the uses key to let GitHub Actions know this is a separate workflow from elsewhere. Later, we’ll see how to run commands directly in the runner when needed.
Generate the static website using Hugo using the codebase
Next, we want to use the code we just checked out to generate our static website. Hugo is our static site generator, which isn’t installed in our runner by default. While we can download and install Hugo manually in the runner, we’re spared from going through all those steps thanks to the peaceiris/actions-hugo action provided by the community.
The peaceiris/actions-hugo action automatically installs Hugo in the runner, so we don’t need to go through the installation process ourselves. The action has a few optional settings that we can configure, using the with key when setting up this step. In our scenario, we’d like to use the same version of Hugo that we used during development to ensure consistency when generating any files (version 0.111.3).
The next step after installing Hugo is to build the static site. Now that the hugo executable is available inside the runner, we can run the commands required to generate the site. Unlike previous steps in the workflow where we defined uses to fetch a reusable workflow, we’ll directly run the command on the runner using the run key, and the command as its value. The command hugo --gc --minify will generate the static site in our workspace’s public directory, ensuring we minify the files and clean up unused cache files. These optional flags will allow us to keep our total file size at a minimum.
Configure the AWS permissions needed inside the workspace
We have our static site ready to place in our Amazon S3 bucket. But first, we need to make sure GitHub Actions has access to our AWS account. All the work we did in Part 1 of this series to set up the necessary permissions between GitHub Actions and AWS will finally come into play inside our workflow.
Assuming we already set things up on the AWS side, we can easily set up permissions in our workflow using the aws-actions/configure-aws-credentials action provided by the AWS team. This action lets us configure our AWS credentials on GitHub Actions in various ways, such as using the access keys for an IAM user. As mentioned in the previous article, we’re going the more secure route with GitHub’s OpenID Connect provider.
The aws-actions/configure-aws-credentials action makes it dead simple to set up our credentials on GitHub Actions through a few settings configured under the with key in this step. The action also sets default values for some settings, which you may need to tweak for your use case. For this article, we’ll stick with the required settings for our configuration.
The first setting, aws-region, is the AWS region where we’ll access our resources. In this example, we’ve placed our Amazon S3 bucket for the static website in the Tokyo, Japan region (ap-northeast-1).
The other setting, role-to-assume, contains the Amazon Resource Name (ARN) of the IAM role we created on AWS. We can fetch this information on the AWS console. If using Terraform as shown in the previous article for this series, we’ll have it available as part of an output value when applying our changes. GitHub Actions will assume this role, which has the policies we need to interact with the Amazon S3 bucket.
Something to note is that we’ve placed the role-to-assume setting as a repository secret. While exposing the ARN for the role won’t automatically give someone access to it, it’s still a good practice to disclose as little information as possible in your workflows to avoid leaking any information about your AWS account. This step is essential in public repositories but is also helpful even if your repository is private.
This step will take care of your authentication with AWS. The workflow will make a request to assume the role. AWS will then authenticate with GitHub’s OpenID Connect provider and send a temporary token. With this token, the GitHub Actions workflow has all it needs to access our AWS resources through the IAM role.
Upload the generated website into our Amazon S3 bucket
Now that we have our site generated and gave the workflow permission to access the Amazon S3 bucket, we’re at the last step: uploading the website files to AWS and making any changes available via the static website configuration. We’ll use the AWS CLI already available in the runner for this.
The command line interface for AWS has a set of commands to interact with Amazon S3 buckets. We want to update the existing website files in a bucket, which we can do in different ways. The most appropriate one for our use case is the sync command, which will upload new and updated files from two locations. Since we’ll typically only change a handful of files at a time in our Hugo repository, using sync will make the transfer quicker since it will only deal with the differences.
The source directory will be our public directory inside the workspace in the GitHub Actions workflow. It’s a local directory, so we only need to define the local path. The destination directory is the Amazon S3 bucket hosting our static website called dennis-static-site. Since the destination is an S3 bucket, we’ll include the s3:// prefix so the CLI knows it’s an Amazon S3 URI.
One other thing we need to take care of is when we delete pages from our static website. By default, the sync command only copies changed files and won’t bother checking if a file is no longer part of the source directory. We don’t want that behavior since we don’t want old, stale pages to remain accessible on our website. The --delete option will automatically delete any files in our Amazon S3 bucket if they’re not in the source directory.
Triggering the GitHub Actions workflow
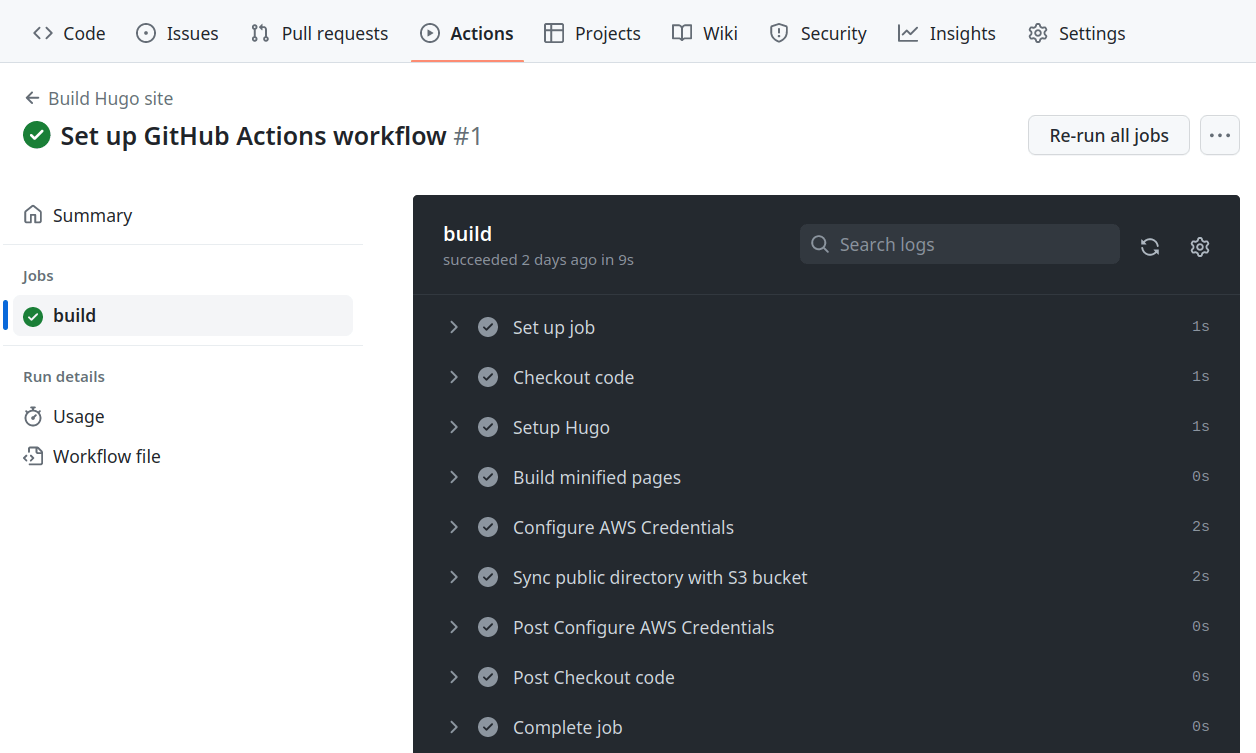
After saving the YAML file inside the .github/workflows directory in our GitHub repository, we can automatically trigger the workflow by committing the file to the repo’s main branch and pushing the changes to GitHub. You can see the workflow come alive inside the Actions tab of the repository on GitHub’s website. If everything is configured correctly, you’ll see the process take place and complete successfully:
Now you don’t have to worry about updating your website on Amazon S3 any time you update your Hugo website.
You can find an example repository containing the GitHub Actions workflow and see it in play at https://github.com/dennmart/hugo_github_actions_s3.
Troubleshooting
If you run into problems during the GitHub Actions workflow execution, here are some troubleshooting tips that may help you figure out the issue:
- Make sure you went through the process of correctly setting up the OpenID Connect provider and IAM role as explained in the previous article of this series.
- Verify that the IAM role has the right policies and associated permissions for your Amazon S3 bucket.
- Double-check the GitHub Actions workflow YAML file to ensure all steps are defined correctly for your scenario.
- Confirm that the YAML file for the GitHub Actions workflow is formatted correctly, as YAML tends to be picky about indentation.
If you still have trouble getting GitHub Actions to deploy your site to Amazon S3, feel free to contact me, and I’ll do my best to help you sort out any issues.
Summary
In this second part of our series, we focused on setting up the GitHub Actions workflow to update a Hugo-based static website hosted on Amazon S3 automatically. We set up GitHub Actions using various community-shared actions to set up Hugo and allow the workflow to access our AWS resources. Even if you don’t use Hugo as your static website generator, you can still adjust parts of the workflow for your preferred tool.
By following the process in this article, you can ensure that your static website is always up to date without manual intervention. We also covered some common tips to help you address potential issues you may encounter while setting up this automation. Thanks to the power of GitHub Actions to automate your website’s deployment, you can spend less time managing your files and more time focusing on creating amazing content.
If you need a DevOps expert to help you with your AWS, Terraform, or other DevOps services, let’s talk. With 20 years of experience working with various startups and an AWS Certified DevOps Engineer, I can guide you through the complexities of modern infrastructure to get the most out of your investment. I’d love to help you build and maintain reliable, scalable, and secure systems, from infrastructure management and deployment to cloud architecture and monitoring. Contact me today to learn more about my services.