In my previous article, Get Started With Hetzner Cloud and Terraform for Easy Deployments, I showed how simple it is to use Terraform to manage a firewall, private network, and server on Hetzner Cloud for deploying web applications. For the example used in the article, I provisioned a single server to host a Ruby on Rails web application.
The single-server approach works well for smaller sites that don’t have a ton of traffic. These days, you can get pretty far on one server before you need to add more to handle the load. But what if you already have a web application that you need to scale across multiple servers? For that, you’ll need a load balancer.
Why Use a Load Balancer?
Spinning up a single server on the cloud to deploy your web applications is straightforward. Once you set up your application on the server, you can point your browser to the server’s IP address or set up a DNS record to have traffic begin flowing to your site. But if you have multiple servers hosting your application, a load balancer will distribute traffic across them through a single entry point.
For web applications needing additional resources, load balancers will improve the performance and reliability of your applications by spreading traffic across all your web servers while ensuring it doesn’t send traffic to any inaccessible servers. When set up correctly, you can let a load balancer automatically detect new servers, add them to the available pool of resources, and remove any servers that have stopped responding.
Should You Get a Managed Load Balancer or Create Your Own?
You can set up a load balancer if you know what you’re doing. At a high level, creating a load balancer involves setting up a web server that supports distributing traffic to different target servers. Some of the most popular web servers used nowadays, like Nginx and Caddy support load balancing out of the box, letting you quickly and easily set up a proxy that will pass along requests across your infrastructure.
Spinning up your own load balancer won’t cost you a lot of money. However, it does require time for maintenance and upkeep, along with additional responsibilities to ensure everything works as expected, so it might cost you more in the long run. Most cloud service providers offer managed load balancers that simplify the process by handling all the complexity for you. In most cases, it just takes a few minutes to start an instance of the load balancer and then configure it to point to your servers. A managed solution usually saves you tons of time and money compared to doing things yourself.
One of my preferred cloud services, Hetzner Cloud, offers managed load balancers that allow you to route traffic to your resources within their infrastructure and handle TLS termination for visitors by decrypting secure HTTPS traffic and passing the request along to your servers. You can create and configure a load balancer through the Hetzner Cloud console, but getting a load balancer up and running using Infrastructure as Code will help you keep your systems organized.
In this article, I’ll show you how to use Terraform to set up and manage a load balancer on Hetzner Cloud through code. I’ll also go through the process of creating an SSL certificate for your domain name and assigning it to your load balancer to handle HTTPS traffic.
Application and Infrastructure Used for This Article
For this example, I’ll use one of the applications I maintain called Airport Gap, a Ruby on Rails application that helps testers practice API automation testing. The site uses a standard tech stack for most modern web applications: some web servers, worker processes for asynchronous background tasks, a PostgreSQL database, and a Redis server for caching and other tasks.
The demo site for Airport Gap used as the base for this article runs using the following infrastructure on Hetzner Cloud:
- Three servers contain the Rails web application.
- One server runs the worker process (Sidekiq) for asynchronous jobs.
- One server is dedicated to the PostgreSQL database.
- One server runs Redis for Sidekiq and caching.
I have provisioned these servers on Hetzner Cloud using Terraform for this article. I also deployed the Airport Gap application using Kamal and can access the site on each server individually through their IP addresses.
However, I want to set up a domain name to access the application and spread the load across all three Rails servers I set up. I also want to automatically handle failures and avoid having requests sent to an inaccessible web server in case one of them goes down. That’s where the load balancer comes into play. With the servers set up individually, let’s expand the Terraform configuration to set up the load balancer using Infrastructure as Code.
Configuring a Hetzner Cloud Load Balancer With Terraform
I’ll need to set up a load balancer in front of the web servers to manage their traffic. The load balancer will have an IP address we can access from our browser and handle routing the request to one of the active targets we define. I can then set up a DNS record to point to the load balancer so users can visit the site through a domain name and have it routed to one of the available Rails servers.
The Terraform configuration for this infrastructure uses the hcloud provider to provision and manage the firewall, private network, and servers for the Airport Gap infrastructure. The provider also supports managing Hetzner Cloud load balancers, so we can use the same configuration file to set up the load balancer.
Creating a load balancer
Creating a Hetzner Cloud load balancer using Terraform involves a few resources. The first resource we’ll need to build is the load balancer itself. We can do that using the hcloud_load_balancer resource type. At the end of our existing Terraform configuration file, we’ll create a new resource block to set this up:
resource "hcloud_load_balancer" "load_balancer" {
  name               = "airportgap-load-balancer"
  load_balancer_type = "lb11"
  location           = "hil"
}
The hcloud_load_balancer resource type requires three arguments. The first required argument is the name, which contains the load balancer’s name to set on Hetzner Cloud. We’re calling this load balancer “airportgap-load-balancer”—which isn’t particularly descriptive, but it’s the only one we’re creating for this demo.
The following required argument we need to set up is the load_balancer_type. Load balancers on Hetzner Cloud currently have three types of managed solutions, the primary differences being how many targets or servers you can specify and how many SSL certificates you can assign to the load balancer. For this example, I’ll only use a single service and three targets, so the LB11 load balancer type is more than enough for me. We’ll specify that in Terraform with “lb11” (using lowercase letters).
Finally, the last required argument we need is the location. For a load balancer to work on Hetzner Cloud, you must set it up in the exact network location as the target servers. Otherwise, it won’t work. I spun up the Airport Gap servers on the Hillsboro, Oregon network, defined by “hil”, so I’ll set up the load balancer on the exact location.
This resource block takes care of the load balancer provisioning. The load balancer won’t do anything with this current configuration because we need to set up at least one target and one service so it knows how to direct traffic to our web app. We can also handle these steps using Terraform. First, let’s set up our target for the load balancer.
Creating the load balancer targets
You can specify the targets to use in a Hetzner Cloud load balancer in Terraform using the hcloud_load_balancer_target resource type. With this resource, we’ll tell the load balancer which servers it should use to route its traffic when we have this set up. Let’s add a new resource block after the load balancer configuration to set this up:
resource "hcloud_load_balancer_target" "load_balancer_web" {
  load_balancer_id = hcloud_load_balancer.load_balancer.id
  type             = "label_selector"
  label_selector   = "server=airportgap-web"
}
The first required argument to set up for this resource type is the load_balancer_id, which we can reference since we’ll manage it with Terraform. We can get the ID of the hcloud_load_balancer.load_balancer resource by using the id attribute reference.
The following argument we need is the type for the load balancer target. Here, we’re telling the load balancer the kind of service we want to configure for its routing. A Hetzner Cloud load balancer supports a couple of ways to configure targets, like specifying the server by its ID (setting a value of server) or an IP address that points to a Hetzner Cloud server located in the same network zone (setting a value of ip).
Specifying a target by its ID or IP address works well enough, but using these target types has limitations. One example is needing to use static IP addresses in case we need to recreate a target server, which incurs additional costs. Another limitation with setting the targets by server ID or IP address is that if we scale our infrastructure up and add new servers, we’ll need to manually add these targets to the load balancer configuration, which is easy to forget.
A more convenient and maintainable approach is configuring the targets by setting the label_selector value. This setting tells the load balancer to look for any server that has specific labels attached to it and automatically put them as targets.
When you create new servers on Hetzner Cloud (or almost any cloud service provider), you can optionally set labels to identify them for different purposes. The servers I configured for this demo have labels attached to determine the server type. For the web servers, I set up a label containing a key of server and a value of airportgap-web.
I can use the label to configure the load balancer to find all services with the server label set to airportgap-web, and it will set up all three web servers as targets with a single configuration setting. Besides reducing the configuration code, it also has the added benefit of automatically setting up new servers as targets on the load balancer if I add additional web servers in the future using the same server label.
After setting the target type, we must configure the label_selector argument. The value for this argument is a query to filter the services you want to include as a target. The Hetzner Cloud API reference has a section showing different ways to set a label selector. For this example, I’ll keep it simple by matching the label name (server) to the value I want for my targets (airportgap-web).
This configuration takes care of configuring the targets for the load balancer. So far, we’ll create a load balancer on our Hetzner Cloud account and set up the targets that we want the load balancer to route traffic to. We still have one more thing to configure before the load balancer is fully functional, and that’s a service.
Creating a load balancer service
For load balancers, a service is where we specify the protocol and port the load balancer will use for handling traffic. It’s also responsible for performing health checks on our targets to check if any are unavailable so the load balancer doesn’t send traffic to a server that’s not working.
The hcloud_load_balancer_service resource type handles creating a load balancer service using Terraform. We’ll create this block under the rest of the configuration:
resource "hcloud_load_balancer_service" "load_balancer_service" {
  load_balancer_id = hcloud_load_balancer.load_balancer.id
  protocol         = "http"

  health_check {
    protocol = "http"
    port     = 80
    interval = 10
    timeout  = 5

    http {
      path         = "/up"
      status_codes = ["200"]
    }
  }
}
This resource type has two required arguments, plus additional ones depending on the service configuration.
The first argument is the load_balancer_id. Since we’re managing this resource in this configuration, we can get the ID through the resource reference with hcloud_load_balancer.load_balancer.id, as we did when configuring the target earlier in this article.
The other required argument is the protocol. Hetzner Cloud load balancers can set up services using HTTP, HTTPS or TCP. For web servers, we’ll use either HTTP or HTTPS. Our web servers are currently not set up to run HTTPS traffic, so in this initial configuration, I’ll set up the protocol to use http (using lowercase letters).
When configuring a load balancer service using the HTTP or HTTPS protocol, we’ll need to include an additional block to configure the health checks that the server will do to keep track of active servers. To do this, we’ll set up the health_check block. Inside the block, we have a few required parameters.
The first one is the protocol parameter. While the parameter name is the same as the one we set up for the service, the protocol parameter for the health check serves a different purpose. The argument for the resource tells the service which protocol to use for the type of traffic the load balancer will accept, while the parameter inside this health_check block tells the service which protocol to use for checking that a server is up.
Typically, both arguments will use the same protocol, but there might be scenarios where you’ll prefer to use a different one as a health check. The web servers I have set up in this configuration are running HTTP services, so that’s what we’ll set for the protocol here.
Next, we need to specify which port the health check should ping. The application for each web server is accessible on port 80, so we’ll set that as the port.
The next required parameter is the interval, which is the number of seconds between each health check done by the service. We set 10 for our configuration, meaning the service will ping each target every ten seconds to check if it’s still responding. For your projects, do some tests to see what interval makes more sense for your needs.
The last requirement to configure in the health check is the timeout. This setting tells the load balancer service how long it should wait for the target to respond before marking it as unhealthy and taking it out of rotation. Our web service should respond in less than a second, so I’ll set the timeout to 5 seconds. If it takes that long for the web app to respond to a simple request, something isn’t working quite right, and we should look into it further.
Since we set the protocol for this health check to “http”, we have one additional block to configure, which is called http. Inside this block, we need to specify where the health check needs to make its requests. All parameters inside the http block are optional, but we should set up a few to specify how our application works and avoid unexpected health checks.
First, we’ll set up the path, which indicates the path of the HTTP request made to the target. I’m using a Rails application with a health check endpoint already configured in the /up path, so I’ll use that.
The other parameter I want to set up here is status_codes. This parameter is a list of strings containing the HTTP status codes that the health check uses to determine whether a target is healthy or unhealthy. If this parameter isn’t specified, it will consider any status code on the 2xx or 3xx range to be successful. I prefer to be specific with these, and I know the health check endpoint in the app should always return a 200 OK status code when it’s working, so I’ll configure the load balancer health check only to check this status code.
The three new resource blocks added should be all that’s necessary to get a load balancer fully functional and routing traffic to all our web servers. We can configure more parameters for the load balancer service if we want to be more specific with some functionality, like running the health checks on a domain name or setting sticky sessions to route users to the same target. For this example, we’ll keep the configuration simple.
Provisioning the Load Balancer Using Terraform
We can finally add the fully-configured load balancer to our Hetzner Cloud project. Going to the command line, we can first do a quick validation using terraform validate to ensure our code is syntactically correct and we don’t have any issues with the Terraform configuration.
Next, we can check the changes Terraform will make with these configuration updates using the terraform plan command:
Terraform used the selected providers to generate the following execution plan. Resource actions are indicated with the following
symbols:
  + create

Terraform will perform the following actions:

  # hcloud_load_balancer.load_balancer will be created
  + resource "hcloud_load_balancer" "load_balancer" {
      + delete_protection  = false
      + id                 = (known after apply)
      + ipv4               = (known after apply)
      + ipv6               = (known after apply)
      + labels             = (known after apply)
      + load_balancer_type = "lb11"
      + location           = "hil"
      + name               = "airportgap-load-balancer"
      + network_id         = (known after apply)
      + network_ip         = (known after apply)
      + network_zone       = (known after apply)
    }

  # hcloud_load_balancer_service.load_balancer_service will be created
  + resource "hcloud_load_balancer_service" "load_balancer_service" {
      + destination_port = (known after apply)
      + id               = (known after apply)
      + listen_port      = (known after apply)
      + load_balancer_id = (known after apply)
      + protocol         = "http"
      + proxyprotocol    = (known after apply)

      + health_check {
          + interval = 10
          + port     = 80
          + protocol = "http"
          + retries  = (known after apply)
          + timeout  = 5

          + http {
              + path         = "/up"
              + status_codes = [
                  + "200",
                ]
            }
        }
    }

  # hcloud_load_balancer_target.load_balancer_web will be created
  + resource "hcloud_load_balancer_target" "load_balancer_web" {
      + id               = (known after apply)
      + label_selector   = "server=airportgap-web"
      + load_balancer_id = (known after apply)
      + type             = "label_selector"
      + use_private_ip   = (known after apply)
    }

Plan: 3 to add, 0 to change, 0 to destroy.
Terraform will add a few new resources, starting with the load balancer and setting up the targets and the service so everything looks great.
All we need to do is apply these infrastructure updates using the terraform apply command. After a bit, Terraform will finish creating the new load balancer and have it completely configured to route traffic to our web servers.
hcloud_load_balancer.load_balancer: Creating...
hcloud_load_balancer.load_balancer: Creation complete after 4s [id=xxxxxxx]
hcloud_load_balancer_target.load_balancer_web: Creating...
hcloud_load_balancer_service.load_balancer_service: Creating...
hcloud_load_balancer_target.load_balancer_web: Creation complete after 2s [id=lb-label-selector-tgt-f05615bba60f30457de676c9e3ed6cf99b24635085409a1cf02fefb138d84fc5-xxxxxxx]
hcloud_load_balancer_service.load_balancer_service: Creation complete after 2s [id=xxxxxxx__80]

Apply complete! Resources: 3 added, 0 changed, 0 destroyed.
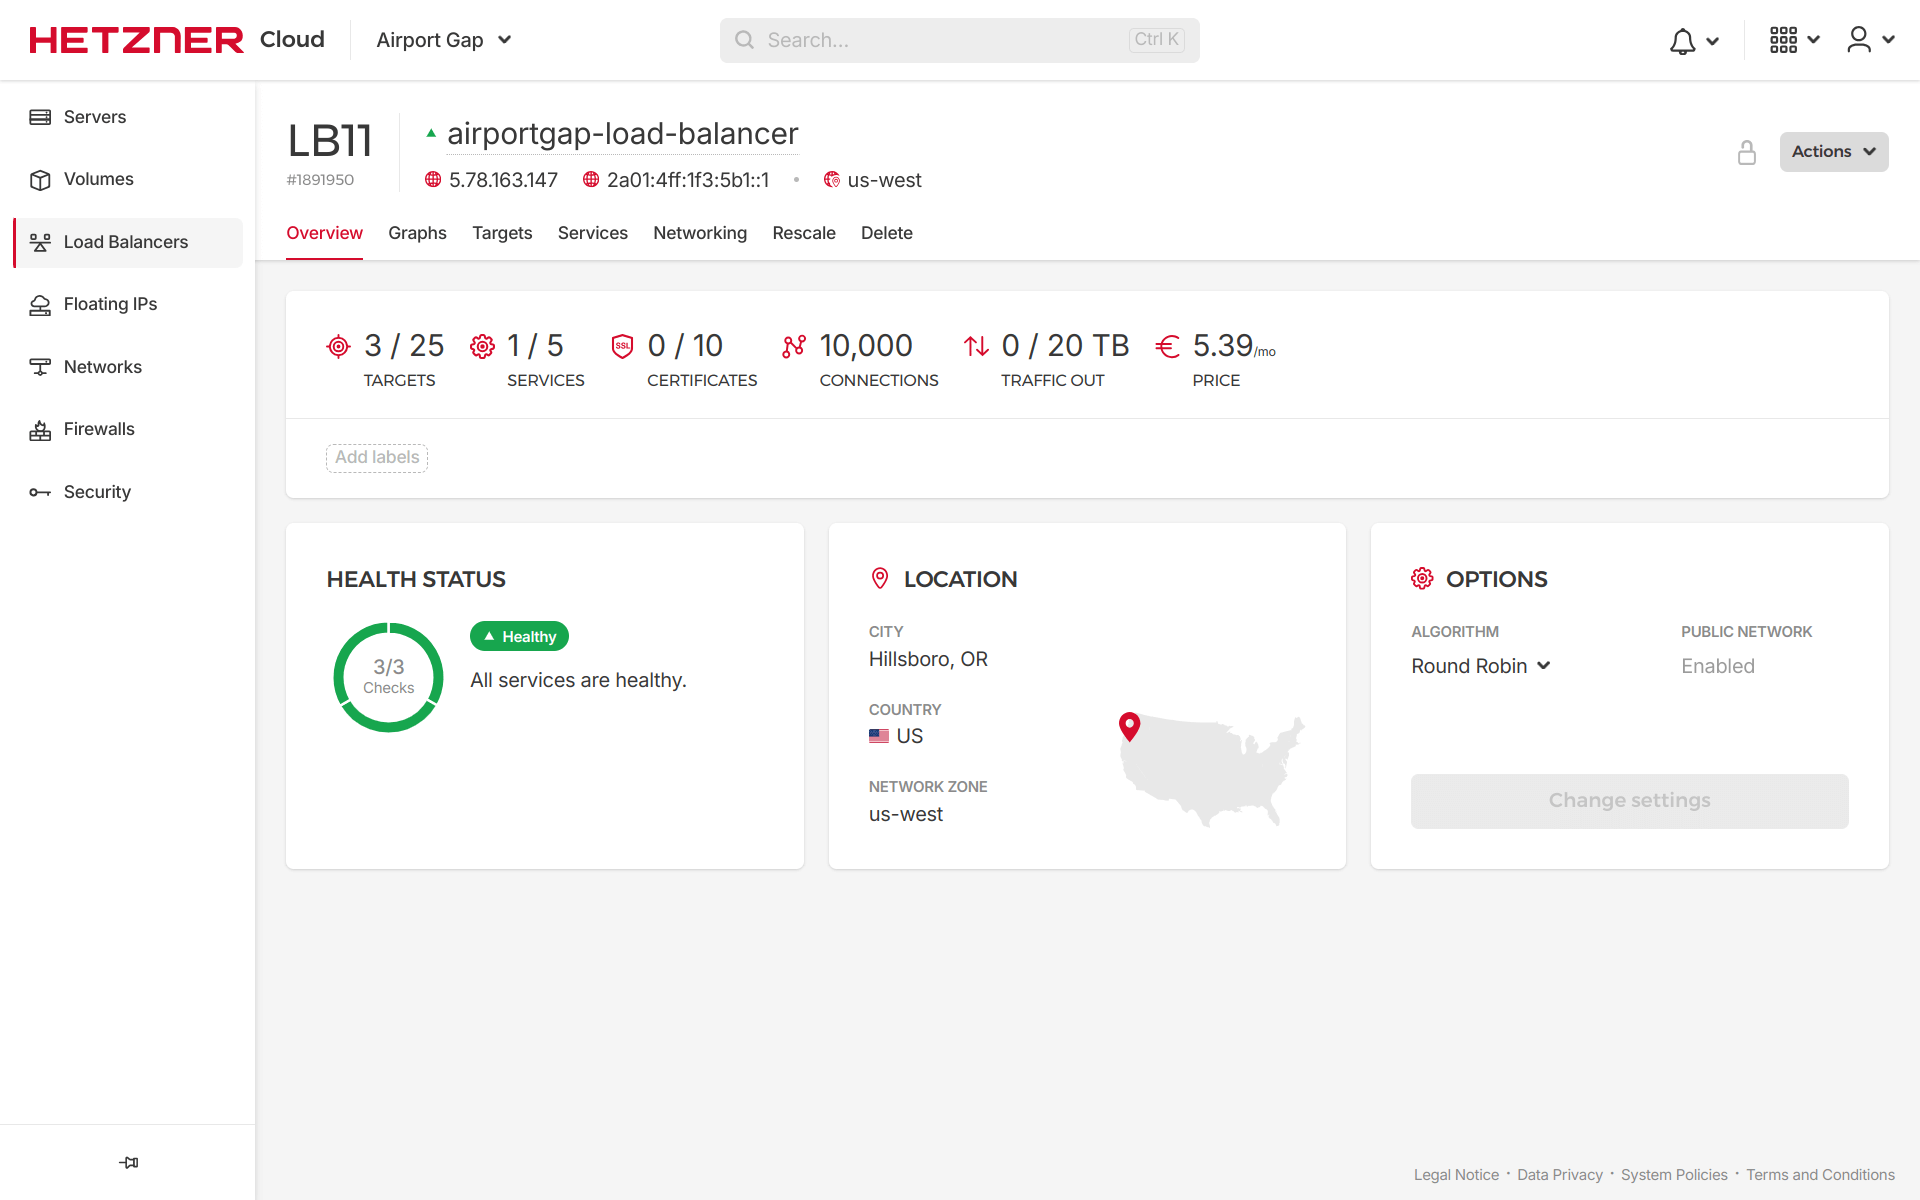
If we go to the project on the Hetzner Cloud console and go to the Load Balancers section, we can see the new load balancer set up with the specified type of LB11, three healthy targets, and a service.
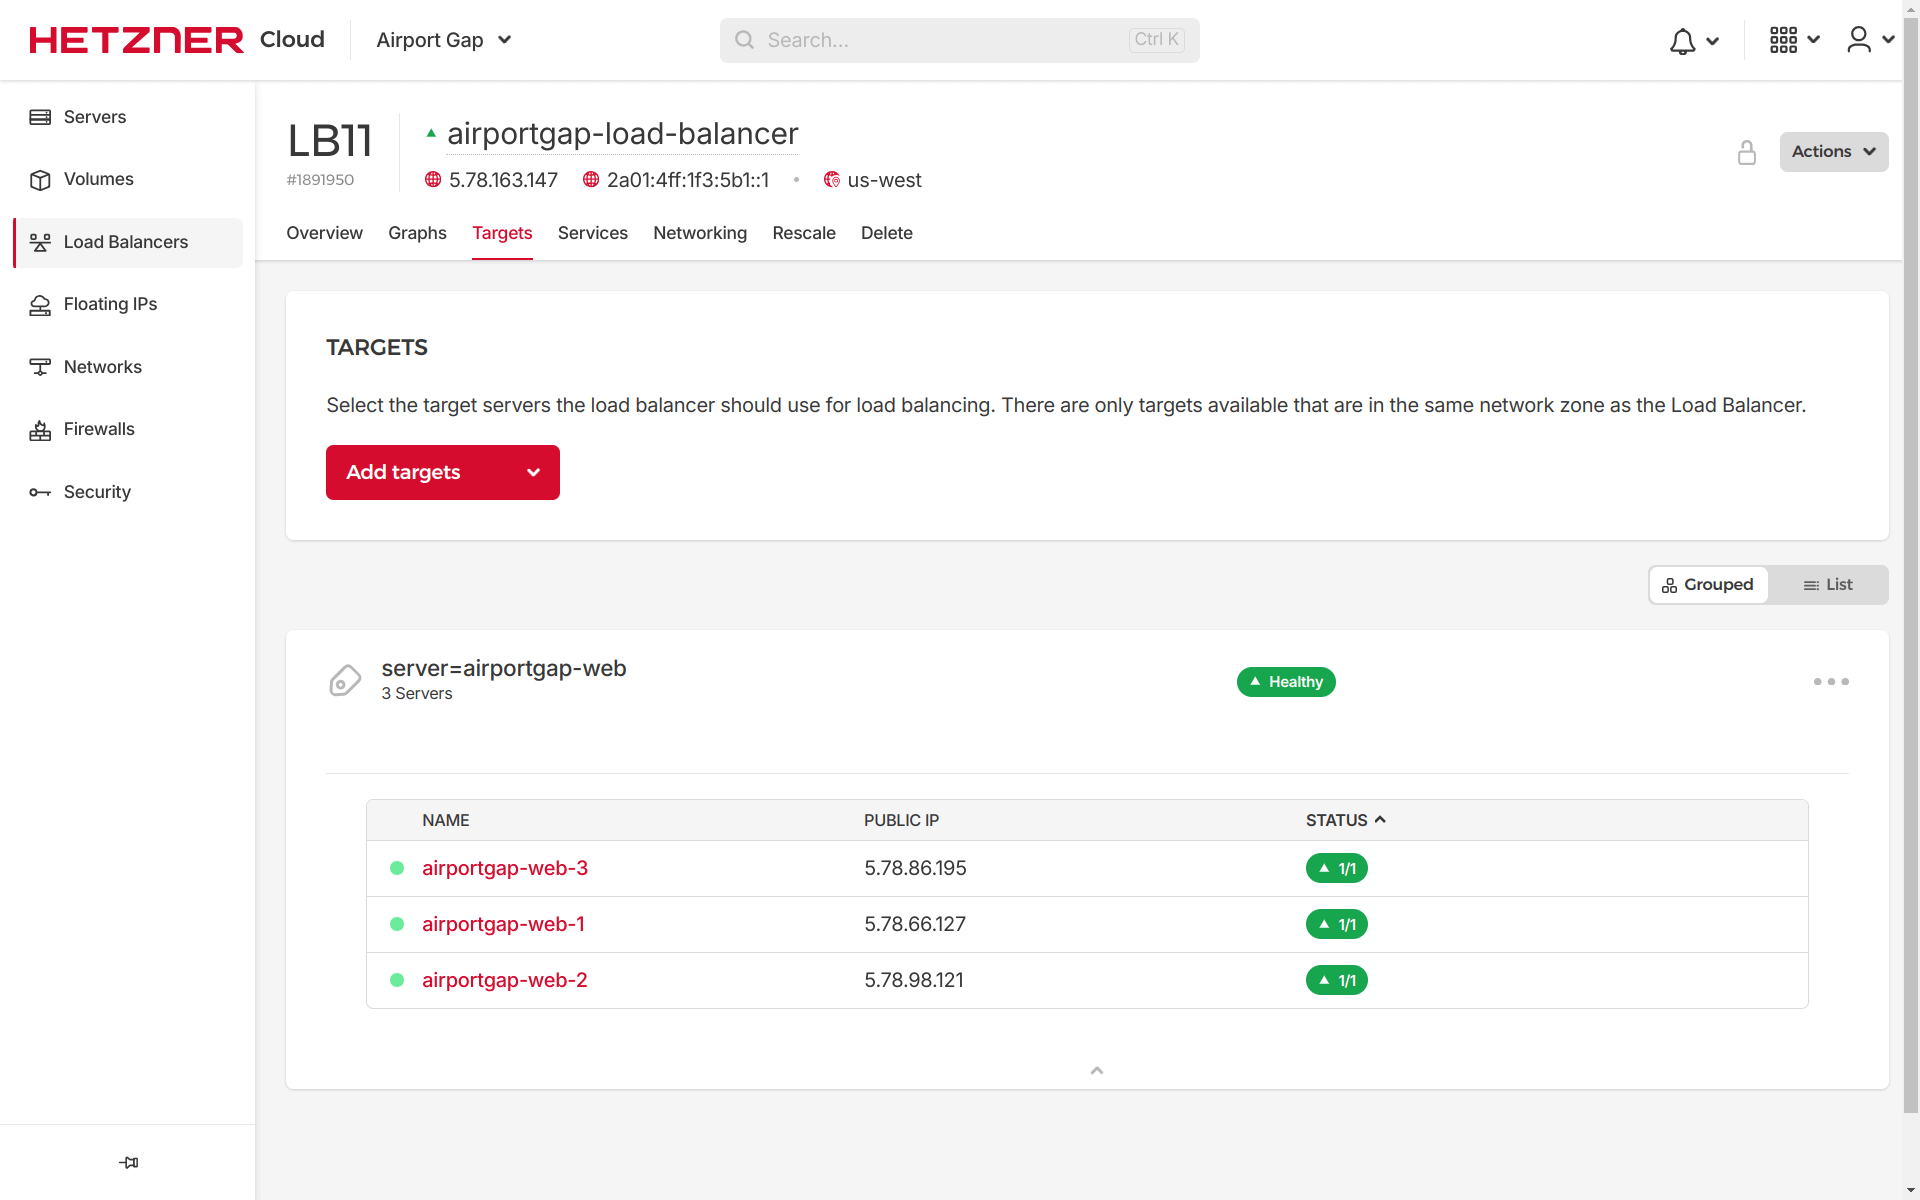
Under the “Targets” tab, we can see that we’re selecting targets based on the server label as specified in the Terraform configuration:
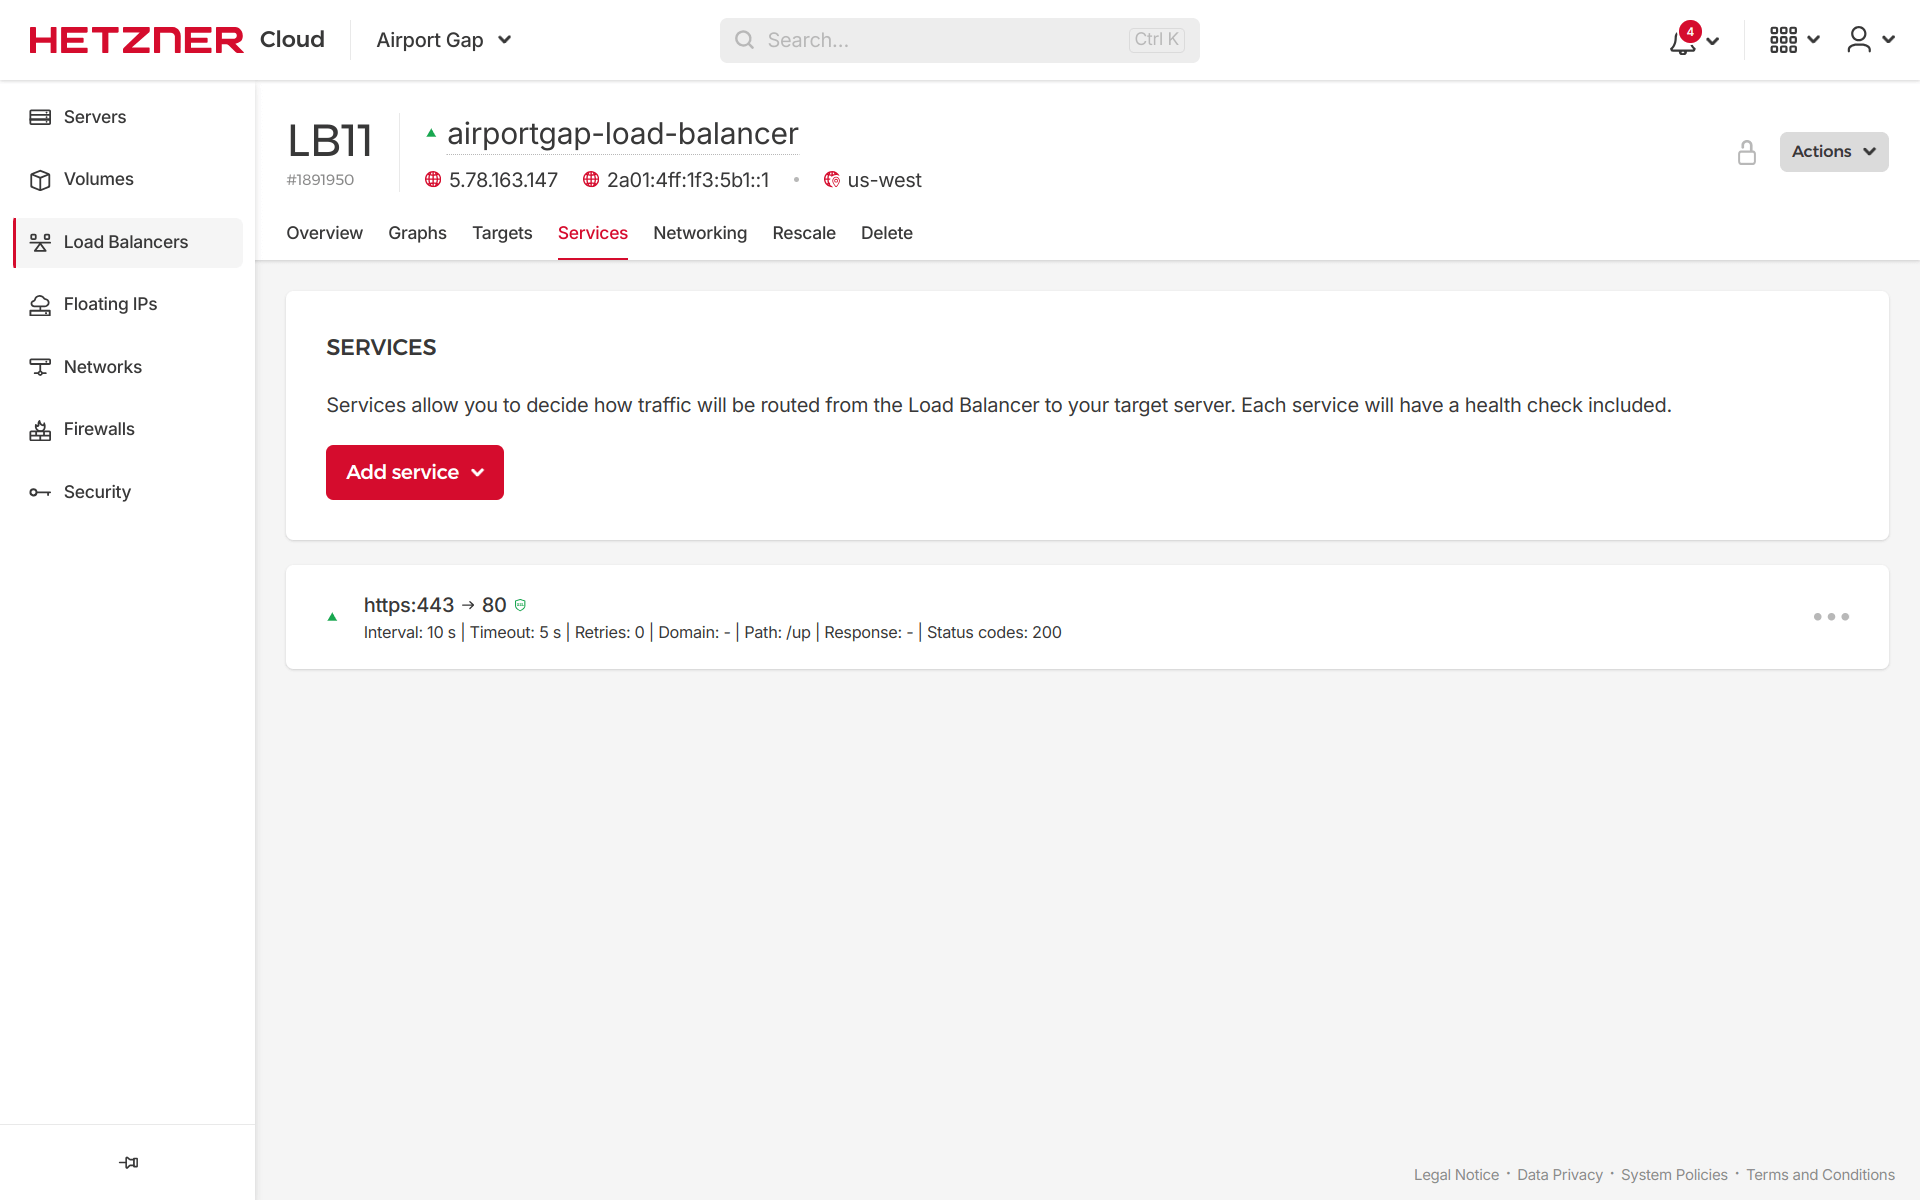
Moving to the “Services” tab, we’ll have our service configured using the HTTP protocol, receiving traffic on port 80 and routing it to port 80 on the targets. We didn’t specify the ports in Terraform, but these are the defaults when using the HTTP protocol. This section also shows the health check configuration like the interval, timeout, and path:
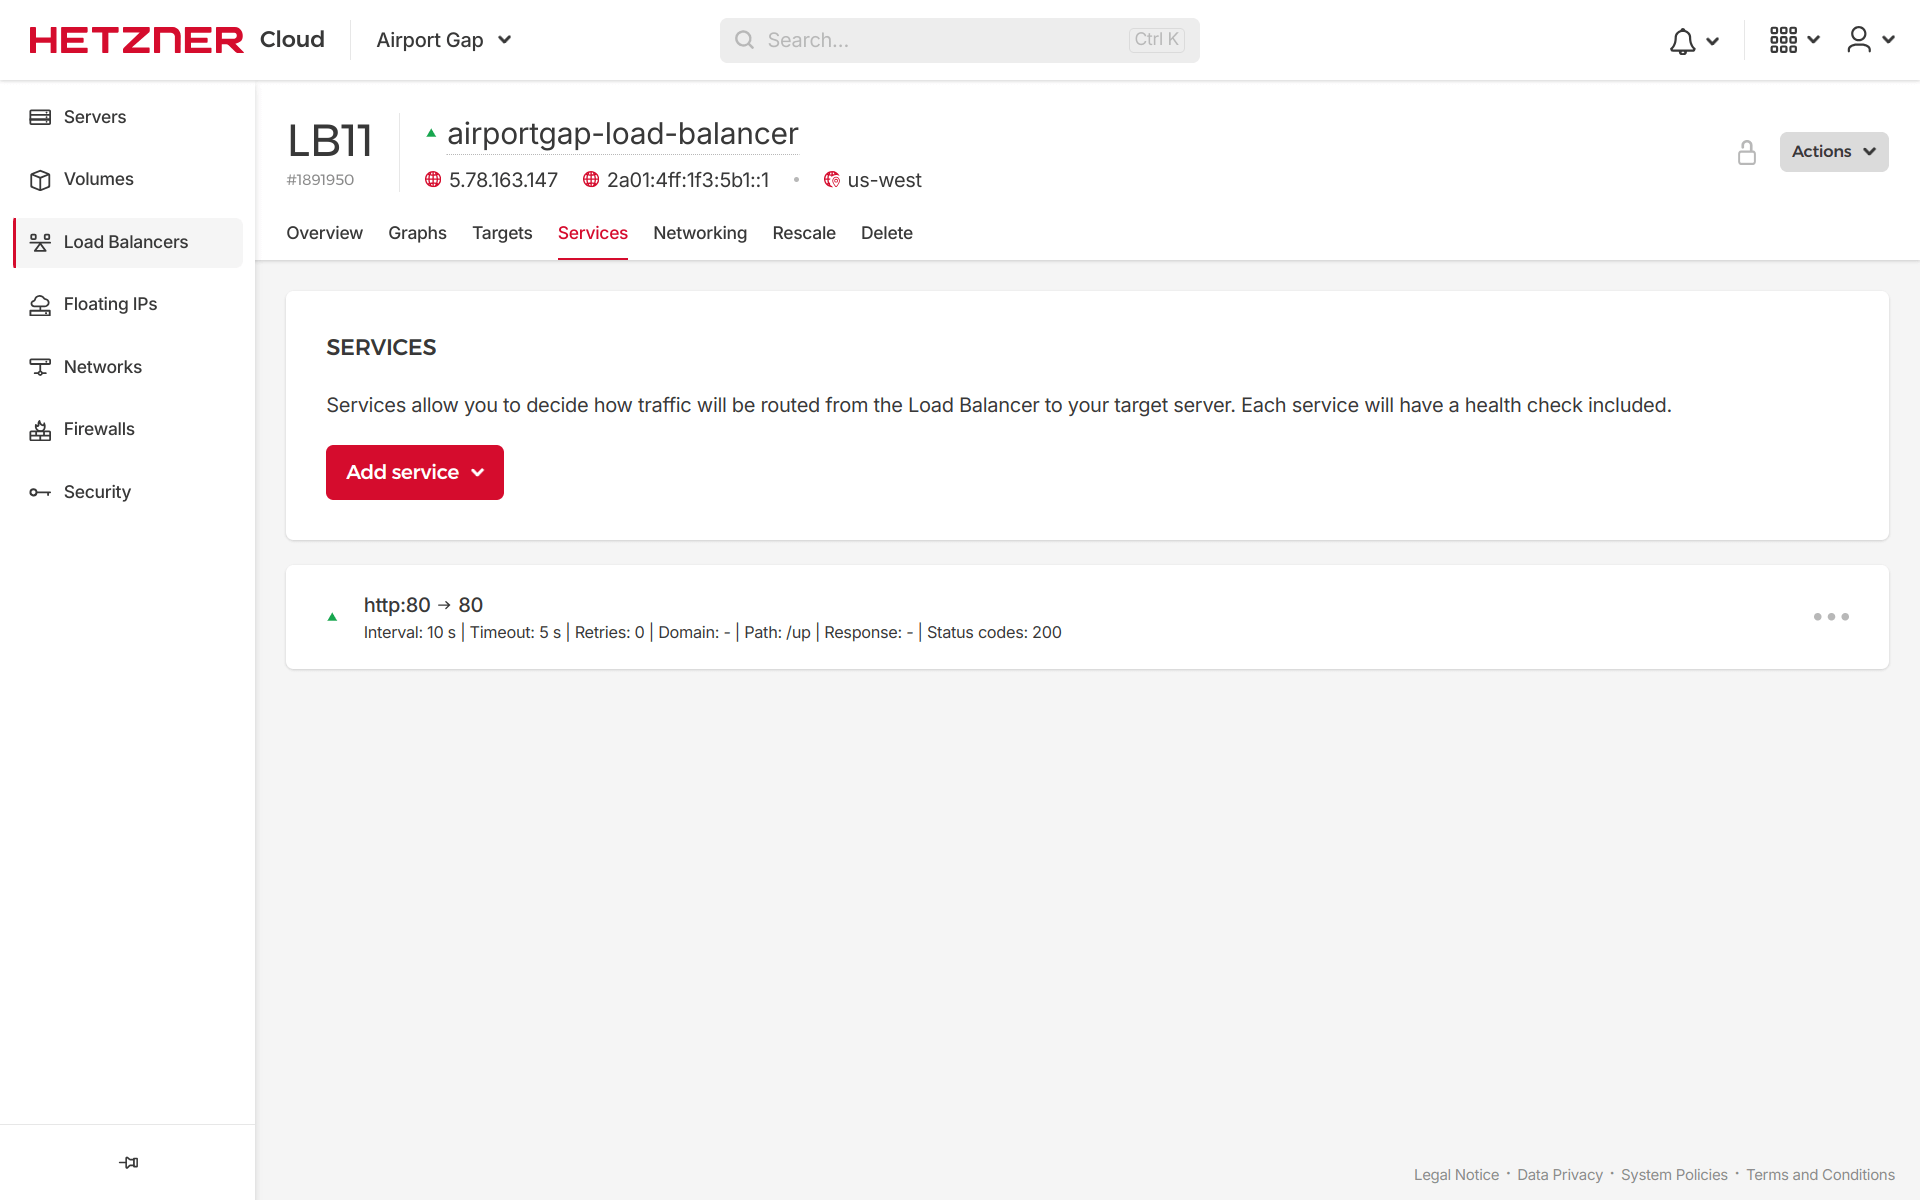
Everything looks exactly as we configured it on Terraform. If we use the IP address of the generated load balancer, we can use it to reach the Airport Gap application. Under the hood, Hetzner Cloud load balancers will route the traffic to one of the target servers, each with its pros and cons.
By default, load balancers on Hetzner Cloud use the “Round Robin” algorithm, which routes the traffic to each server in order, so the first request goes to the first target, the subsequent request goes to the second target, and so on until it loops back. We can also set the load balancer to use the “Least Connections” algorithm, which tracks how much traffic it has sent to a target and will send a request to the target with the least traffic.
Setting up TLS Termination on the Load Balancer
Our application uses the load balancer successfully, but it only works through HTTP traffic, which should be a no-no for any production website nowadays. However, we can configure the load balancer to use a more secure form of communication.
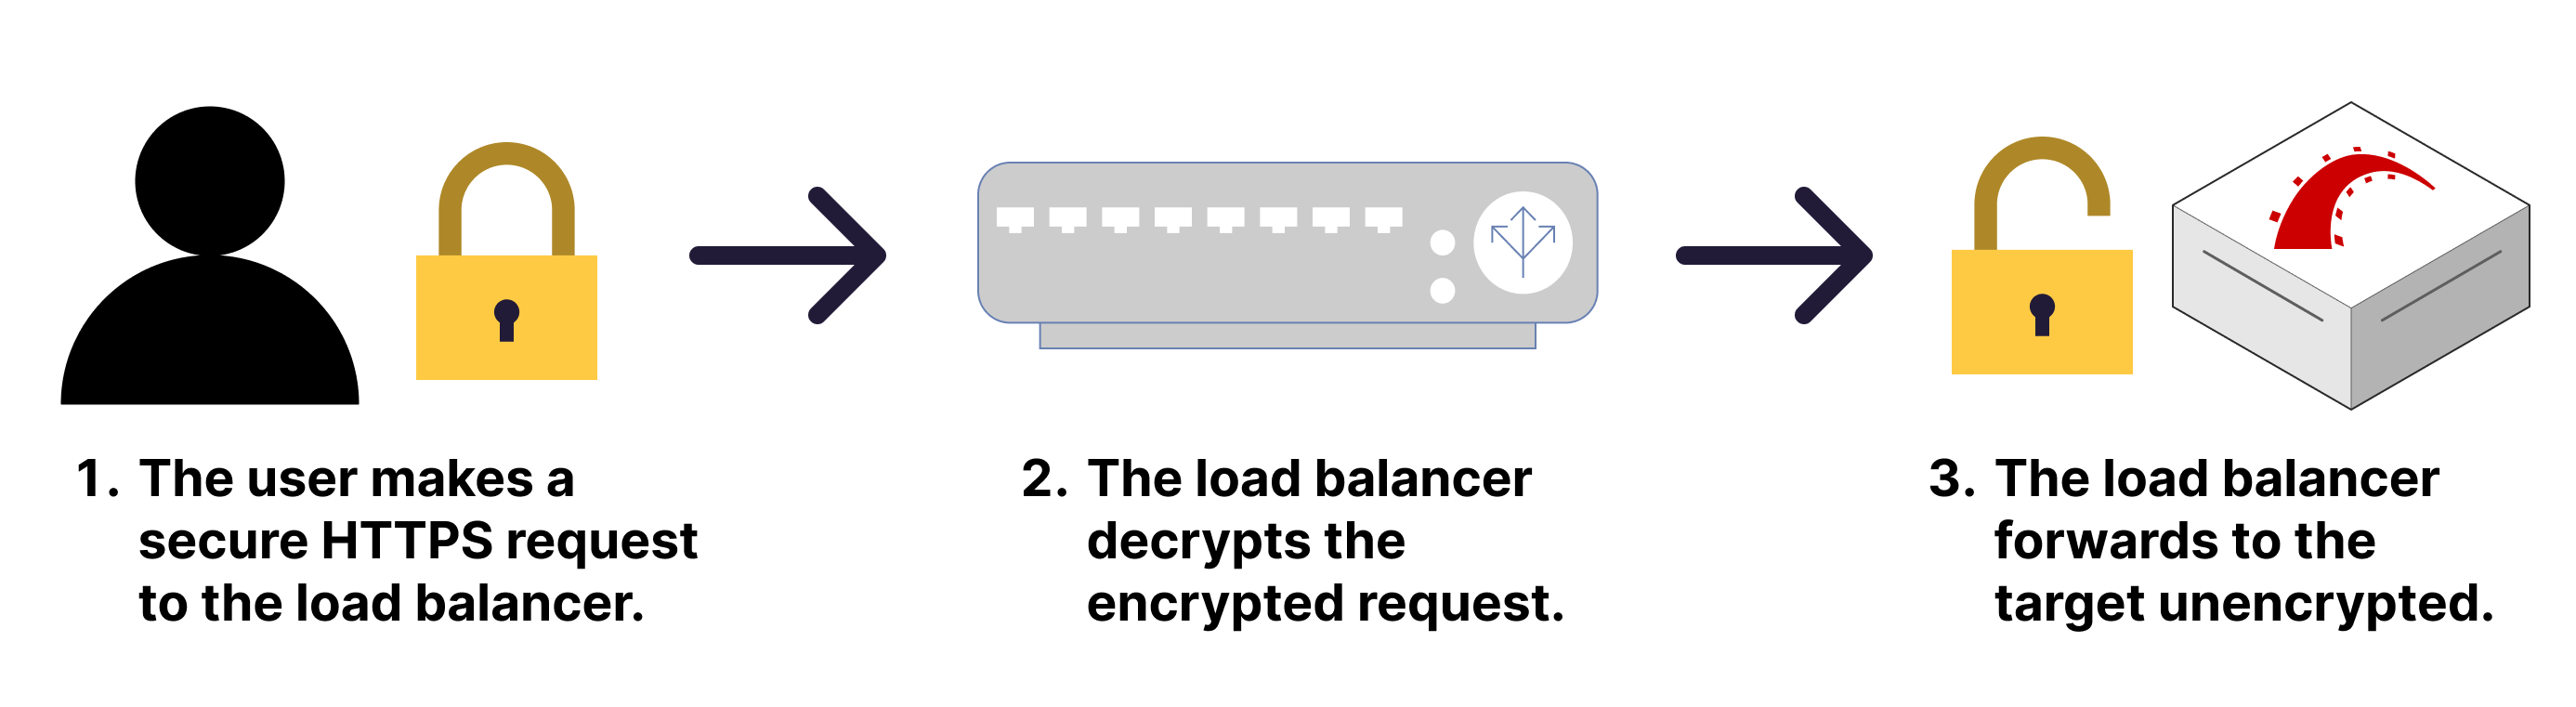
Hetzner Cloud load balancers can accept traffic through the HTTPS protocol using TLS Termination. Secure requests reach the load balancer, which will decrypt the communication and then route the unencrypted traffic to the target through normal HTTP.
Using TLS termination works excellent and should be enough for almost all non-sensitive use cases. However, to ensure encrypted communication from the load balancer to your targets, you’ll need to set up your load balancer service to use the TCP protocol. That’s a separate topic I won’t cover in this article. For this demo, I’ll keep it simple by using TLS termination and let the load balancer send regular HTTP traffic to the target servers.
When setting up a load balancer service that uses TLS termination, you’ll need to set up an SSL certificate for your Hetzner Cloud project. You can do this process in one of two ways:
- You can upload an existing certificate and private key if you already have one from a provider.
- You can let Hetzner Cloud generate one for you using Let’s Encrypt.
I almost always use Let’s Encrypt for SSL certificates since it’s dead simple to use, and it works great. So let’s do that for our load balancer.
However, one caveat makes this process a bit more involved. Currently, Hetzner Cloud creates a Let’s Encrypt SSL certificate for you only through Hetzner’s DNS service. It needs to use its DNS service because the SSL certificate creation process goes through Let’s Encrypt’s DNS challenge to prove that you control the domain name you want to set for the certificate.
Hetzner can only set up the required DNS records needed to complete the challenge through its own service. Using Hetzner’s DNS service is perfectly fine if you have a new domain and don’t have a strong preference for which DNS service you use for your domain. But you might already have your desired domain configured on a separate DNS service like DNSimple or Cloudflare.
I already have the airportgap.com DNS records managed using Cloudflare, and I don’t want to migrate the domain to Hetzner just to set up SSL for my load balancer. Fortunately, there is a way to delegate the records required for Let’s Encrypt DNS challenge over to Hetzner’s DNS service to have it create a certificate while keeping your domains in your preferred DNS service.
I’ll go through the process of configuring the DNS zone on my Hetzner account to set it up for the Let’s Encrypt validation, along with configuring my DNS provider, Cloudflare, to allow this process to happen. While I can also manage these updates through Terraform, it makes everything more complex since it requires additional providers and extra setup. I’ll manually go through the DNS configuration for this example.
Creating a DNS zone on Hetzner for the Let’s Encrypt DNS challenge
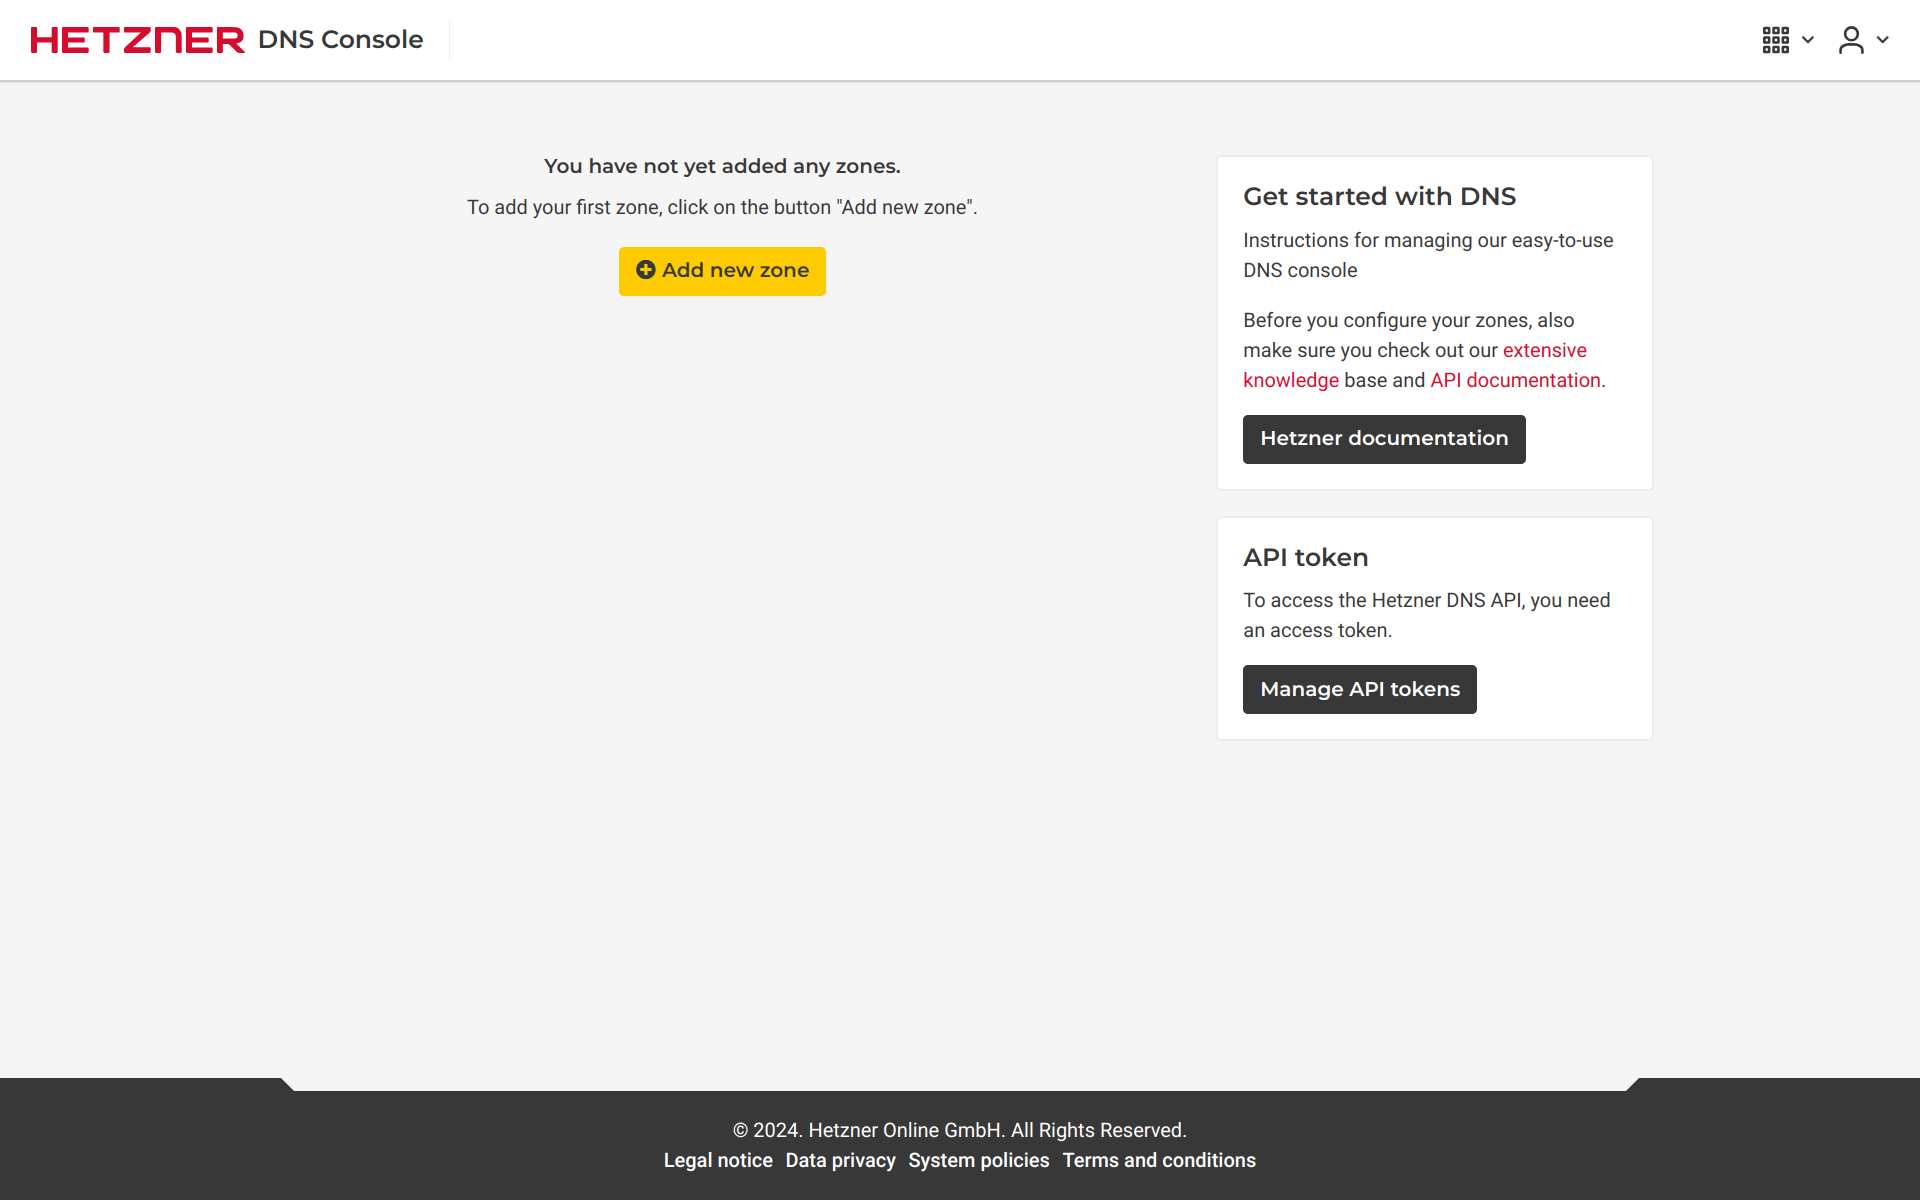
The first step in this process is to create a DNS Zone on Hetzner by going to https://dns.hetzner.com/. Here, we can create a new zone by clicking the “Add new zone” button.
On the next page, we’ll add the DNS zone name and set a few options.
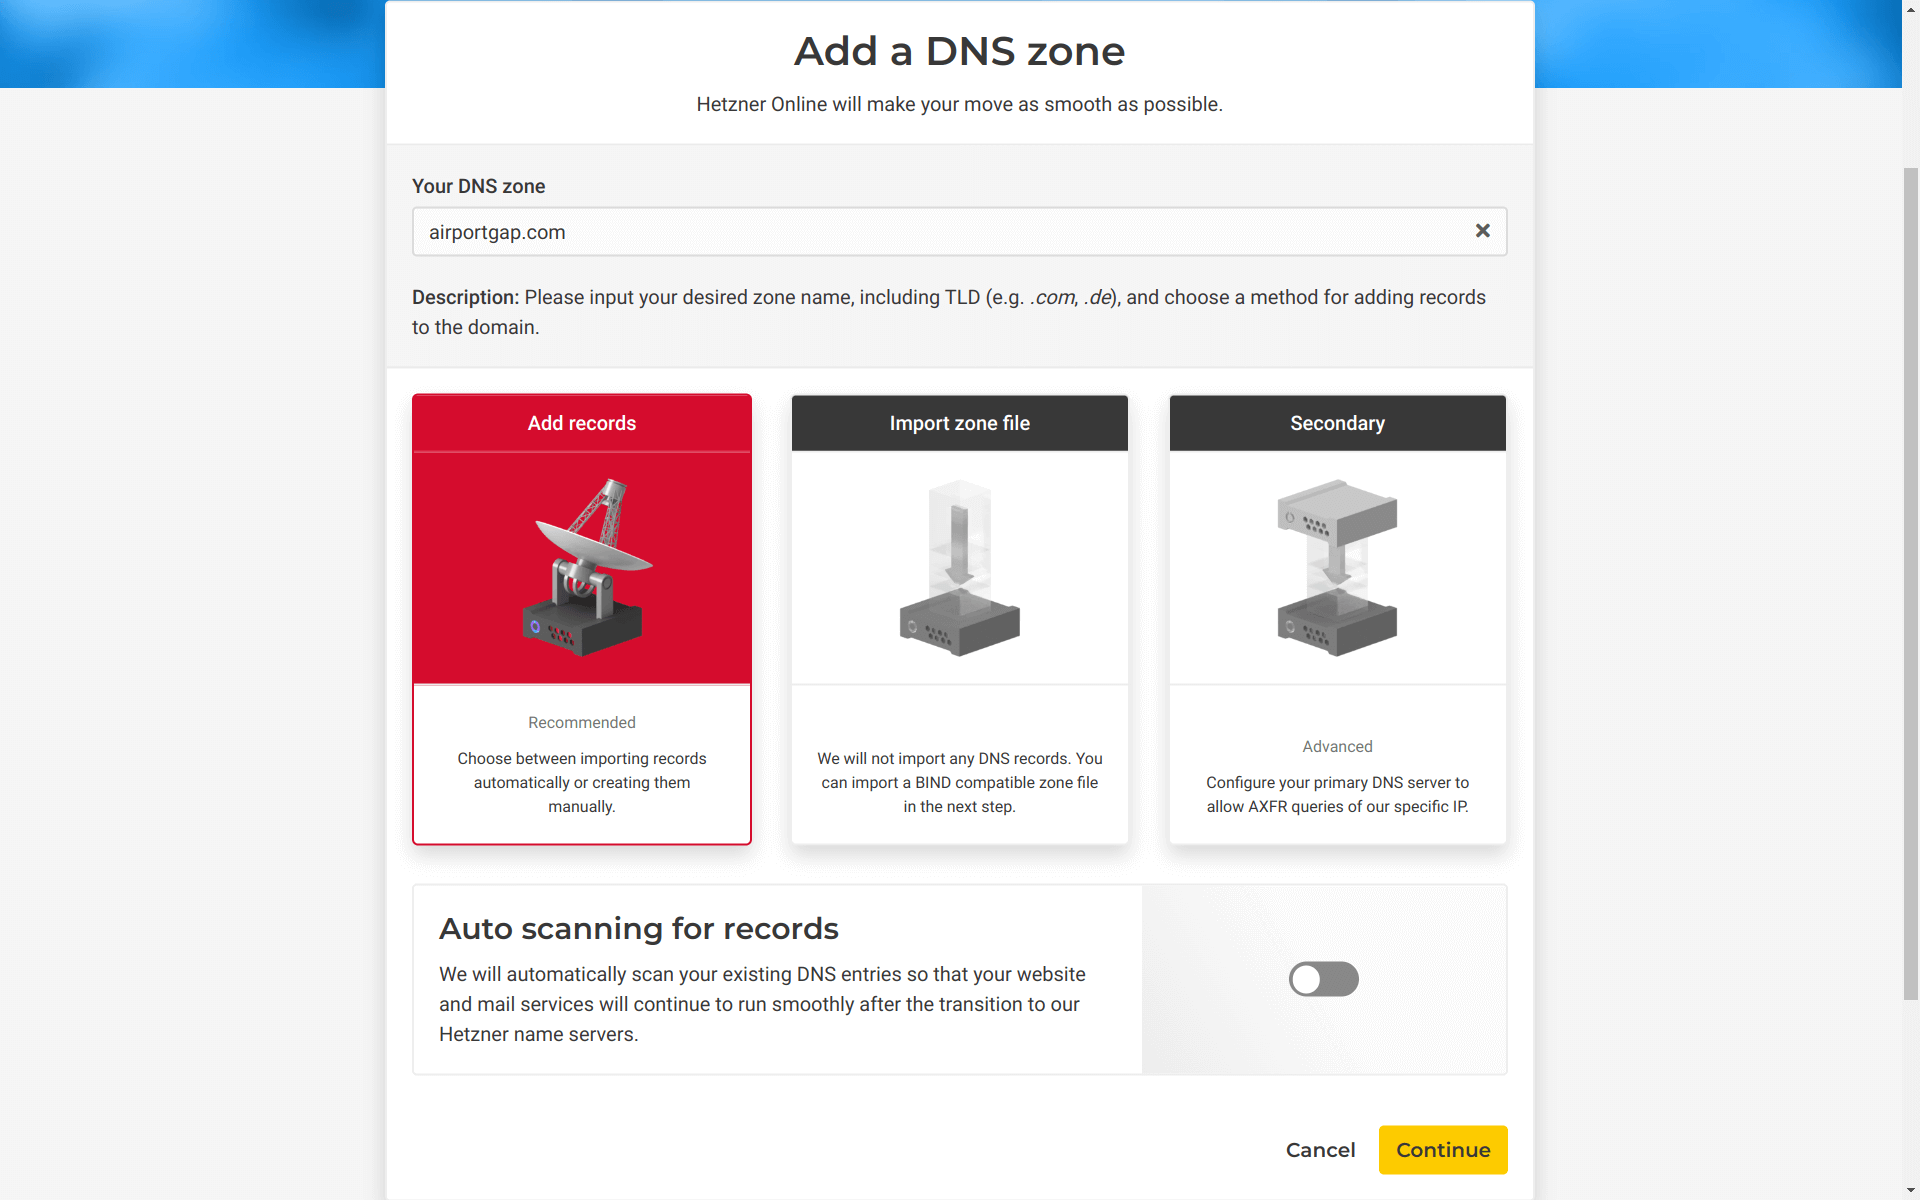
The DNS zone name is the name of the root domain that I want to use for the certificate. In this case, it’s airportgap.com. We’ll leave the “Add Records” option configured so Hetzner can set up the necessary nameserver records. However, we should turn off the “Auto scanning for records” option since we don’t want Hetzner to scan and automatically set up our existing records since we’re not planning to migrate the DNS settings.
After clicking “Continue”, we’ll see the new DNS zone with a few DNS records automatically generated. The only records we care about are the nameserver (NS) records so that we can delete the rest.
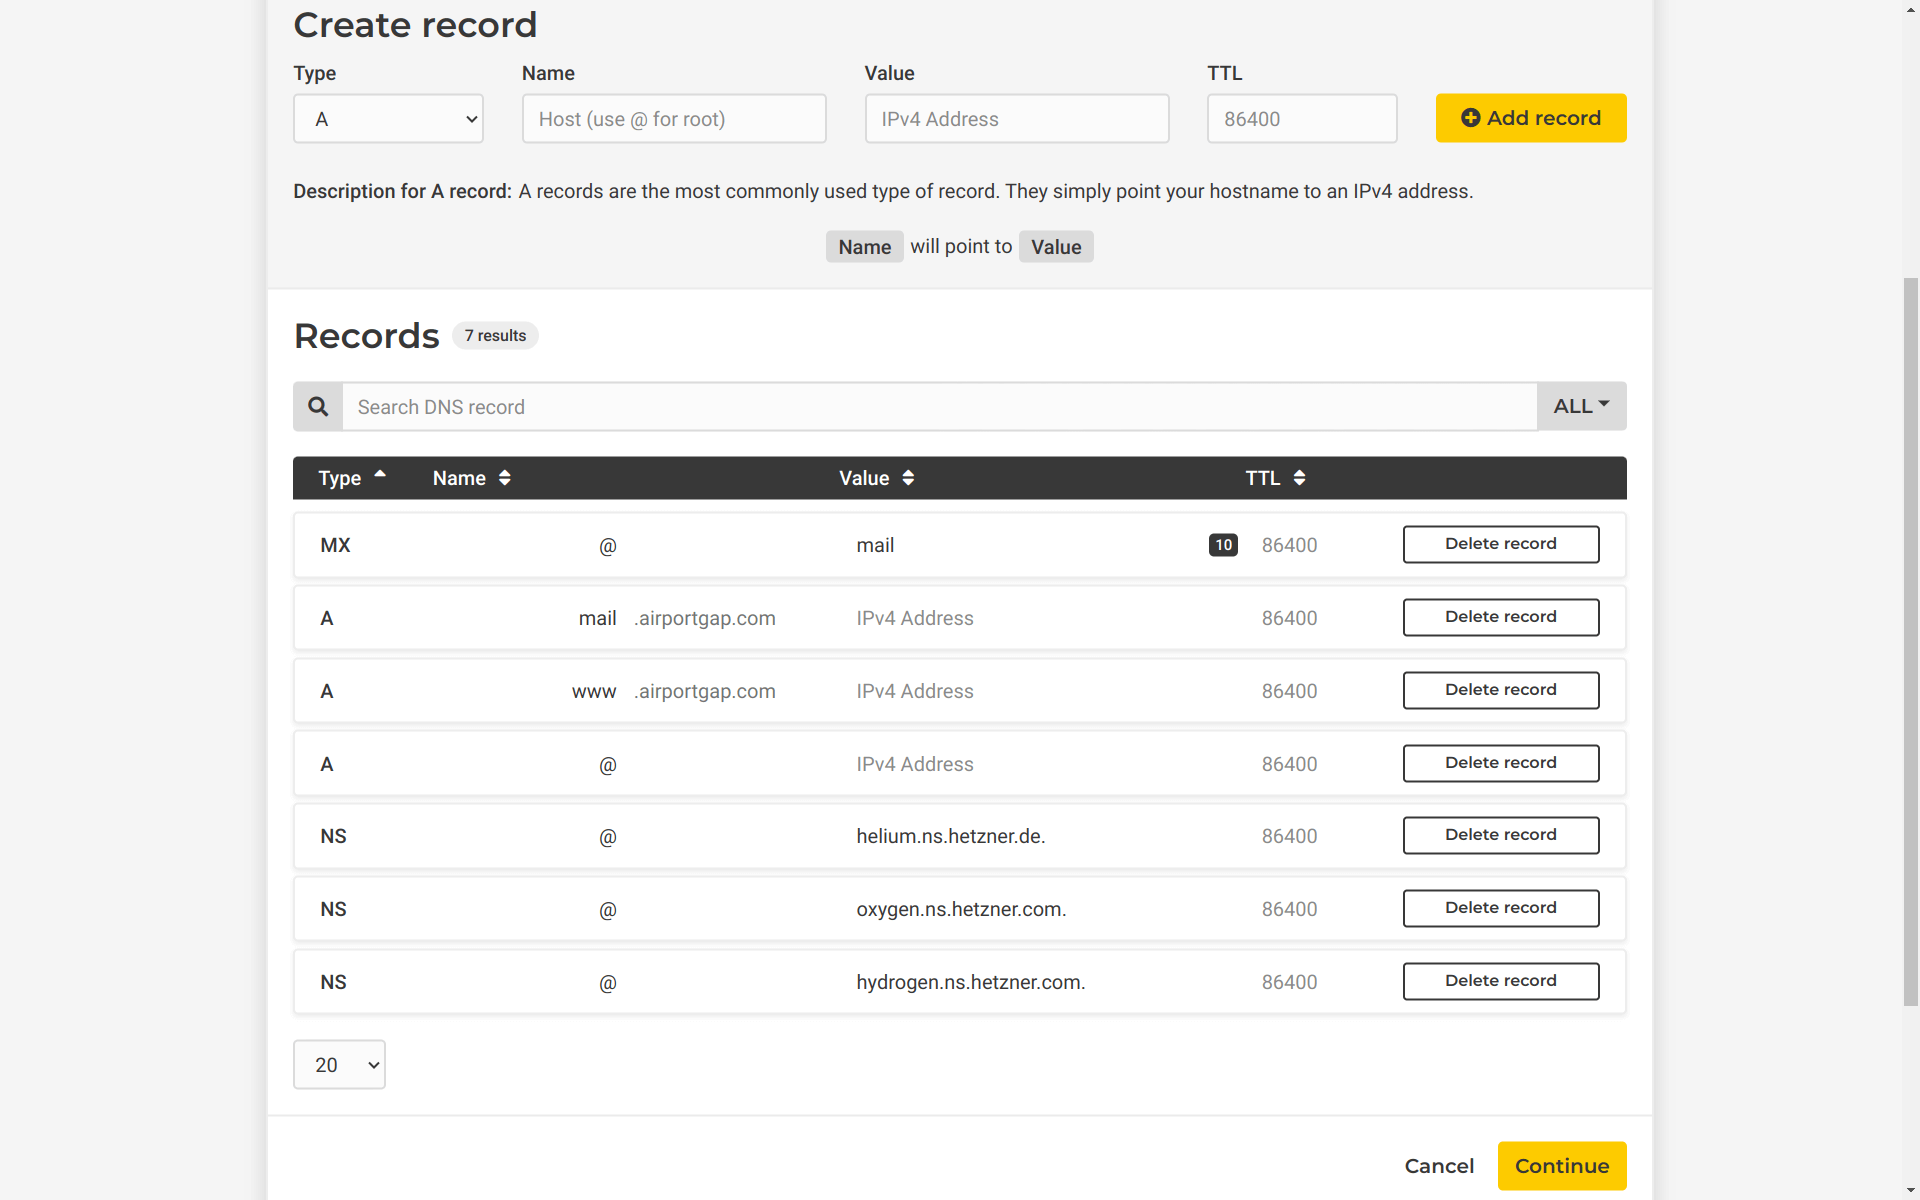
One other thing we’ll do here is create a DNS entry for the domain we want to use to point the load balancer to. For this example, I want to use balancer.airportgap.com as the domain name to point to the load balancer, so I’ll create an A record with the name of balancer, and the IP address pointing to the load balancer IP address. I’ll leave the time-to-live value as the default. After setting these DNS records, I’ll click “Continue”.
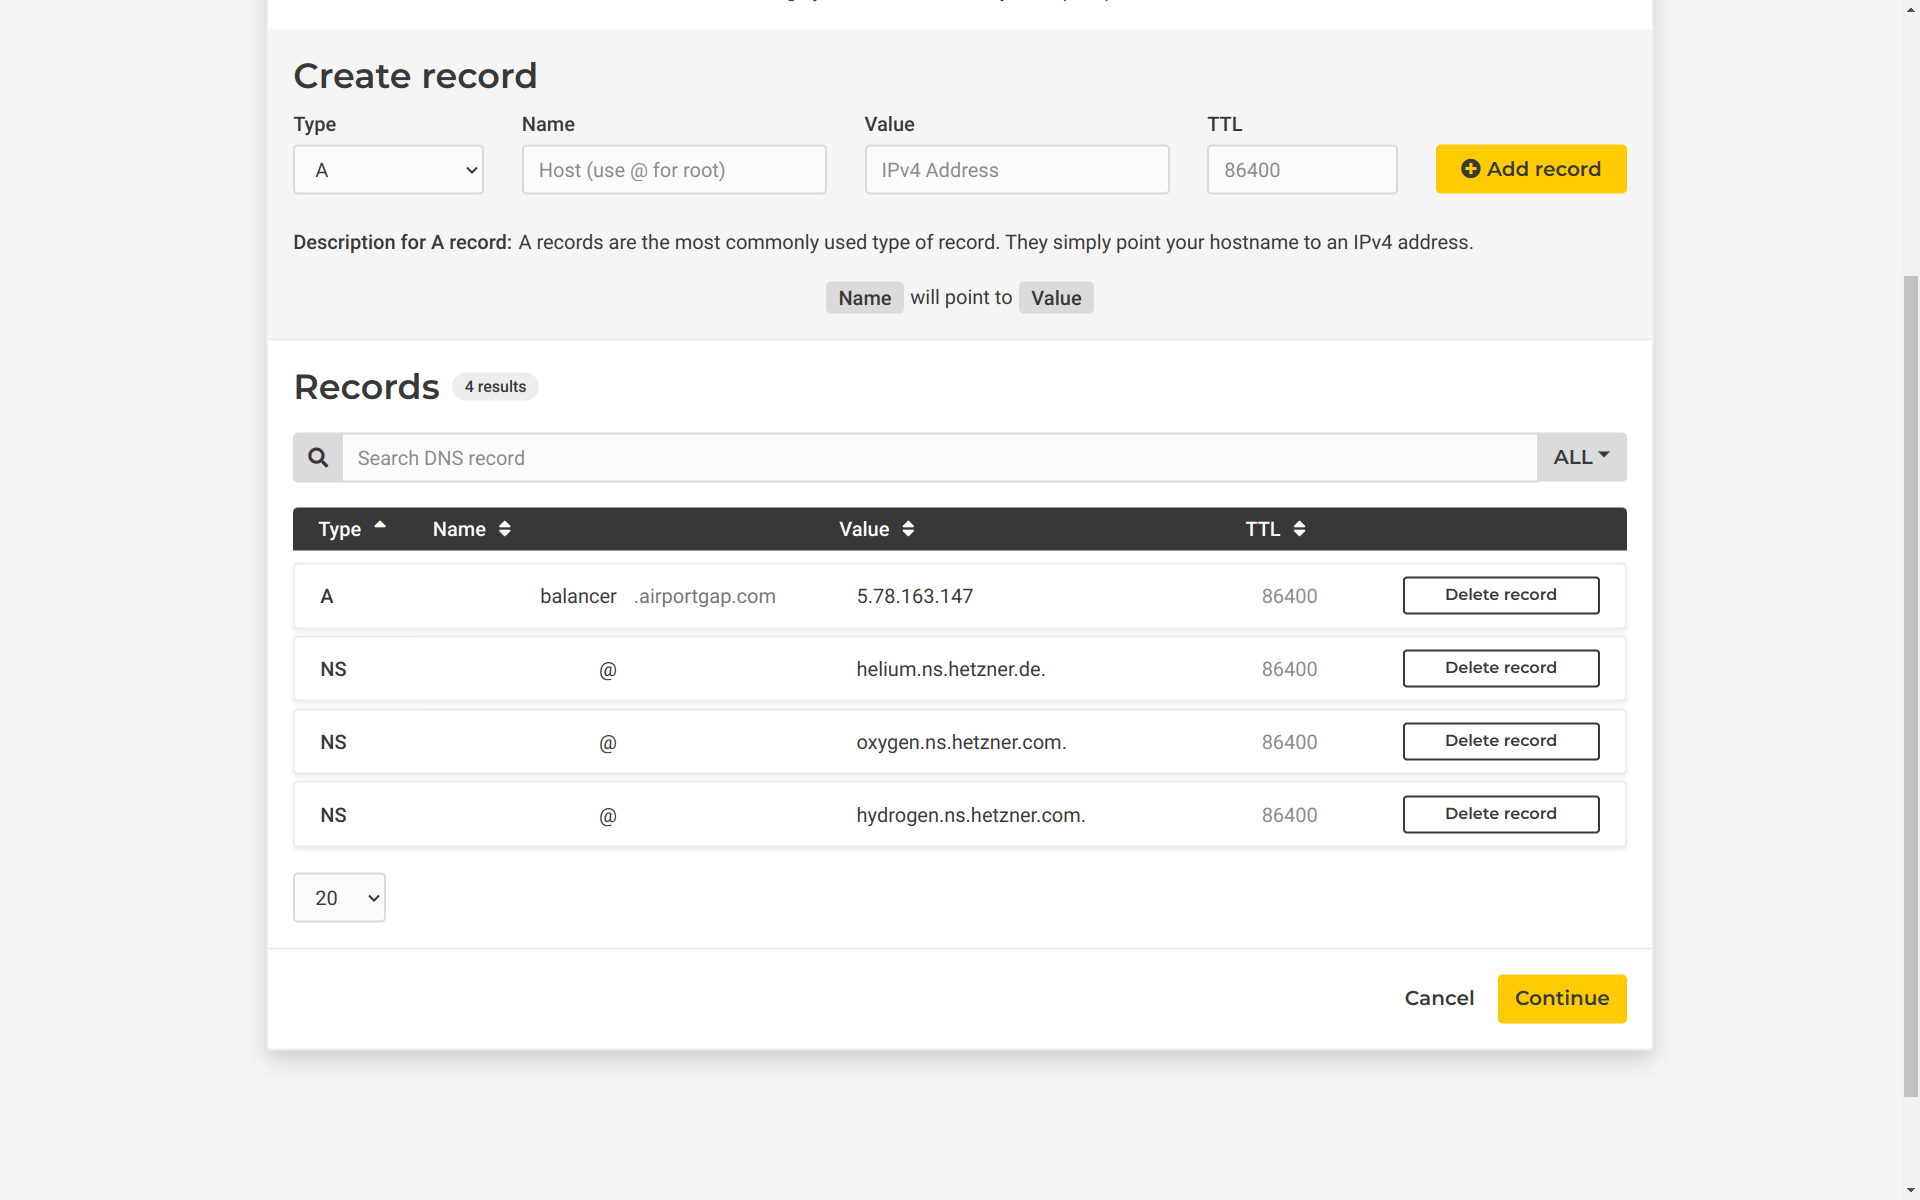
Hetzner will create the DNS zone with the nameservers and the subdomain I want to use for the load balancer. At this stage, we can skip the remaining configuration where Hetzner DNS asks to verify ownership of the domain by setting up its DNS nameservers. Since we only want Hetzner to handle the Let’s Encrypt DNS challenge, we can skip this.
Delegating DNS records from Cloudflare to Hetzner
The configuration on Hetzner DNS will allow it to process the Let’s Encrypt DNS challenge. However, we need to pass along the queries for the required DNS records from our primary DNS service. All DNS queries for the airportgap.com domain will still go through Cloudflare. Cloudflare has support for passing DNS queries to external nameservers, so let’s set that up so it can hand over a few queries to Hetzner DNS.
The first step in Let’s Encrypt’s DNS challenge is to make a request to the _acme-challenge subdomain for the root domain name we want to use for the certificate. We want to pass ownership of this DNS record over to Hetzner so it can handle this part of the process. Going to the DNS section for the airportgap.com domain on Cloudflare, I’ll create new NS records for each of Hetzner’s DNS nameservers that point to the _acme-challenge subdomain.
We’ll also want to delegate the subdomain we want to use for our load balancer to Hetzner (balancer) since we’ll keep the main airportgap.com domain under Cloudflare. We’ll add these the same way as we did with the acme-challenge subdomain by creating new NS records.
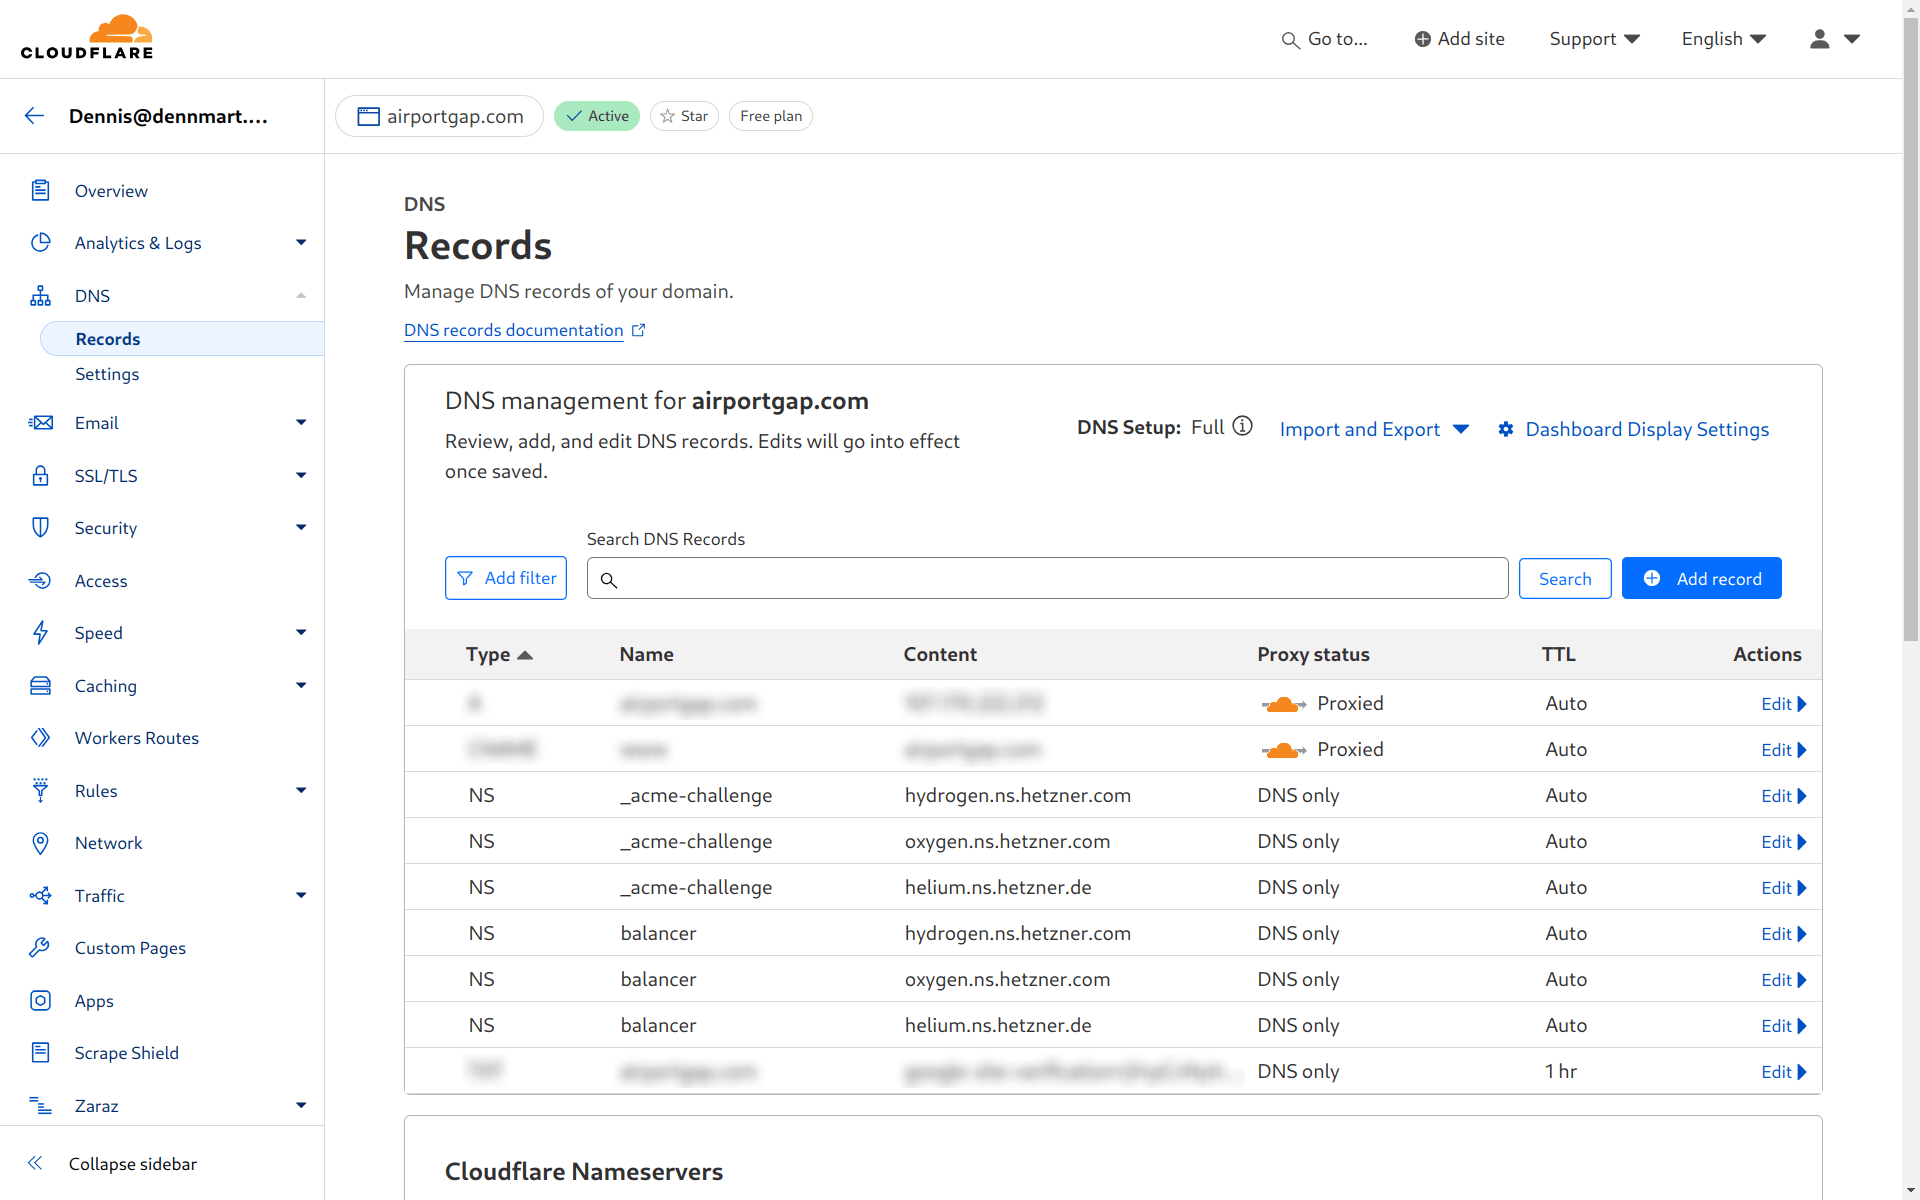
It’s essential to create NS records for each of Hetzner’s nameservers here. Even though the subdomains are the same and seem repetitive, you’ll need each nameserver to ensure the DNS query reaches Hetzner properly.
Once we have these DNS records configured, we can already let Hetzner Cloud manage an SSL certificate for us. We can manage this certificate through Terraform and configure the load balancer service to use it, so let’s get back to our Terraform file.
Creating a managed SSL certificate for Hetzner Cloud
The hcloud Terraform provider has support for generating managed certificates using the hcloud_managed_certificate resource type:
resource "hcloud_managed_certificate" "managed_cert" {
  name         = "Airport Gap Certificate"
  domain_names = ["balancer.airportgap.com"]
}
This resource type requires a name to identify the certificate on Hetzner Cloud. It also requires a list of domain_names to generate for the certificate. You can specify multiple domain names or even a wildcard certificate for all subdomains. For this demo, I’ll create a certificate for the balancer.airportgap.com domain name only, which is the one that’s pointing to our load balancer.
This resource block and the configured DNS records are all we need to generate a managed certificate on Hetzner Cloud. Going back to the command line, let’s run terraform plan to see the infrastructure changes:
Terraform used the selected providers to generate the following execution plan. Resource actions are indicated with the following
symbols:
  + create

Terraform will perform the following actions:

  # hcloud_managed_certificate.managed_cert will be created
  + resource "hcloud_managed_certificate" "managed_cert" {
      + certificate      = (known after apply)
      + created          = (known after apply)
      + domain_names     = [
          + "balancer.airportgap.com",
        ]
      + fingerprint      = (known after apply)
      + id               = (known after apply)
      + name             = "Airport Gap Certificate"
      + not_valid_after  = (known after apply)
      + not_valid_before = (known after apply)
      + type             = (known after apply)
    }

Plan: 1 to add, 0 to change, 0 to destroy.
The output shows it’s going to do what we want, which is to create a managed certificate using the balancer.airportgap.com domain. So let’s go ahead and apply it using terraform apply. Applying these changes kicks off the Let’s Encrypt certificate generation. If we’ve set up all the DNS records correctly, we’ll have a new SSL certificate created in a minute or less.
hcloud_managed_certificate.managed_cert: Creating...
hcloud_managed_certificate.managed_cert: Still creating... [10s elapsed]
hcloud_managed_certificate.managed_cert: Still creating... [20s elapsed]
hcloud_managed_certificate.managed_cert: Still creating... [30s elapsed]
hcloud_managed_certificate.managed_cert: Creation complete after 36s [id=xxxxxxx]

Apply complete! Resources: 1 added, 0 changed, 0 destroyed.
If you receive an error during this process, or Terraform attempts to apply this resource for more than a few minutes, the likely culprit is a misconfiguration with your DNS records. Double-check the entries on both Hetzner DNS and your primary DNS service, and give it some time to make sure the DNS records are propagated across both sides.
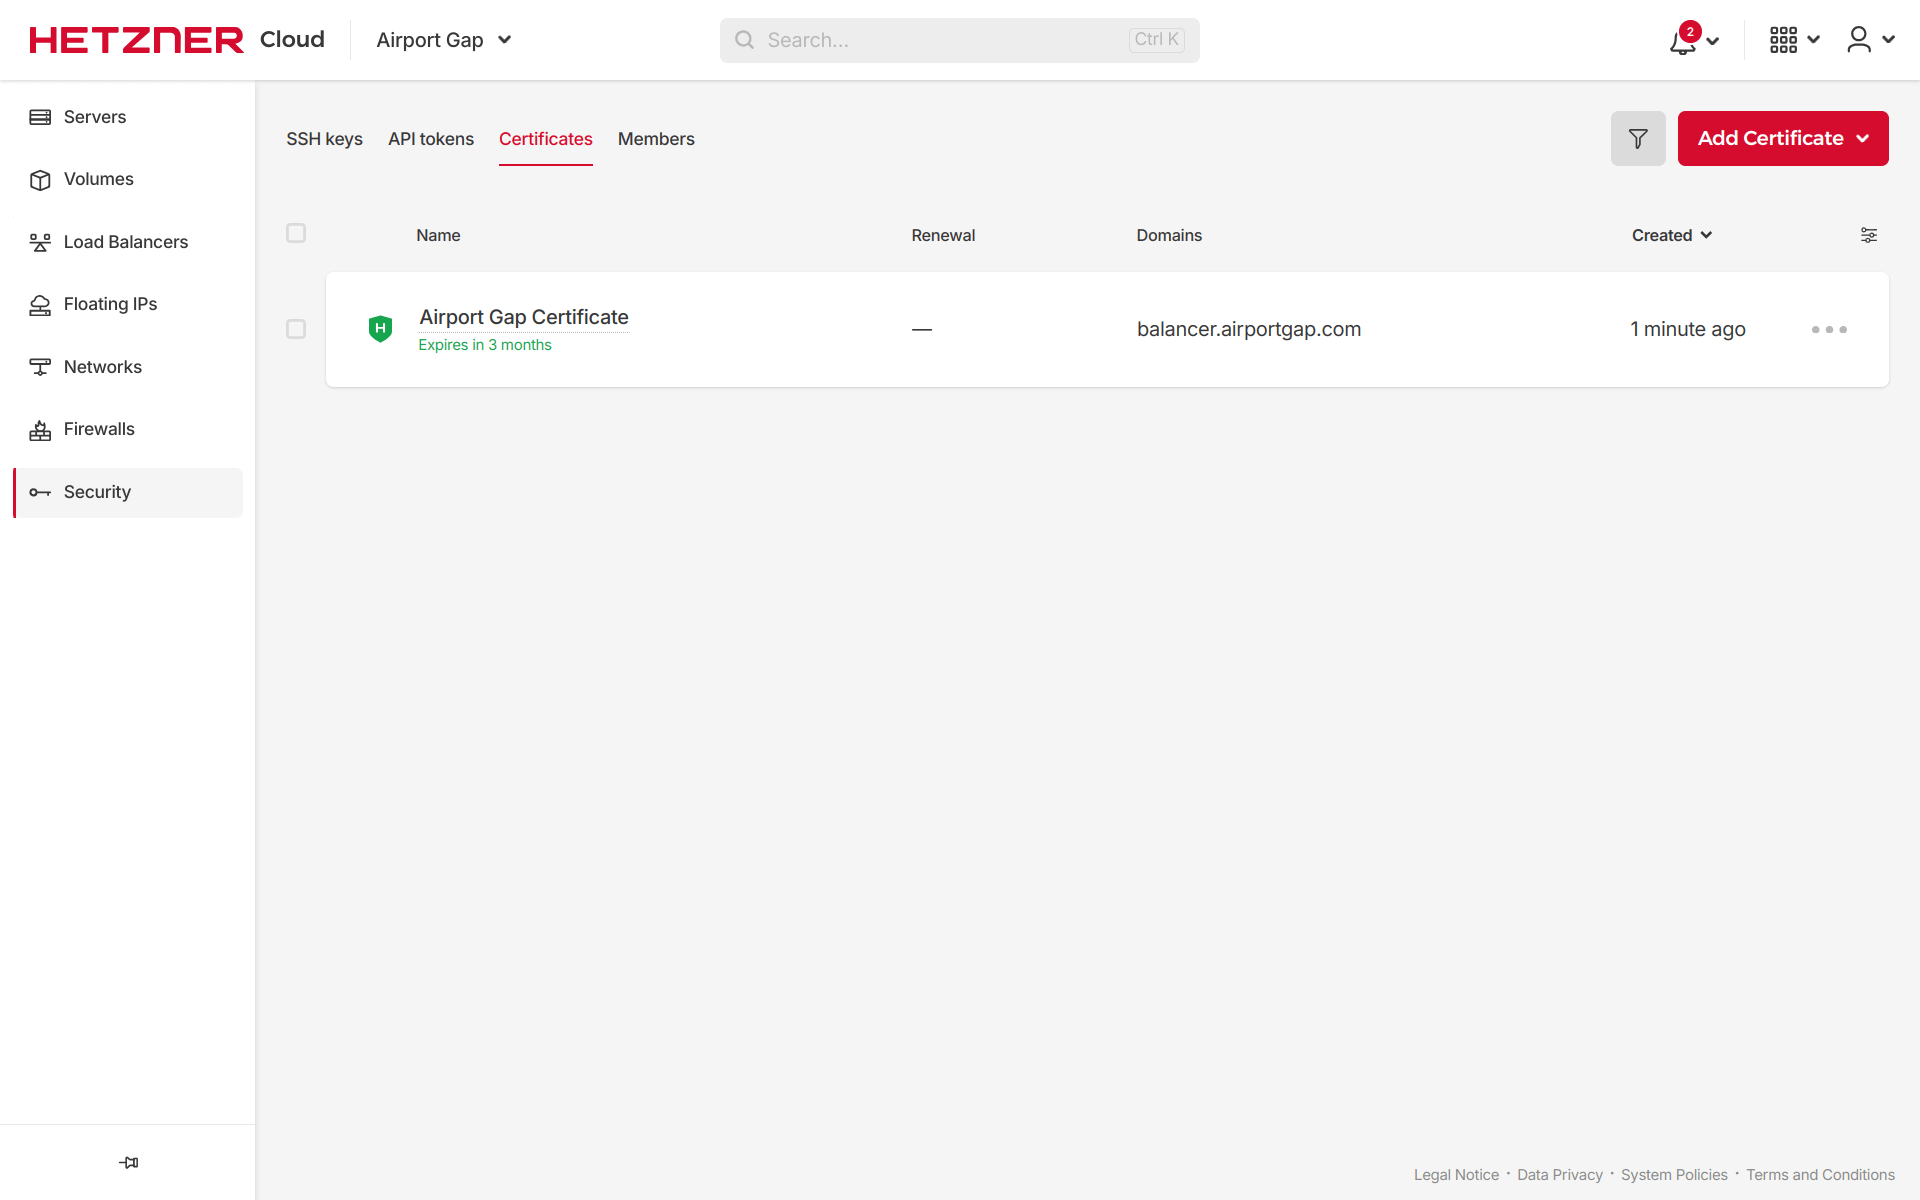
If we visit the project in the Hetzner Cloud console, we can go to the Security page and see the new managed certificate under “Certificates”:
Updating the load balancer service for TLS termination
Now that we have a managed certificate, we need to update the load balancer service we created earlier to use TLS termination so we can send encrypted HTTPS traffic to it. Updating the existing load balancer service to support HTTPS is pretty straightforward in Terraform, requiring only two changes noted as comments in the updated resource block below:
resource "hcloud_load_balancer_service" "load_balancer_service" {
  load_balancer_id = hcloud_load_balancer.load_balancer.id

  # Change #1: The `protocol` value switched from "http" to "https"
  protocol         = "https"

  # Change #2: Added a new `http` block.
  http {
    redirect_http = true
    certificates  = [hcloud_managed_certificate.managed_cert.id]
  }

  health_check {
    protocol = "http"
    port     = 80
    interval = 10
    timeout  = 5

    http {
      path         = "/up"
      status_codes = ["200"]
    }
  }
}
First, we need to switch the protocol argument from “http” to “https”. This value sets up the service to use TLS termination. Since we switched the protocol for the service, we’ll need to add some additional configuration to the load balancer service with a new http block to change some of the default service configurations.
Inside the http block, we’ll set the redirect_http parameter to true. This parameter forces any unencrypted HTTP connections to the load balancer to redirect to HTTPS. It’s an optional step, but in most cases, you’ll want all of your website traffic to go through HTTPS.
The other parameter that we want to include in the new http block is the certificates parameter. This parameter accepts a list of the SSL certificates that the load balancer will use to enable the encrypted connection between the client and the server. The certificates parameter accepts a list of certificate IDs that we have for our Hetzner Cloud project. We’re managing this certificate in Terraform, so all we need to do is add the reference to the resource ID.
These updates are all we need to reconfigure our service to use TLS termination. We don’t need to update anything inside the health_check block since the load balancer will still use regular HTTP traffic to the target servers. As we always do, let’s run terraform plan to ensure these updates are doing what we expect:
Terraform used the selected providers to generate the following execution plan. Resource actions are indicated with the following
symbols:
-/+ destroy and then create replacement

Terraform will perform the following actions:

  # hcloud_load_balancer_service.load_balancer_service must be replaced
-/+ resource "hcloud_load_balancer_service" "load_balancer_service" {
      ~ destination_port = 80 -> (known after apply)
      ~ id               = "1891950__80" -> (known after apply)
      ~ listen_port      = 80 -> (known after apply)
      ~ protocol         = "http" -> "https" # forces replacement
      ~ proxyprotocol    = false -> (known after apply)
        # (1 unchanged attribute hidden)

      ~ health_check {
          ~ retries  = 0 -> (known after apply)
            # (4 unchanged attributes hidden)

          ~ http {
              - tls          = false -> null
                # (4 unchanged attributes hidden)
            }
        }

      ~ http {
          ~ certificates    = [
              + 1298003,
            ]
          ~ cookie_lifetime = 300 -> (known after apply)
          ~ cookie_name     = "HCLBSTICKY" -> (known after apply)
          ~ redirect_http   = false -> true
          ~ sticky_sessions = false -> (known after apply)
        }
    }

Plan: 1 to add, 0 to change, 1 to destroy.
Something you may notice is that Terraform is forcing a replacement of the service instead of updating it. This forced replacement is because we can’t switch the protocol of an existing load balancer service on Hetzner Cloud. If we were managing this infrastructure manually through the Hetzner Cloud console, we would have to delete the existing service and create a new one. However, Terraform will automatically handle this for us simply by updating the argument, which is a nice benefit that Infrastructure as Code tools have.
The change looks good, so we’ll apply the changes with terraform apply.
hcloud_load_balancer_service.load_balancer_service: Destroying... [id=xxxxxxx__80]
hcloud_load_balancer_service.load_balancer_service: Destruction complete after 4s
hcloud_load_balancer_service.load_balancer_service: Creating...
hcloud_load_balancer_service.load_balancer_service: Creation complete after 2s [id=xxxxxxx__443]

Apply complete! Resources: 1 added, 0 changed, 1 destroyed.
If we go back to the load balancer service in the Hetzner Cloud console, we’ll see the updates have taken place. The service shows that it will route traffic from port 443 to the target servers using port 80.
On the browser, if we visit the balancer.airportgap.com domain, we can see that our load balancer is working using HTTPS. With this, we now have a fully functional load balancer for our web application on Hetzner Cloud using TLS termination.
Wrap Up
This article shows how we can use tools like Terraform to set up and efficiently manage a load balancer on Hetzner Cloud. We also set up a domain name from an external DNS service to create an SSL certificate for encrypted communication between a user and the load balancer.
As a reminder, the way we set up the load balancer in this video handles the encrypted connection up to the load balancer, where it decrypts the request and passes it along unencrypted to one of the target servers. If you have strict security requirements, you’ll need to set up a way to encrypt the connection between the load balancer and the targets.
You could spin up and configure a load balancer on Hetzner Cloud through their console. However, using Infrastructure as Code to handle these tasks instead of clicking buttons on their website helps build consistent and repeatable systems, making it much easier to manage as your organization scales.
You can find the code used in this article in the dennmart/airport_gap_load_balancer_demo repository on GitHub.
Need assistance with Hetzner Cloud or Terraform?
Are you looking for a hand to help you make the most out of your Hetzner Cloud infrastructure or to get your application’s architecture under control well using Terraform? As a certified DevOps engineer with 20+ years of professional experience, I can help teams like yours manage and improve your systems.
I’d love to talk with you to learn more about the challenges you’re facing and how I can help. Send a message to schedule some time with me today.
Screencast
If you found this article or video helpful, please consider subscribing to my YouTube channel and follow for more tips on helping developers ship their code confidently, from development to deployment.