When building infrastructure for your applications, it’s hard to beat a tool like Terraform. Its declarative approach to defining your infrastructure as code makes managing your entire environment a breeze. As someone who frequently needed to provision servers and services manually in the past, I’m glad we can now quickly reproduce these systems without worrying about human error by using a handful of commands.
Although Terraform’s primary use cases include setting up permissions, creating and configuring networks, and spinning up servers, we can also use it to manage serverless applications. Using the same approach we take for managing any other resource on the cloud, Terraform can handle all the different components to get a complete serverless application running on the cloud provider of your choosing.
In this article, we’ll show how to use Terraform to set up and manage a serverless application on AWS, consisting of a Lambda function and a DynamoDB table, along with the roles and policies needed to ensure we’re granting only the permissions required for the application to work. You can use these examples to build more intricate serverless applications on Amazon Web Services or other platforms like Google Cloud Platform or Microsoft Azure.
Why Use Terraform for AWS Serverless Applications?
The AWS ecosystem already provides tools to create and manage cloud resources, such as AWS CloudFormation and AWS Serverless Application Model, or SAM. Why would you use a third-party tool like Terraform instead of the first-party ones maintained by the same company running your application? Any of these tools will help you deploy and operate your serverless application, but Terraform has some advantages that can make the process more manageable.
Manage infrastructure outside of AWS
The main draw of using Terraform lies in being platform-agnostic, meaning you can use it not only with AWS but also with other cloud and on-premise providers. Although rare, more organizations nowadays are mixing resources across different providers for their serverless applications according to their needs. For instance, you might want to use Google’s Firebase’s authentication and real-time database services for an application running on Amazon EC2. Ideally, you’d try to consolidate services to keep management overhead minimal. But Terraform makes managing these scenarios more effortless if you need to work across platforms.
Easier maintenance through modules
A common problem with Infrastructure as Code tools is long-term maintenance, especially when managing dozens or hundreds of resources. Terraform allows you to create modules that help you split up and reuse resources and configurations across your organization’s projects. As your project grows, these modules will allow you to handle the increasing number of resources you must manage. CloudFormation has its own version of modules and stacksets, but they feel somewhat disconnected from your configuration, at least in my experience.
Easier to read code
This part is more of a personal preference, but Terraform’s HCL syntax is more readable than using JSON and YAML with CloudFormation and SAM. One example is that it’s easier to remember how to refer to other resources in your configuration and spot them when reading the code. For instance, if you need to refer to the ARN of a Lambda function, you would use aws_lambda_function.post_function.arn in Terraform, while in CloudFormation, you’d use !GetAtt PostFunction.Arn. CloudFormation’s syntax is shorter, but Terraform typically shows the intent more explicitly without the puzzling function names.
Terraform has its strengths and weaknesses for managing serverless applications, like any other Infrastructure as Code tools. You might want to take a few different ones for a test run to understand better how they work for your use cases.
Serverless Application Example
To demonstrate how Terraform can help manage your serverless applications, I’ve created a Lambda function that will collect email addresses in a web application to serve as an example for this article. The function receives an email address and optional name through an endpoint, performs some validations, and inserts the data into a DynamoDB table if the email does not exist. This kind of functionality is perfect for something like a static landing page that’s collecting email addresses.
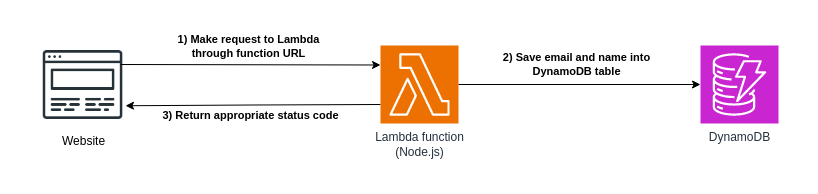
Although the infrastructure for the functionality looks simple in this diagram, managing serverless applications on AWS typically requires additional resources, especially in setting up the roles and policies that grant access to each piece of the puzzle. Besides the Lambda function and DynamoDB table, we’ll want to create an execution role for the function, along with the policies needed to invoke the function, access the DynamoDB table, and write logs to CloudWatch. You can do all this through the AWS console or command line tools, but Terraform will help us keep track of all these moving parts more easily.
Lambda Function for Saving Data to DynamoDB
The centerpiece of our serverless application is the Lambda function. Our function helps us get our code up and running without dealing with setting up additional infrastructure while keeping costs low thanks to the pay-per-use model. For this example, we’ll use Node.js as the runtime, which has first-class support for Lambda functions, including the latest versions of the AWS SDK, which we’ll use to interact with other services.
As mentioned earlier, we want our function to receive a few parameters through an HTTP POST request. The function will check that the email parameter is formatted correctly and then attempt to insert it into the DynamoDB table if it doesn’t exist. The function will return different status codes depending on the results of the function execution:
201 Createdif the record was inserted successfully into the DynamoDB table.422 Unprocessable Entityif theemailparameter is not a properly formatted email address.409 Conflictif a record with the specified email address already exists in the DynamoDB table.500 Internal Server Errorfor any other exceptions while attempting to insert the record into the DynamoDB table.
The Lambda function handling this logic looks like this:
import { DynamoDBClient, PutItemCommand } from "@aws-sdk/client-dynamodb";

export const handler = async (event) => {
  const client = new DynamoDBClient();
  const { email, name } = JSON.parse(event.body);

  const emailRegex = /^[^\s@]+@[^\s@]+\.[^\s@]+$/;
  if (!emailRegex.test(email)) {
    return {
      statusCode: 422,
      body: JSON.stringify({ message: "Invalid email address" }),
    };
  }

  const itemAttributes = {
    email: {
      S: email,
    },
    created_at: {
      N: Date.now().toString(),
    },
  };

  if (name && name.trim() !== "") {
    itemAttributes.name = {
      S: name,
    };
  }

  const input = {
    TableName: process.env.TABLE_NAME,
    Item: itemAttributes,
    ConditionExpression: "attribute_not_exists(email)",
  };

  const command = new PutItemCommand(input);

  try {
    await client.send(command);

    return {
      statusCode: 201,
      body: JSON.stringify({ message: "Email added successfully" }),
    };
  } catch (err) {
    if (err.name === "ConditionalCheckFailedException") {
      return {
        statusCode: 409,
        body: JSON.stringify({ message: "Email already exists" }),
      };
    } else {
      return {
        statusCode: 500,
        body: JSON.stringify({ message: err.name }),
      };
    }
  }
};
This article won’t go through how to test this function before deploying, but you can run this function using the AWS SAM CLI tool. Since we plan to use Terraform to manage our serverless application, it’s good to know that the tool also has Terraform support for testing Lambda functions. Testing before deploying Lambda functions should be a top priority for any developer, regardless of whether managing it through Terraform or other means.
The beauty of AWS Lambda and serverless applications is that we can get a functional application in under 60 lines of code using additional services within the AWS ecosystem. Now that we have the main segment of the application done let’s begin using Terraform to deploy the function and spin up the resources needed to make everything work.
Setting up the Resources for Your Serverless Application With Terraform
The remainder of this article will go through setting up a Terraform project and explain how to use it to manage every element of our serverless application.
Initial configuration
We’ll start by creating the initial configuration for our Terraform project. While we do an initial pass to set up the infrastructure needed for the serverless application, we’ll put all our resources into a single file called main.tf as the root module. In the future, we can decide whether to clean up the code into separate modules for increased maintainability. But for simplicity in this example, we’ll keep everything in a single place.
To start with a Terraform project, you’ll begin with the Terraform settings and specify which version of Terraform you’ll use for this project and the required providers you’ll use for creating the infrastructure. We’ll use the latest version of Terraform available as of this writing (version 1.6.3). Since we’re deploying our serverless application on AWS, we’ll also use the latest version of the AWS provider (version 5.25.0). We’ll specify them in the terraform block inside main.tf:
terraform {
  required_providers {
    aws = {
      source  = "hashicorp/aws"
      version = "5.25.0"
    }
  }
}
As a first pass, we’ll keep the Terraform state local while we get the project up and running. In the future, we can set up a backend to share the state with other team members if needed.
Next, we can configure each provider specified in the project using the provider block. Some configuration settings you can change here include authentication settings, region, proxy settings, and more. For the AWS provider, you have multiple ways to configure authentication, which don’t include hard-coding access keys or secrets in the file. For this example, we’ll assume that we set up authentication correctly in our local environment. We’ll also specify the region where we want to deploy our serverless application and configure the provider to automatically set default tags to all the resources we generate to help manage them. We’ll add this configuration inside main.tf:
provider "aws" {
  region = "ap-northeast-1"

  default_tags {
    tags = {
      Terraform = "true"
      Name      = "serverless-email-collector"
    }
  }
}
DynamoDB provisioning
Now that we have configured the basics of our Terraform project, we can begin provisioning the resources needed for our serverless application. The first resource we’ll create is the DynamoDB table that will store our email addresses. We’ll start with this resource because it’s possibly the simplest one to manage in our project since all we need to do is configure and create the table. We’ll also want to reference the resource’s attributes later in our project for setting up access policies.
You can use the aws_dynamodb_table resource from the AWS provider to create the DynamoDB table. The resource requires a couple of attributes:
- The table name.
- The partition (or hash) key.
- The read and write request units.
- The partition/hash key attribute definition.
We’ll set up DynamoDB as a single table and not use any secondary indexes to keep the application small and simple. One thing to note is that by default, the aws_dynamodb_table resource sets the billing option to provisioned mode, which is perfect for our small example serverless application. However, it requires us to specify the read and write request units beforehand. We’ll set each unit to 1 since we’ll only use the table for writes under 1 KB.
For the partition key (defined by the hash_key argument in the AWS provider), we’ll use the email attribute as our unique attribute. As shown in the Lambda function, we’ll only put new emails into the table if they don’t exist already, so we don’t have to worry about using another identifier. The Lambda function will also put additional attributes into each record when inserted, but we don’t need to specify them when provisioning the table.
The configuration to provision our DynamoDB table in Terraform will look like this inside the main.tf file:
resource "aws_dynamodb_table" "email_collector" {
  name           = "email-collector"
  hash_key       = "email"
  read_capacity  = 1
  write_capacity = 1

  attribute {
    name = "email"
    type = "S"
  }
}
One area to potentially improve in the future is to use variables to define some configuration, such as the table name or the read/write unit capacity. One common use case for using variables is when you need to create separate environments for staging and production applications. You can reuse the same configuration setup while using different values for some arguments. For this example, however, we’ll only make a single environment and hard-code all values.
IAM management
The next step we need to handle is to set up the roles and policies for accessing the different resources we’ll use for our serverless application. This step is one of the most tedious and potentially confusing parts of managing serverless applications on the cloud, but it’s also essential to keep our systems as secure as possible. We don’t want to accidentally expose data from our applications because of a misconfigured role or a widely open policy.
We need to create a few IAM resources for our Lambda function. First, we’ll create an IAM role for the Lambda function, serving as our execution role. This role will allow the Lambda function to access other services within AWS, such as our DynamoDB table, without needing to set or fetch credentials in the function. You can find more information about execution roles with Lambda in the AWS documentation.
To set up the execution role using Terraform, we’ll use the aws_iam_role resource from the AWS provider, combined with the aws_iam_policy_document data source to make it easy to generate a policy document that we can attach to the role at the end of the main.tf file:
data "aws_iam_policy_document" "lambda_execution_policy_document" {
  statement {
    effect = "Allow"

    principals {
      type        = "Service"
      identifiers = ["lambda.amazonaws.com"]
    }

    actions = ["sts:AssumeRole"]
  }
}

resource "aws_iam_role" "email_collector_lambda_role" {
  name               = "email-collector-lambda-role"
  assume_role_policy = data.aws_iam_policy_document.lambda_execution_policy_document.json
}
We’re first generating the policy allowing the Lambda function to assume the execution role using a data source from the AWS provider. The data source is more of a convenient method to generate the correct JSON syntax for the policy. You can also use a string combined with the jsonencode function if you prefer to set it up without the data source.
After generating the policy, we’ll provision an IAM role for our Lambda function and attach the policy by referring to the data source in JSON format. The attached policy specifies the Lambda service principal described under the principals block inside the data source as a trusted service. It also allows the function to generate temporary credentials to access other services with the sts:AssumeRole action.
Allow the Lambda function to write to DynamoDB
So far, we have a DynamoDB table created and an IAM role that we’ll attach to Lambda for execution. While the role allows us to access other resources and services in our AWS account, we still need to give the Lambda function permission to take action on these resources. In our example, we’ll need to allow the Lambda function to write into our DynamoDB table. To accomplish this, we’ll need to create a separate IAM policy with our desired permissions and attach it to the role:
data "aws_iam_policy_document" "lambda_policy_document" {
  statement {
    effect = "Allow"
    actions = [
      "dynamodb:PutItem"
    ]
    resources = [
      aws_dynamodb_table.email_collector.arn
    ]
  }
}

resource "aws_iam_policy" "lambda_policy" {
  name   = "email-collector-policy"
  policy = data.aws_iam_policy_document.lambda_policy_document.json
}

resource "aws_iam_role_policy_attachment" "lambda_policy_attachment" {
  role       = aws_iam_role.email_collector_lambda_role.name
  policy_arn = aws_iam_policy.lambda_policy.arn
}
Like before, we’re using the aws_iam_policy_document data source to generate the necessary policy document. This policy is structured differently since it’s different from the one we generated to assume the role. Here, we’re generating a policy that allows the role to write into DynamoDB by specifying the dynamodb:PutItem action, and we’re scoping it to our managed DynamoDB table for this Terraform project. This way, we’re granting least-privilege permissions to ensure our Lambda function doesn’t over-reach its boundaries.
Once we have a generated policy with the permission to write into our DynamoDB table, we’ll create the policy using the aws_iam_policy resource, and then attach it to our Lambda execution role using the aws_iam_role_policy_attachment resource. Our Lambda function can now access and write into the DynamoDB table without specific credentials with these policies on the execution role.
Enabling CloudWatch logs for the Lambda function
The previous policies are enough to get our serverless application functioning as we want. We can already invoke the Lambda function and have it write into our DynamoDB table. It’s enough to get us started, but for any codebase, logging is essential to maintain a healthy application. It’s especially critical for serverless applications since we won’t have a log file like we typically have on a typical server.
By default, Lambda publishes a few metrics to AWS CloudWatch, such as the number of invocations for the function, the success and error rates, and the time it takes to execute the function. However, the current setup doesn’t give us much visibility into the Lambda function code if something fails, making it difficult to debug any potential problems we might encounter when the application is live.
Thankfully, it’s straightforward to grant permissions to a Lambda function to write into CloudWatch and generate logs for each invocation. AWS provides a managed policy that we can attach to a role and have access to Cloudwatch. Let’s attach it to our Lambda execution role in Terraform by adding the following aws_iam_role_policy_attachment resource to our main.tf file:
resource "aws_iam_role_policy_attachment" "basic_execution" {
  policy_arn = "arn:aws:iam::aws:policy/service-role/AWSLambdaBasicExecutionRole"
  role       = aws_iam_role.email_collector_lambda_role.name
}
The AWSLambdaBasicExecutionRole policy used here is managed by AWS and has the permissions the function needs to write logs into CloudWatch. AWS has hundreds of managed policies for all of its services. It’s a good idea to look at these when working with AWS services to see if they already have a policy available for what you need so you don’t have to reinvent the wheel.
Uploading our Lambda function
Finally, we’re at the main event of our Terraform project: setting up our Lambda function in our AWS account. The basics of deploying a Lambda function in Terraform takes two steps:
- Creating a zip archive of the Lambda function, including any dependencies.
- Provisioning the Lambda function in AWS using the zipped archive.
Terraform has a data source called archive_file which lets us create an archive of files or directories directly from our project, so we don’t need to worry about performing this step manually every time we want to deploy our Lambda function. The Lambda function used for this example is in a single JavaScript file as an ES6 module (using the .mjs file extension) located in our repository’s lambda/ sub-directory. We can create a zip archive of this single file into the same sub-directory with the following block in main.tf:
data "archive_file" "email_collector_lambda_function" {
  type        = "zip"
  source_file = "./lambda/email_collector.mjs"
  output_path = "./lambda/email_collector.zip"
}
Next, we can set up the provisioning of our Lambda function using the aws_lambda_function resource inside of main.tf. The resource requires a function name and an execution role, which we’ll set up as part of our Terraform execution. We’ll also need to set up the zip archive as our deployment package, the function handler or entry point, and the Lambda runtime. Finally, we’ll set up an environment variable to configure the DynamoDB table name used in the Lambda function. Here’s how all of that looks:
resource "aws_lambda_function" "email_collector" {
  function_name    = "email-collector"
  filename         = "./lambda/email_collector.zip"
  role             = aws_iam_role.email_collector_lambda_role.arn
  handler          = "email_collector.handler"
  runtime          = "nodejs18.x"

  environment {
    variables = {
      TABLE_NAME = aws_dynamodb_table.email_collector.name
    }
  }
}
This single block contains all we need to deploy a Lambda function to AWS. We have to specify the path of the zip archive for the filename argument since the data source doesn’t have an attribute to give this to us. It’s easy to accidentally set an invalid file path in this configuration, so double-check that both the archive_file data source and the aws_lambda_function resource refer to the same path.
Generating a function URL for our Lambda function
We have all the pieces of our serverless application in place—a DynamoDB table, a Lambda function, and all the permissions required to run our code without any issues. We can invoke the Lambda function and pass the email and optional name parameters, and it will write the data into DynamoDB. But if we want to use it through a web application, like through a form submission, we’ll want to create an HTTP endpoint that will invoke the Lambda function.
In the past, teams needed to provision endpoints using Amazon API Gateway. This solution still works and is necessary when the application requires additional functionality like caching, usage plans, or authorizers. In our example, we only want an endpoint that allows us to make a POST request and invoke the Lambda function. For this use case, we can generate a Lambda function URL, making our infrastructure cost-effective and easier to manage.
Like all of our resources, we can create a function URL for our Lambda function in Terraform. The AWS provider includes the aws_lambda_function_url resource for handling this step, which we’ll add to our main.tf file. The resource requires the Lambda function name and the type of authentication we’ll use for the endpoint:
resource "aws_lambda_function_url" "email_collector" {
  function_name      = aws_lambda_function.email_collector.function_name
  authorization_type = "NONE"
}
Lambda function URLs allow us to manage access through authorized IAM roles or policies, requiring creating a signature and sending it as a header. Otherwise, we can publicly expose the function URL, which won’t need additional headers. In our case, we won’t require any authorization. We could also use the aws_lambda_function_url resource to enable CORS to limit the origin where the URL can be used, but we’ll skip that for this basic application.
The above configuration generates the function URL, but we’ll need to tell Terraform to expose it for our project. We can do this as a Terraform output value. A best practice is to create a separate file for Terraform outputs (like outputs.tf) to make things easier to manage as we scale up our infrastructure. For this example, we’ll add the output block in main.tf:
output "function_url" {
  description = "The function URL for the Lambda function"
  value       = aws_lambda_function_url.email_collector.function_url
}
When we deploy our infrastructure to our AWS account using Terraform, it will display the generated function URL, so we won’t need to fetch it elsewhere like the AWS console.
Provisioning a Serverless Application With Terraform
We’ve got our entire serverless application configured with Terraform. Now comes the easy part—creating all of our defined resources. Once you install Terraform and configure the correct AWS credentials in your local environment, you can run terraform plan to preview the changes that it will make to your AWS account and verify that the set up is correct. If everything looks good, you can provision your entire infrastructure with the terraform apply command.
Here’s an example of how it looks when we deploy our example serverless application:
$ terraform apply

data.archive_file.email_collector_lambda_function: Reading...
data.archive_file.email_collector_lambda_function: Read complete after 0s [id=63d01c156e3e061a5bf87c32f051bbafcb72194e]
data.aws_iam_policy_document.lambda_execution_policy_document: Reading...
data.aws_iam_policy_document.lambda_execution_policy_document: Read complete after 0s [id=2690255455]

Terraform used the selected providers to generate the following execution plan. Resource actions are indicated with the following symbols:
  + create
 <= read (data resources)

Terraform will perform the following actions:

# ...
# Details of the defined data sources and resources from our configuration.
# ...

Plan: 7 to add, 0 to change, 0 to destroy.

Changes to Outputs:
  + function_url = (known after apply)

Do you want to perform these actions?
  Terraform will perform the actions described above.
  Only 'yes' will be accepted to approve.

  Enter a value: yes

aws_iam_role.email_collector_lambda_role: Creating...
aws_dynamodb_table.email_collector: Creating...
aws_iam_role.email_collector_lambda_role: Creation complete after 1s [id=email-collector-lambda-role]
aws_iam_role_policy_attachment.basic_execution: Creating...
aws_iam_role_policy_attachment.basic_execution: Creation complete after 0s [id=email-collector-lambda-role-20231110065722201200000001]
aws_dynamodb_table.email_collector: Creation complete after 6s [id=email-collector]
data.aws_iam_policy_document.dynamodb_policy_document: Reading...
data.aws_iam_policy_document.dynamodb_policy_document: Read complete after 0s [id=1234567890]
aws_iam_policy.dynamodb_policy: Creating...
aws_lambda_function.email_collector: Creating...
aws_iam_policy.dynamodb_policy: Creation complete after 1s [id=arn:aws:iam::111111111111:policy/email-collector-policy]
aws_iam_role_policy_attachment.lambda_policy_attachment: Creating...
aws_iam_role_policy_attachment.lambda_policy_attachment: Creation complete after 0s [id=email-collector-lambda-role-20231110065728019200000002]
aws_lambda_function.email_collector: Creation complete after 7s [id=email-collector]
aws_lambda_function_url.email_collector: Creating...
aws_lambda_function_url.email_collector: Creation complete after 1s [id=email-collector]

Apply complete! Resources: 7 added, 0 changed, 0 destroyed.

Outputs:

function_url = "https://thx3yqwsztu367qbf4918jn815qtdr7j.lambda-url.ap-northeast-1.on.aws/"
We have our serverless application up and running in less than one minute. We can confirm this by making a POST request to the Lambda function URL returned by Terraform, passing in the correct headers and body. The following is an example cURL request for this:
$ curl -i -X POST \
  -H "Content-Type: application/json" \
  -d '{"email": "example-email@dennmart.com", "name": "Dennis Martinez"}' \
  https://thx3yqwsztu367qbf4918jn815qtdr7j.lambda-url.ap-northeast-1.on.aws/
We’ll get back a successful response from the function URL, indicating that our application is working as intended:
HTTP/1.1 201 Created
Date: Tue, 10 Nov 2023 07:22:06 GMT
Content-Type: application/json
Content-Length: 38
Connection: keep-alive
x-amzn-RequestId: e4d26b89-9898-4bbe-bbdd-f15f258d9e9e
X-Amzn-Trace-Id: root=1-6553201c-00a12e9f6eb914ed272808c2;sampled=0;lineage=bb2ebc5e:0

{"message": "Email added successfully"}
Let’s double-check that the data was correctly inserted into our DynamoDB table by doing a quick scan with the AWS Command Line Interface:
$ aws dynamodb scan --table-name email-collector --region ap-northeast-1
{
    "Items": [
        {
            "created_at": {
                "N": "1699600925515"
            },
            "email": {
                "S": "example-email@dennmart.com"
            },
            "name": {
                "S": "Dennis Martinez"
            }
        }
    ],
    "Count": 1,
    "ScannedCount": 1,
    "ConsumedCapacity": null
}
It seems like our serverless application is working well!
Updating Lambda Functions With Terraform
One of the benefits of Terraform is its simplicity when we need to modify existing resources. All you need to do is change the configuration and run a terraform apply. As long as someone hasn’t manipulated the resources elsewhere, Terraform will compare the desired state from your configuration to the current state on the cloud and perform any changes needed to match them. For instance, we can update the read and write capacity of the DynamoDB table by updating the values in our configuration, run terraform apply, and we’re done.
When managing Lambda functions with Terraform, performing updates in our function code won’t work in the same way. Let’s imagine we have to update the error message for our Lambda function when attempting to put an existing email address in our DynamoDB table:
return {
  statusCode: 409,
  body: JSON.stringify({ message: "The entered email already exists." }),
};
After updating the JavaScript file for the function, we want to redeploy the function, so we’ll run terraform apply expecting the function to get updated on AWS. However, we run into the following message:
$ terraform apply

# ...
# Terraform verifies desired and current state.
# ...

No changes. Your infrastructure matches the configuration.

Terraform has compared your real infrastructure against your configuration and found no differences, so no changes are needed.
What’s happening here? I clearly made a change to the application code, so why doesn’t Terraform detect it? The issue is that our Lambda function gets packaged up into a zip archive in our configuration. Terraform won’t know that the code inside the zip archive changed, so it assumes everything matches up to the current state of the application on AWS.
How can we make Terraform detect any changes in our Lambda function code? The archive_file data source we used earlier contains some read-only attributes that will help with this. In particular, the archive_file data source can generate a checksum of the archived zip file. The hash will change whenever the contents of the archived file change, so we can use one of these attributes to determine when the Lambda function gets updates.
We can use the zip file’s checksum in the aws_lambda_function resource, thanks to the source_code_hash argument. This argument accepts a Base64-encoded SHA256 hash and will tell Terraform that this resource has changed. The archive_file data source conveniently has an attribute that returns a Base64-encoded SHA256 hash called output_base64sha256. Let’s add it to the resource block in our existing Terraform configuration:
resource "aws_lambda_function" "email_collector" {
  function_name    = "email-collector"
  filename         = "./lambda/email_collector.zip"
  role             = aws_iam_role.email_collector_lambda_role.arn
  handler          = "email_collector.handler"
  runtime          = "nodejs18.x"

  # New argument to detect when our Lambda function is modified.
  source_code_hash = data.archive_file.email_collector_lambda_function.output_base64sha256

  environment {
    variables = {
      TABLE_NAME = aws_dynamodb_table.email_collector.name
    }
  }
}
We can run terraform apply after this change to see that Terraform is now detecting a change in our Lambda function. Our updated error message will become active after applying and deploying the changes:
$ terraform apply

# ...
# Terraform verifies desired and current state.
# ...

Terraform used the selected providers to generate the following execution plan. Resource actions are indicated with the following symbols:
  ~ update in-place

Terraform will perform the following actions:

  # aws_lambda_function.email_collector will be updated in-place
  ~ resource "aws_lambda_function" "email_collector" {
        id                             = "email-collector"
      ~ last_modified                  = "2023-11-10T07:21:53.000+0000" -> (known after apply)
      ~ source_code_hash               = "WKHd20YxBh0/b3++fjOkP5DJ7NPniZd/s4u37eCNYZc=" -> "PcK1ZaVC0B5vzJv7Fz/e9LlUCY+RtULzuXF5dxlJHeY="
        tags                           = {}
        # (20 unchanged attributes hidden)

        # (3 unchanged blocks hidden)
    }

Plan: 0 to add, 1 to change, 0 to destroy.

Do you want to perform these actions?
  Terraform will perform the actions described above.
  Only 'yes' will be accepted to approve.

  Enter a value: yes

aws_lambda_function.email_collector: Modifying... [id=email-collector]
aws_lambda_function.email_collector: Modifications complete after 6s [id=email-collector]

Apply complete! Resources: 0 added, 1 changed, 0 destroyed.
Summary
This article goes through a practical demonstration of how you can set up serverless applications on AWS using Terraform. While there are other methods to accomplish the same effect, Terraform helps us streamline the process thanks to its readability and simplicity of the AWS provider. The example app shown here uses Lambda and DynamoDB as the primary resources, but you can apply the same techniques with other serverless technologies, whether on Amazon Web Services or mixing with other cloud providers.
The serverless computing model can be a game-changer for many organizations by setting up an entire application and getting it up and running quickly without incurring upfront costs. Combining it with tools like Terraform to manage the complete infrastructure and permissions empowers teams to build the robust and scalable apps that people expect nowadays with ease.
If you’re interested in serverless applications or managing your existing ones more effectively, I’m available to help. As an AWS Certified DevOps Engineer with over 20 years of software development experience, I can help you set up the proper architecture for maintainable and reliable systems. Reach out to me today and let’s start a conversation. I’d love to chat and come up with a plan on how serverless computing and the cloud can elevate your company to the next level.