As someone who’s been working with Ruby on Rails applications for 15 years and counting, it’s been amazing to see how it remains relevant in web development today. It’s always exciting to see a new major version come around the horizon and see what new things are coming down the pipeline to continue helping developers build stable and solid web applications quickly.
The upcoming release of Rails is just around the corner, with the announcement of the release candidate for Rails 7.1 this week. This new version contains many valuable and exciting updates, like better helpers for authentication, improvements in asynchronous database querying, and support for the new darling of the JavaScript world, Bun. These enhancements keep making Rails better and an excellent choice for anyone looking to build a web application quickly in 2023 and beyond.
Another addition in Rails 7.1 is the inclusion of Dockerfiles when generating new applications. Rails has always been somewhat tricky to deploy into production. Platforms like Heroku and Render have helped reduce the friction of shipping Rails applications, but they’re not the right solution for every scenario. Docker is an ideal solution when you need to run a Rails application in your own infrastructure, whether on the cloud or bare metal servers. It helps produce consistent releases from development to testing to production and makes your applications easier to manage and scale once on your servers.
Using Docker with Rails applications isn’t exclusive only to new Rails 7.1 applications. For older projects, you can still create a Dockerfile that builds lean Docker images for your Ruby on Rails applications. However, even with a Dockerfile in your project, you’ll still need to ensure that your Docker images are up to date with the latest changes in your code repository so they’re ready to use at any time.
You don’t need to perform manual or complicated processes to automatically build your Docker images whenever a developer commits new code to your main branches. You can leverage the power of continuous integration systems to trigger automated builds, so you always have the latest changes in your containerized application. If your team uses GitHub to store your Rails application’s code, you already have the tools you need to get this up and running effortlessly.
Using GitHub Actions and GitHub Packages to Build and Publish Docker Images for Your Rails App Automatically
This article will cover how to use GitHub Actions, GitHub’s integrated CI/CD platform, to automatically detect changes in your repository and trigger the Docker build process. It will also cover how to upload your newly built Docker image into a registry that your developers and servers can use.
As a brief intro to GitHub Actions, it’s a tool that helps automate various tasks related to your code hosted on a GitHub repository. You can use GitHub Actions to run automated tests, push your code to other servers, and send alerts through email or messaging services like Slack. Using GitHub Actions is a good choice for many teams. Since many organizations already use GitHub as their remote code repository, you’ll have fewer moving parts to handle as opposed to using a separate service.
Another benefit of using this service is GitHub’s marketplace containing thousands of pre-built actions. For most automated tasks you want to run on GitHub Actions, you’ll likely find a pre-built action that you can plug into your workflow with minimal effort. This article will use a few pre-built actions to handle all you need to quickly get a Docker image build and push working for you automatically.
The GitHub ecosystem also provides functionality to publish your Docker image through GitHub Packages. This feature lets you publish packaged code privately for internal use in your organization or publicly to give access to anyone across the globe. GitHub Packages is extremely helpful for Docker-based workflows as it provides a Docker registry for distributing your containerized applications.
Limitations of GitHub Actions and GitHub Packages
GitHub Actions is available on both free and paid plans for most GitHub repositories. However, they have limitations your organization must be aware of. Depending on the GitHub plan and code repo, you’ll have limits on the number of concurrent jobs you can run simultaneously, the amount of storage for artifacts, and how many minutes you can spend building on their servers. Refer to the Usage limits, billing, and administration and the About billing for GitHub Actions sections in GitHub’s documentation.
GitHub Packages have similar limitations depending on your usage. You can use the feature for free if your packages are public. For privately published packages, you’ll have limits on the amount of storage and data transfer according to your organization’s GitHub plan, and any usage beyond those limits will get charged. The About billing for GitHub Packages section in GitHub’s documentation contains more details about these limits and charges.
Setting up Your GitHub Repo
In the example we’ll cover in this article, we’ll use GitHub Actions to build Docker images with the latest code changes and push them into a registry whenever there are changes to your Rails application’s main branch.
This example will use a Rails application I built called Airport Gap, a fully functional API to help testers and developers improve their test automation skills with a live API. The application code is available on GitHub, including the GitHub Actions workflow to build and publish a Docker image.
To set up a GitHub repository for building Docker images, you’ll need two things in the codebase:
- A Dockerfile to build an image for the latest code in the repo.
- A YAML file containing the GitHub Actions workflow to build and publish the Docker image.
I won’t go over the process of creating a Dockerfile for a Rails application. You can read the article “Building Lean Docker Images for Rails Apps” for examples of creating an optimized Dockerfile for Rails. The remainder of this article focuses on setting up GitHub Actions. GitHub already provides the tools to build and publish new Docker images, so you need to do nothing else in your code repository. Let’s begin automating this process by setting up the GitHub Actions workflow.
Creating a GitHub Actions Workflow
GitHub Actions workflow files are located in the .github/workflows directory at the root of your application’s codebase. You can have multiple workflows in this directory that GitHub Actions can pick up and process according to their configuration. For instance, you can have a workflow that runs your tests and another that builds a Docker image. We’ll show how multiple workflows work later on in this article.
Inside the .github/workflows directory, we’ll create a file called docker.yml to hold our GitHub Actions workflow for building and distributing Docker images from the Airport Gap application. The name of the file isn’t important as long as it’s in .github/workflows in your repo, but it’s a good practice to use a descriptive name to make it easier for your team to identify.
In the docker.yml file, we’ll define the complete workflow for the Docker build and push process. The following code handles each step. I’ll break down each section to explain what each workflow segment does.
name: Build and publish Docker image

on:
  push:
    branches:
      - main

jobs:
  build-and-push-image:
    runs-on: ubuntu-latest
    permissions:
      contents: read
      packages: write

    steps:
      - name: Checkout repository
        uses: actions/checkout@v3

      - name: Log in to the Container registry
        uses: docker/login-action@v2
        with:
          registry: ghcr.io
          username: ${{ github.actor }}
          password: ${{ secrets.GITHUB_TOKEN }}

      - name: Build and push Docker image
        uses: docker/build-push-action@v4
        with:
          context: .
          push: true
          tags: ghcr.io/${{ github.repository_owner }}/airport-gap:latest
          cache-from: type=registry,ref=ghcr.io/${{ github.repository_owner }}/airport-gap:latest
          cache-to: type=inline
Configuring basic GitHub Actions workflow settings
Starting from the beginning of this file, the name key allows you to name the workflow, which appears on your GitHub repository’s Actions tab. Setting a value in this key is optional, and GitHub Actions will use the file’s name instead. However, selecting a descriptive name from the start makes it easier to keep track of your automated workflows as your repository grows.
Next, we have the on key, which defines when we want GitHub Actions to trigger this workflow. GitHub Actions provides multiple ways to run a workflow, such as pushing code into a specific branch, opening a pull request, or adding a label to an existing pull request. In this example, we’re telling GitHub Actions to trigger the Docker image build process when we only push new code into the main branch since we don’t need to initiate new Docker builds for every branch.
Setting up your jobs on GitHub Actions
The following section, jobs, is the main section of any GitHub Actions workflow. Here, we define all the steps we want the workflow to take for our automation. All GitHub Actions workflows require one or more jobs, each containing additional configuration settings and the steps to go through. In this example, we only have one job with an ID of build-and-push-image.
The build-and-push-image job requires some configuration, like specifying where to run the workflow and any permissions we must provide to GitHub Actions. For this workflow, we’ll specify the type of machine (also known as the runner) to execute each step in the workflow with the runs-on key. You can choose to trigger the workflow on a self-hosted runner or use one of GitHub’s runners that they maintain. For most cases, the GitHub-hosted runners are more than enough to run your automated tasks unless you have specific requirements that prevent you from using them. In this example, we’ll use the ubuntu-latest runner, which currently is a server running Ubuntu 22.04.
The following configuration needed for our job is to set the proper permissions. Setting the permissions key is vital for this workflow since we need to grant access for GitHub Actions to push the Docker image to our organization’s GitHub Packages repository, as explained earlier. By default, GitHub Actions only provides read access to GitHub Packages, so we need to explicitly grant it write permissions to publish the Docker image during the workflow. We can set this using the packages: write setting under permissions.
Setting the permissions key in a GitHub Actions workflow will overwrite the default permissions that GitHub Actions uses and set any unspecified permissions to none. The contents: read setting is required to allow GitHub Actions to read the code from our repository. This setting is configured by default, but since we’re overriding the permissions, we must specify it here.
After configuring our job, we can define the steps we want the workflow to perform under the appropriately named steps key. Each of the steps in this section will execute on the runner. In most GitHub Actions workflows, you’ll use multiple pre-built actions to handle common tasks, which we’ll heavily rely on in this example.
The build-and-push-image job we’ll use in this scenario consists of three steps:
Check out the codebase from our GitHub repo
When the server (runner) spins up on GitHub, it will be a blank slate besides the preinstalled software included. The runner has many applications and libraries installed by default, but it won’t have your application code. In most GitHub Actions workflows, the first step you need to take is to check out the code repository in the runner so you can perform any actions on your codebase in subsequent steps.
Since this is a typical step that most GitHub Actions workflows take, GitHub provides a convenient pre-built action called actions/checkout. This action is a workflow in itself that fetches the code from the GitHub repository triggering the job. Whenever we use a pre-built action like this one, the uses key indicates it’s a separate workflow, and GitHub Actions will handle fetching it from the marketplace or elsewhere if specified.
In this example, since we’re triggering the workflow when pushing code into the main branch, the actions/checkout action will check out the code from that commit and place it inside the runner. This step allows us to run the workflow against the latest code and ensure the Docker image is always up to date.
Logging in to the GitHub Container registry
The next step we need to take before proceeding with the Docker image building process is to log in to the GitHub Container registry on the runner. Even if you decide to publish your Docker image publicly, you’ll still need to authenticate to push the image into the registry. Otherwise, anyone would be able to manipulate the packages in your organization’s account.
Like checking out the code into the runner, logging in to a Docker registry can be done through a pre-built action. The docker/login-action workflow easily handles this inside the GitHub Actions workflow. While you can technically run the docker login command to authenticate inside of the runner, using a pre-built action is easier to set up and manage. This step will require additional configuration, specified using the with key as shown in the workflow file. In our example, we need to configure the action with three settings.
First, we’ll specify the registry we want to log in to using the registry key. Since we want to publish our Docker image inside of GitHub Packages, we’ll use their registry URL (ghcr.io). If you need to switch to a different registry in the future, like Docker Hub or Amazon’s Elastic Container Registry, you can easily change this value without needing to reconfigure the steps.
Next, we need to set our username and password to authenticate with the registry. GitHub Packages requires your GitHub username and an access token to publish packages inside the registry. Thankfully, GitHub Action conveniently provides these details as part of running the workflow, so you don’t need to create any tokens or configuration separately.
You can access the username triggering the GitHub Actions workflow using the github.actor value. The github context provides details of this specific workflow execution. In this example, the github.actor value is the GitHub username for the account that triggered the workflow. For this example, whenever I push code into the main branch, my GitHub username (dennmart) will be the value of github.actor since my account triggered the workflow. You can find more details about the github context in their documentation.
For the password, you can create a personal access token on your GitHub account and set it as a secret for your workflow. However, these steps are unnecessary since GitHub provides a special token accessible through secrets.GITHUB_TOKEN. This token has write permissions as specified in the permissions key mentioned earlier, so we can use it to push into our organization’s packages.
Build and push Docker image
After setting permissions, checking out your application code into the runner, and logging in to the Docker registry, we can finally get to the main event of this workflow: building and publishing the Docker image for your Rails application. Again, we’ll leverage a pre-built action that effortlessly handles all these steps.
docker/build-push-action is a full-fledged action that helps you build and distribute Docker images. Besides those basic capabilities, it’s also highly flexible, allowing you to create images for multiple architectures, push to multiple Docker registries, and more. For this example, we’ll focus on building and pushing our Rails application Docker image to the GitHub container registry. The docker/build-push-action workflow requires a few settings and some optional setup to improve the build process.
First, the context key lets us set the location of the files we want to use in the build process. In this example, we’re setting the build context to the current working directory which GitHub Actions checked out in an earlier step. If the files you want to use for this build are in a separate directory (useful for monorepos), you can set this according to the Docker image you wish to build.
Next, the push key tells the action that we want to push this image to an external registry. By default, the action will build the image locally in the runner. If you plan to use the Docker image for other GitHub Actions workflows or manage its distribution manually, you can set this to false. For our example scenario, we’ll publish it outside of the runner.
The tags key is where you’ll specify the name of the Docker image when pushing it to the registry. Since we’re going to push the image to GitHub’s container registry, we need to follow the naming convention of ghcr.io/<user or organization>/<image name>:<tag>, where <user or organization> refers to the GitHub username or organization name where you want the image to be available from, and the <image name> and <tag> placeholders are the name and tag for your Docker image. You can set the user or organization name directly in the workflow, but to make it more flexible, you can use the github.repository_owner value available in the github context, similar to what we used in the previous step.
Finally, the cache-from and cache-to keys are optional settings to help speed up your workflow by caching the Docker image builds. The first time we run this workflow, GitHub Actions will run the image build process from the start. On subsequent workflow executions, we don’t need to start from the beginning, which is where these settings come into play. It can significantly speed up your GitHub Actions workflow by skipping any image layers that don’t need updating.
The cache-to setting tells the action where to set the cache. The tools used by docker/build-push-action under the hood (BuildKit) allow us to export the final build cache for a Docker image in different locations, like to a cache manifest in your registry, an Amazon S3 bucket, or to a local directory. In our example, we’re setting the cache inline (type=inline), which writes the cache metadata into the image configuration itself. This is the easiest way to handle Docker image caching in a GitHub Actions workflow.
The cache-from setting tells our workflow where to fetch the cache before building the image. As mentioned above, we’re caching the Docker build into the image itself, so we’ll have to specify that the cache is located in a remote registry (type=registry). We must also set the image reference with the ref setting in the same configuration line so that the action can pull the appropriate image.
Executing the Docker Image Build on GitHub Actions
Now that the GitHub Actions workflow is set up, all you need to do is save the docker.yml file inside of the .github/workflows directory in your Rails code repository and push the update to your main branch on GitHub. GitHub Actions will automatically detect the new workflow and trigger it:
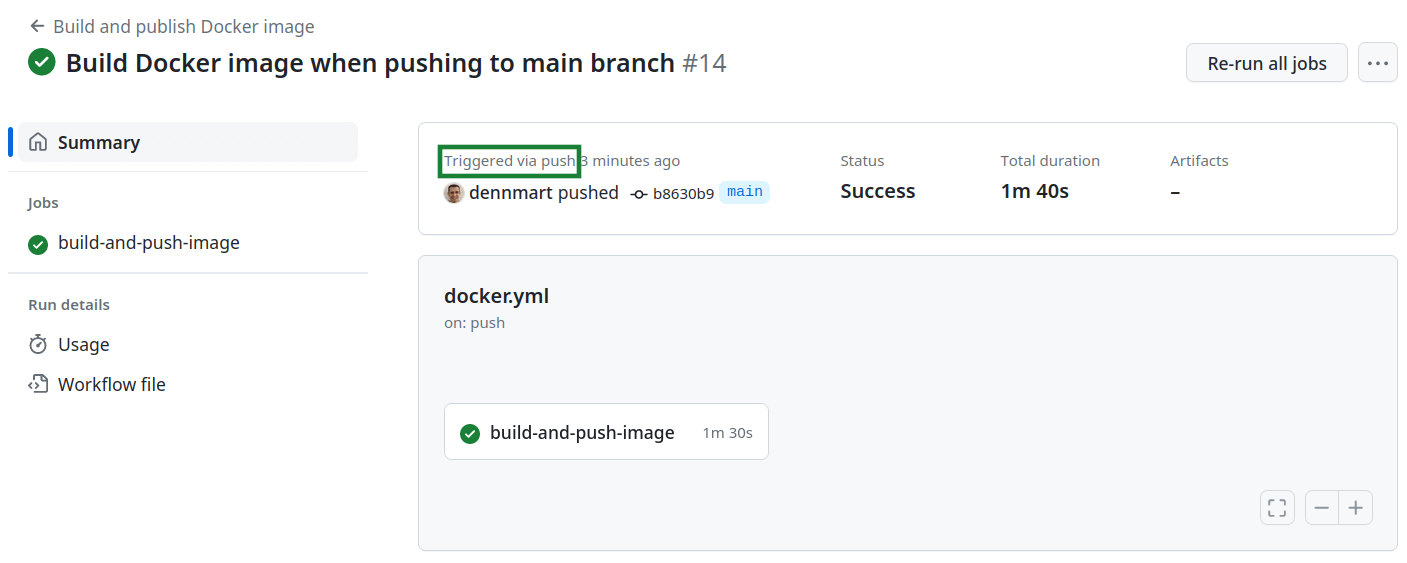
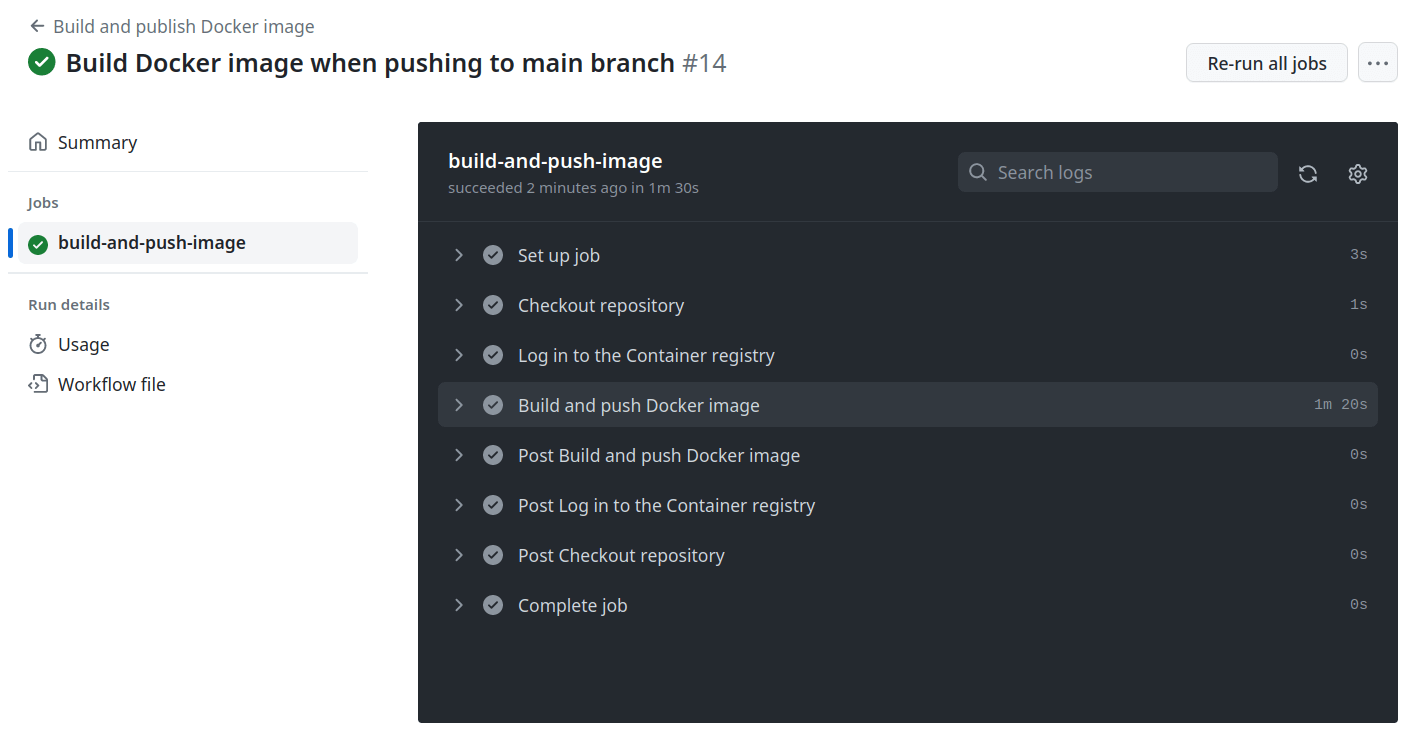
If everything is set up correctly in the workflow, you’ll see a successful Docker image build for your Rails application. The information for the created image and details on how to pull it from the GitHub container registry will be available by viewing the packages for your GitHub’s username or organization packages:

With just a short configuration file in your code repository, GitHub Actions has containerized your Rails application and published it to a registry where it can be conveniently accessed or deployed. Your development and QA team can use the image internally for testing purposes, or you can use this image to deploy the latest updates to your production servers. Once this workflow is set up, you won’t have to worry about having up-to-date Docker images for your Rails apps.
Building the Docker Image Only When Your Rails Application Tests Pass
So far, we’ve seen how to build Docker images when publishing new code into the main branch. While this process works, it has a few potential pitfalls. Let’s say a developer accidentally commits buggy code into the main branch for your Rails application. The Docker image will still build and get published to the registry, potentially leading your team or production systems to run a broken application.
To prevent this from happening, one strategy we can take is to run tests against the Rails application before building the Docker image on GitHub Actions. If you have an automated test suite for your application, you can configure the Docker image build workflow to wait until those tests pass before creating the image. This approach will ensure that your Rails application is in a good state based on existing automated test coverage and will avoid wasting build time for potentially broken code.
GitHub Actions allows you to handle this in a few ways by configuring different triggers in the on key, as explained earlier in this article. In our example, we configured this setting to trigger the workflow when pushing code into the main branch. We can change this setting to a different trigger, depending on your automated testing setup:
- The
repository_dispatchevent triggers the workflow from outside of GitHub. This trigger is helpful if you have a separate continuous integration solution that runs tests outside of GitHub Actions. - The
workflow_runevent triggers the workflow based on the execution or completion of another workflow inside GitHub Actions.
You’ll likely have all your automated testing in the same CI service. The Rails application in this example, Airport Gap, has automated unit and API tests configured in GitHub Actions. We won’t go through the process of how the automated tests have been set up (refer to the Airport Gap GitHub repository to see the workflows), but we’ll show how to update the Docker image build workflow with the workflow_run event to trigger the workflow when those tests pass.
The following code contains the updated .github/workflows/docker.yml file to update our GitHub Actions workflow:
name: Build and publish Docker image

on:
  workflow_run:
    workflows:
      - APId tests
    types:
      - completed
    branches:
      - main

jobs:
  build-and-push-image:
    if: ${{ github.event.workflow_run.conclusion == 'success' }}

    runs-on: ubuntu-latest
    permissions:
      contents: read
      packages: write

    steps:
      - name: Checkout repository
        uses: actions/checkout@v3

      - name: Log in to the Container registry
        uses: docker/login-action@v2
        with:
          registry: ghcr.io
          username: ${{ github.actor }}
          password: ${{ secrets.GITHUB_TOKEN }}

      - name: Build and push Docker image
        uses: docker/build-push-action@v4
        with:
          context: .
          push: true
          tags: ghcr.io/${{ github.repository_owner }}/airport-gap:latest
          cache-from: type=registry,ref=ghcr.io/${{ github.repository_owner }}/airport-gap:latest
          cache-to: type=inline
The majority of the workflow remains unchanged, but there are two significant modifications to make our Docker image build happen only when our tests pass.
First, the on key changed from the push event to the workflow_run event. This event contains a few additional settings to narrow down when we want to trigger our Docker image build workflow. We need to specify which GitHub Action workflows we want to allow to start our Docker image builds. The example repo used for this article has two separate workflows, so we’ll use one with the name of APId tests for the workflows setting. Next, we want to trigger the Docker image build only when the API tests workflow completes. We’ll put the types setting as completed for this step. Finally, we want to narrow down the branch as we did when triggering the Docker image build on push, keeping it only for the main branch.
The other change done to the workflow is the if setting under our build-and-push-image job. This key contains conditional checks to tell GitHub Actions whether or not to run the job. Here, we want to check that the workflow triggering the job (APId tests, as specified in the workflow_run trigger) has completed successfully. Once again, we’ll use the github context to find these details. The value of github.event.workflow_run.conclusion returns the status of the triggering workflow, and we only want it to run on success. If we don’t set this conditional check, GitHub Actions will always build the Docker image even if the automated tests fail, defeating the purpose of specifying this new event trigger.
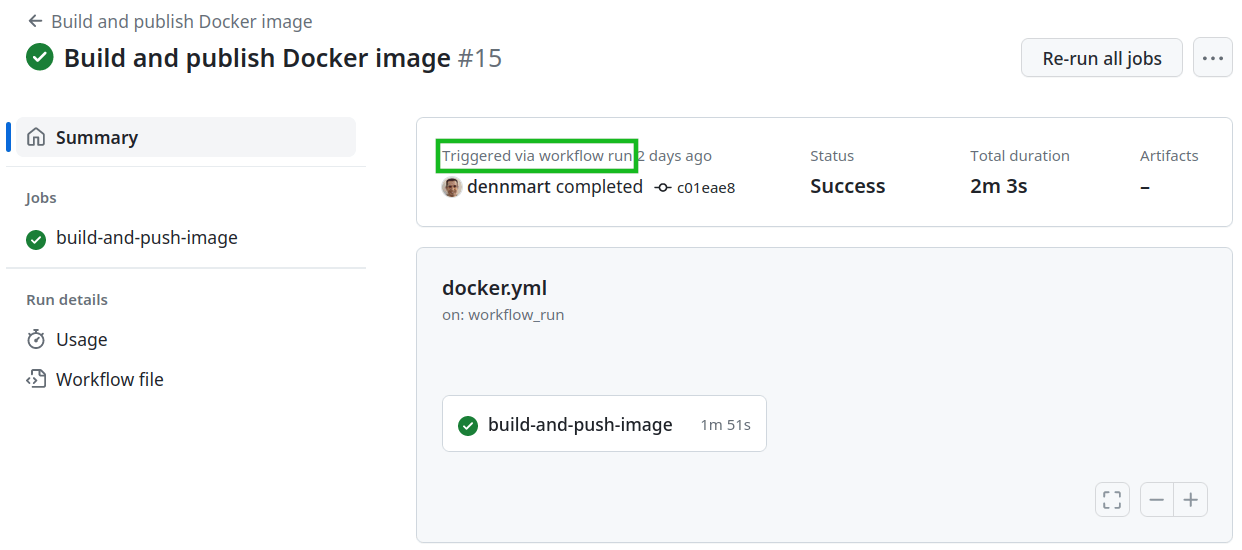
With these changes in place, we can merge these workflow updates to the Rails application code repo and see them in action. Our automated tests will run first since they’re configured to run when pushing code into the main branch. Once the workflow for the API tests finishes, it will trigger the Docker image build workflow. If the API tests fail or time out, the Docker image build won’t happen. Otherwise, the process will proceed as before with the image build and push to the registry:
Learning to use different events like workflow_run will optimize your account’s use of GitHub Actions. Instead of slowing down the development cycle and burning up build minutes for no reason, you can ensure you’re only running the tasks you and your team need, and it helps prevent publishing broken Docker images.
Summary
This article walks you through setting up a continuous integration workflow to automatically create a Docker image of your Rails applications and publish it to a registry using GitHub Actions. We also showed how to ensure that your Docker images are in a functional state by building them after validating your code through your automated tests. These steps show how simple it is to get started with these kinds of automation tasks to help your entire team have a containerized Rails application that they can use for testing and deployment.
If your organization maintains its codebase in the GitHub ecosystem, GitHub Actions is one of the better solutions to optimize your development, testing, and release processes. Even if you don’t use GitHub or GitHub Actions, this article can provide a starting point to use your version control and CI/CD services. Regardless of what you use, these procedures are all about making your organization more efficient and delivering quality results faster.
If you or your team found this article helpful and are interested in streamlining your Rails application development, I offer hands-on support through consulting and project-based contracts tailored to your specific needs. With over 15 years working as a software engineer on Ruby on Rails applications, I know the ins and outs to help you overcome any obstacle in your path. Contact me to schedule a call, and let’s work together to make your development processes as efficient as possible.