Prefer to watch a screencast instead? Check out the video at the end of this article.
These days, it’s super-easy to spin up a server on the cloud and have it available in under a minute. Less than 20 years ago, provisioning a new server meant installing physical hardware, setting up networks, and configuring all the software you needed, and it would require a few weeks to complete. Now, you can instantly sign up to any available cloud provider like AWS, DigitalOcean, or Hetzner Cloud and click on a few buttons to have a fully functional server ready for your applications.
However, the ease of creating a new server through a dashboard has its downsides. This approach makes it difficult to track changes for existing servers and ensure consistency between different environments. What if you need to replicate your infrastructure for testing purposes or explain the system architecture to new team members? You can have someone go through these processes, which are time-consuming and error-prone.
Instead of manually managing your servers and their dependencies, a more effective approach is to use Infrastructure as Code. Managing your servers through code helps you automate and streamline your DevOps processes, making them much easier to maintain and scale down the road. You’ll also have a clear picture of how you and your team set up your systems, avoiding any confusion about how everything works.
There are many different Infrastructure as Code tools out there, but my preferred tool is Terraform. Terraform makes it dead simple to define your systems through a configuration file. Because it’s platform-agnostic, you can build and manage your infrastructure with your chosen provider. It doesn’t matter where your servers are, whether they’re cloud or on-prem servers. You can use Terraform to handle what you need.
In this article, we’ll show how easy it is to spin up a new server on the cloud using Terraform to help you manage it for the long haul.
Installing Terraform
Before starting, you’ll need to install Terraform on your local system. Terraform is available on multiple platforms, from Windows to Linux to macOS. If you want to follow along with this article, please visit the “Install Terraform” page on their documentation to download and set up Terraform in your environment.
Setting up Your Cloud Service Provider
The next step is to set up the cloud service provider where we want to spin up a new server. For this article, I’ll use Hetzner Cloud as my cloud service provider, but you can use any other service, such as Google Cloud Platform (GCP), Microsoft Azure, Linode, and many others. You can choose your preferred cloud service as long as Terraform has a provider available (which we’ll discuss later).
We must generate an API token to connect Terraform to our Hetzner Cloud account. You can do this by logging in to the Hetzner Cloud console, going to our desired project, then visiting the Security page and going to the API tokens section. We’ll click the “Generate API token” button, give it a descriptive name, and make sure to provide it with Read & Write permissions since we’ll use this token to create new resources.
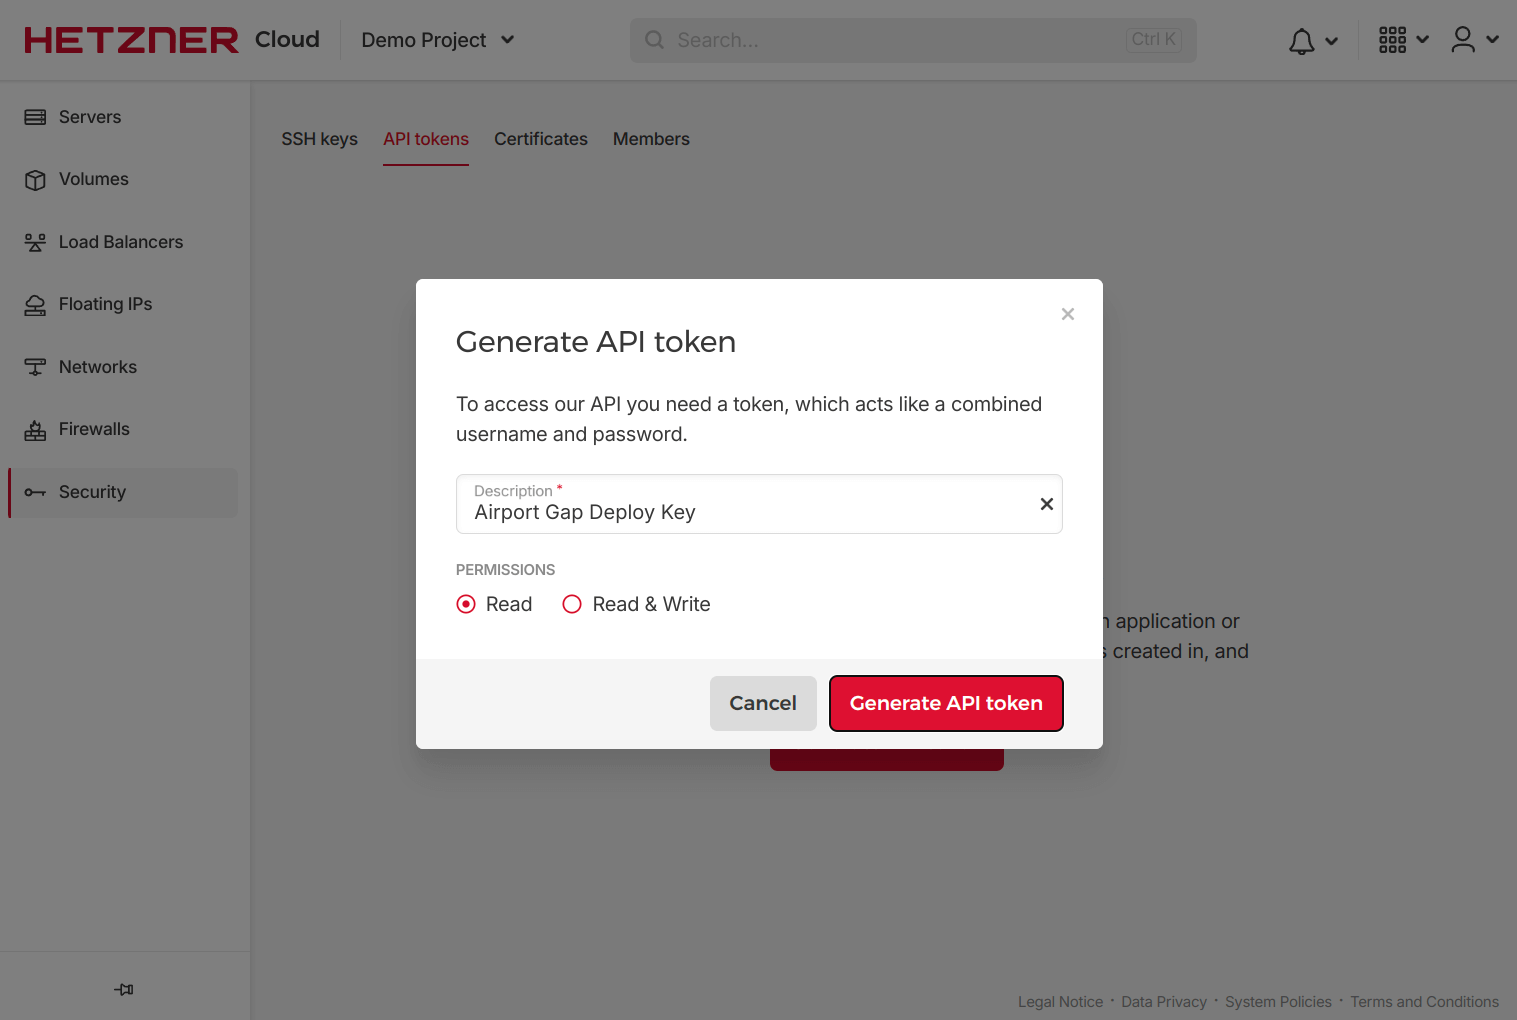
After generating an API token, it’s important to store it in a secure location, as we won’t have access to it once you close the modal.
Another step we’ll take on the Hetzner Cloud console is to add a public SSH key to easily access the server we’ll create with Terraform. We can add our local system’s key in the SSH keys section under the Security page in the Hetzner Cloud project. Clicking on the “Add SSH key” will pop up a modal to copy our public SSH key, add a descriptive name, and choose to make it the default key for all provisioned servers.
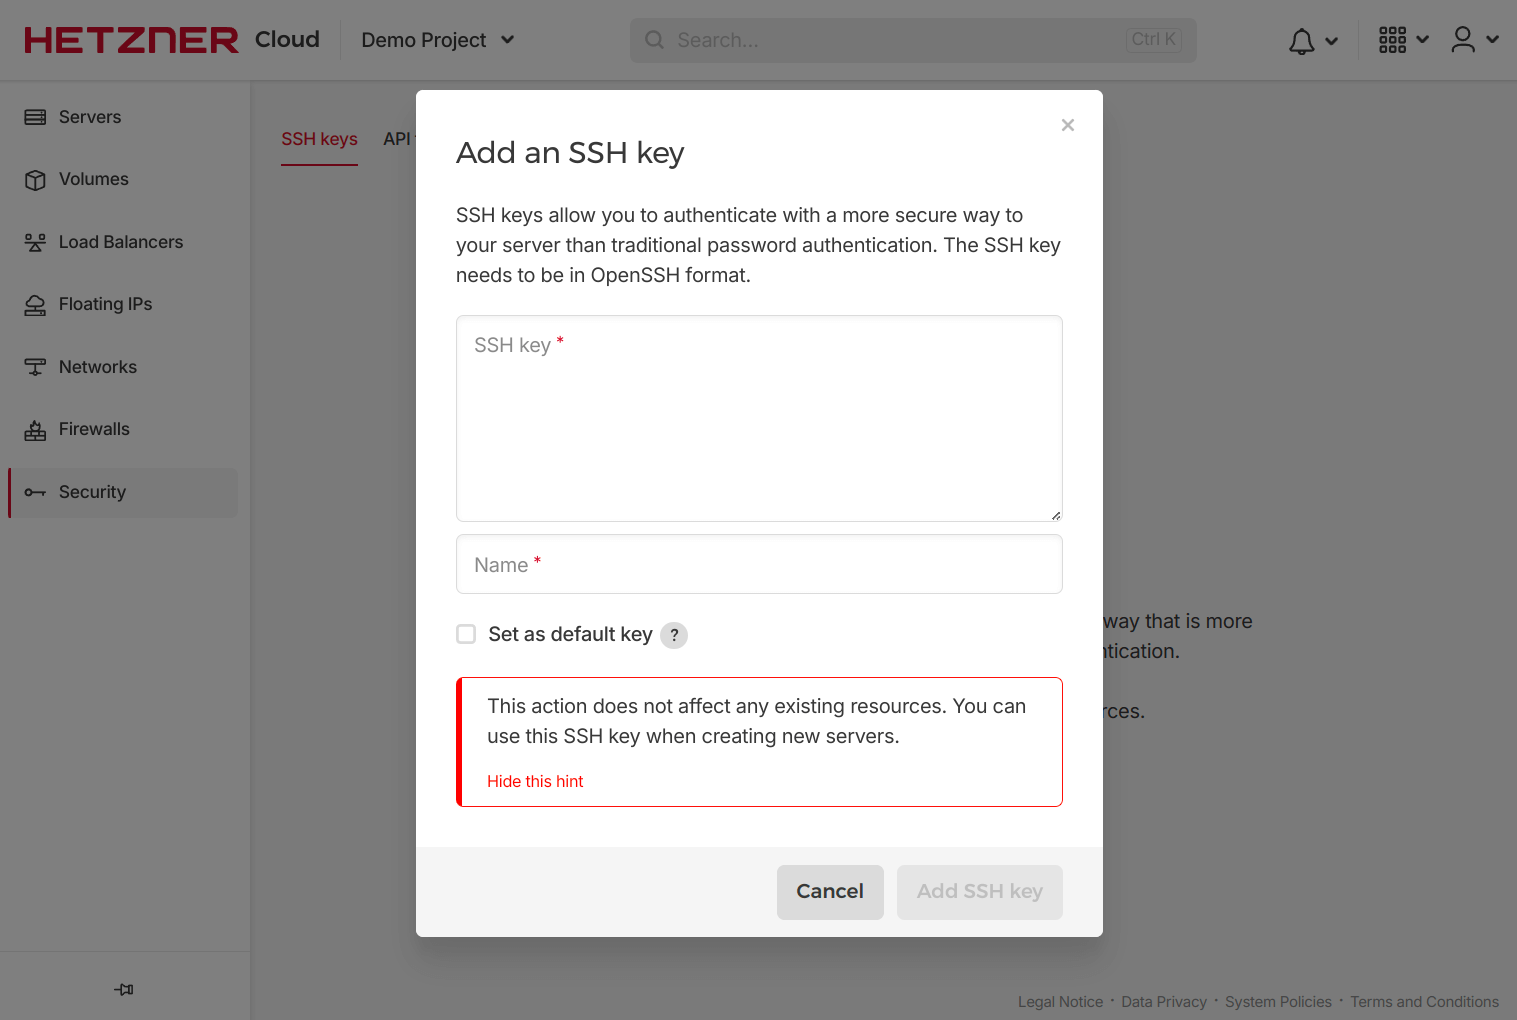
With these two steps, our Hetzner Cloud account is ready to use with Terraform.
Building Your Server Infrastructure With Terraform
For this article’s demonstration, I’ll create a separate code repository to hold the Terraform code used to generate all the resources for a Hetzner Cloud server. Depending on your project and team, you might want to add this code to your main application’s repo instead.
Starting with an empty project, we’ll create our main Terraform configuration file called main.tf. This filename follows standard naming conventions for Terraform projects and is considered the root module. More complex projects will use multiple modules, but that’s outside the scope of this article.
Configuring the Terraform provider
A Terraform project starts with a provider, which are plugins that interact with other services through their APIs. A provider allows Terraform to communicate with different services using a standard configuration. You’ll find Terraform providers for almost any cloud service out there. This project will use the Hetzner Cloud provider.
The documentation for this provider contains many examples of how to set it up and use it. First, we’ll set up our project with the terraform block to tell Terraform which providers we’ll use. We’ll also specify which version of the provider we want to use so anyone else using this Terraform configuration will have the same version to prevent any surprises.
We can get this information by clicking the “Use Provider” button on the provider’s documentation, which gives us the details on setting it up. We’ll copy and paste this terraform block and place it at the beginning of our main.tf file:
terraform {
  required_providers {
    hcloud = {
      source = "hetznercloud/hcloud"
      version = "1.46.1"
    }
  }
}
We also need to configure the provider to connect to our account. We’ll do that using the provider block in the Terraform configuration. Let’s copy this and place it after the terraform block:
terraform {
  required_providers {
    hcloud = {
      source = "hetznercloud/hcloud"
      version = "1.46.1"
    }
  }
}

provider "hcloud" {

}
The options used to configure a provider depend on the one you use. The documentation for each provider typically has an Argument Reference section to explain how to configure it. The Hetzner Cloud provider requires the token argument, which is the Hetzner Cloud API token we generated earlier. The provider can look up this information through an environment variable, but it’s better to set this up in the configuration so other engineers know how to configure their systems if they were to work on this project.
Since the API token is a sensitive piece of information, we won’t want to place it here in plain text. Instead, we’ll set it up as a variable so each contributor to the project can set it up on their systems. Inside the provider block, we’ll add the token argument and set the value as a variable called hetzner_cloud_api_token:
provider "hcloud" {
  token = var.hetzner_cloud_api_token
}
The var syntax tells Terraform that this is a variable, and we must declare it in our project. We can do that in this file, but the convention used in Terraform projects is to place this configuration in a separate file called variables.tf. We’ll create that file in the project and declare the variable using the variable block:
variable "hetzner_cloud_api_token" {
  sensitive = true
  type = string
  description = "Hetzner Cloud API Token"
}
This block requires a label to name our variable (hetzner_cloud_api_token). Inside the block, we’ll set a few arguments. These arguments are optional, but setting some of these for security and maintainability is a good practice.
The first argument is sensitive, which tells Terraform that this contains a value that Terraform shouldn’t show in its output. Since it’s a boolean argument, we’ll set this to true.
The following argument is the type to indicate the value type this variable can accept. The API token is a string, so we’ll use that here. Terraform will accept any data type if we don’t specify the type argument. It’s okay to omit this argument in this simple example, but it should be considered necessary for more complex Terraform configurations.
The last argument we’ll use here is the description, which serves as documentation to tell others about this variable. Again, for this simple example, a description is not necessary, but you should get into the habit of creating descriptions here to make it easier for others and yourself down the road.
With the variable declared, we’ll need to set the value somewhere. Terraform has a couple of ways of setting input variables:
- Through a command line option when running Terraform commands (like
terraform apply -var= "image_id=ami-abc123"). - Through special environment variables starting with
TF_VAR_that Terraform can pick up (likeTF_VAR_image_id=ami-abc123 terraform apply).
My preference for smaller projects like this is to create a separate file containing the values for your variables. Terraform automatically loads a file named terraform.tfvars, making setting these variables convenient.
In the project, we’ll create a new file called terraform.tfvars. This file uses the same syntax as setting arguments in Terraform, so we only need to add the name of our declared variable—in this case, hetzner_cloud_api_token—and put the secret value.
hetzner_cloud_api_token = "<API Token Goes Here>"
Given that we don’t want to expose our API token, we shouldn’t check in this file to a remote code repository, so make sure to add it to your .gitignore file or similar for your preferred version control system.
Initializing the Terraform project
We now have the Hetzner Cloud provider configured, so let’s initialize this Terraform project using terraform init. This command will download any providers we specified and set up the project’s initial state. After a few seconds, we’ll see a message saying we’re ready to use Terraform.
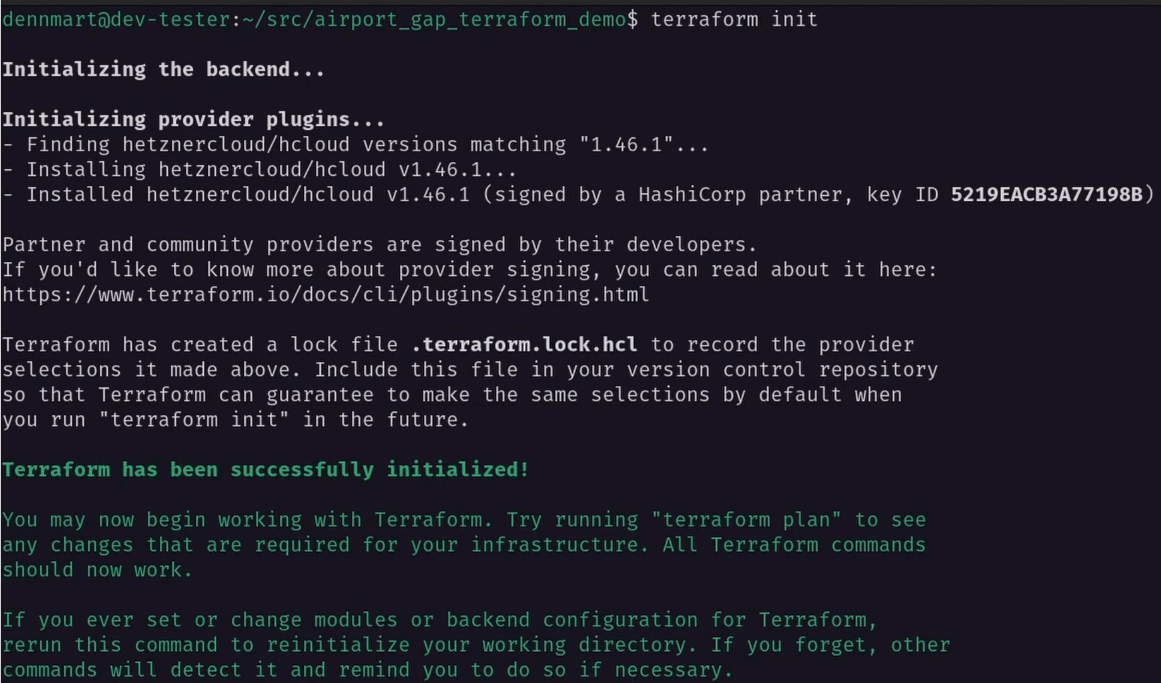
With the project initialized, we can return to setting up our cloud infrastructure and creating new resources.
Creating a Hetzner Cloud firewall
The purpose of this article is to spin up a new server. But before we get there, we’ll set up a couple of additional resources. First, we’ll want to begin securing our server by setting up a firewall that allows only web and SSH traffic to our servers. Hetzner Cloud offers its own firewall service that we can associate with any of our servers and manage using Terraform.
To manage a resource with Terraform, we’ll use the resource block. The block uses two labels. The first one indicates the resource type—in this case, a Hetzner Cloud firewall. The second label is a local name to describe this resource and use it as a reference in the configuration.
Go to the provider documentation to find the resource type to set in the Terraform configuration. On the left side of the documentation page, we have a text field to filter through the resources offered by the provider. If we filter by “firewall,” we’ll find a few resources.
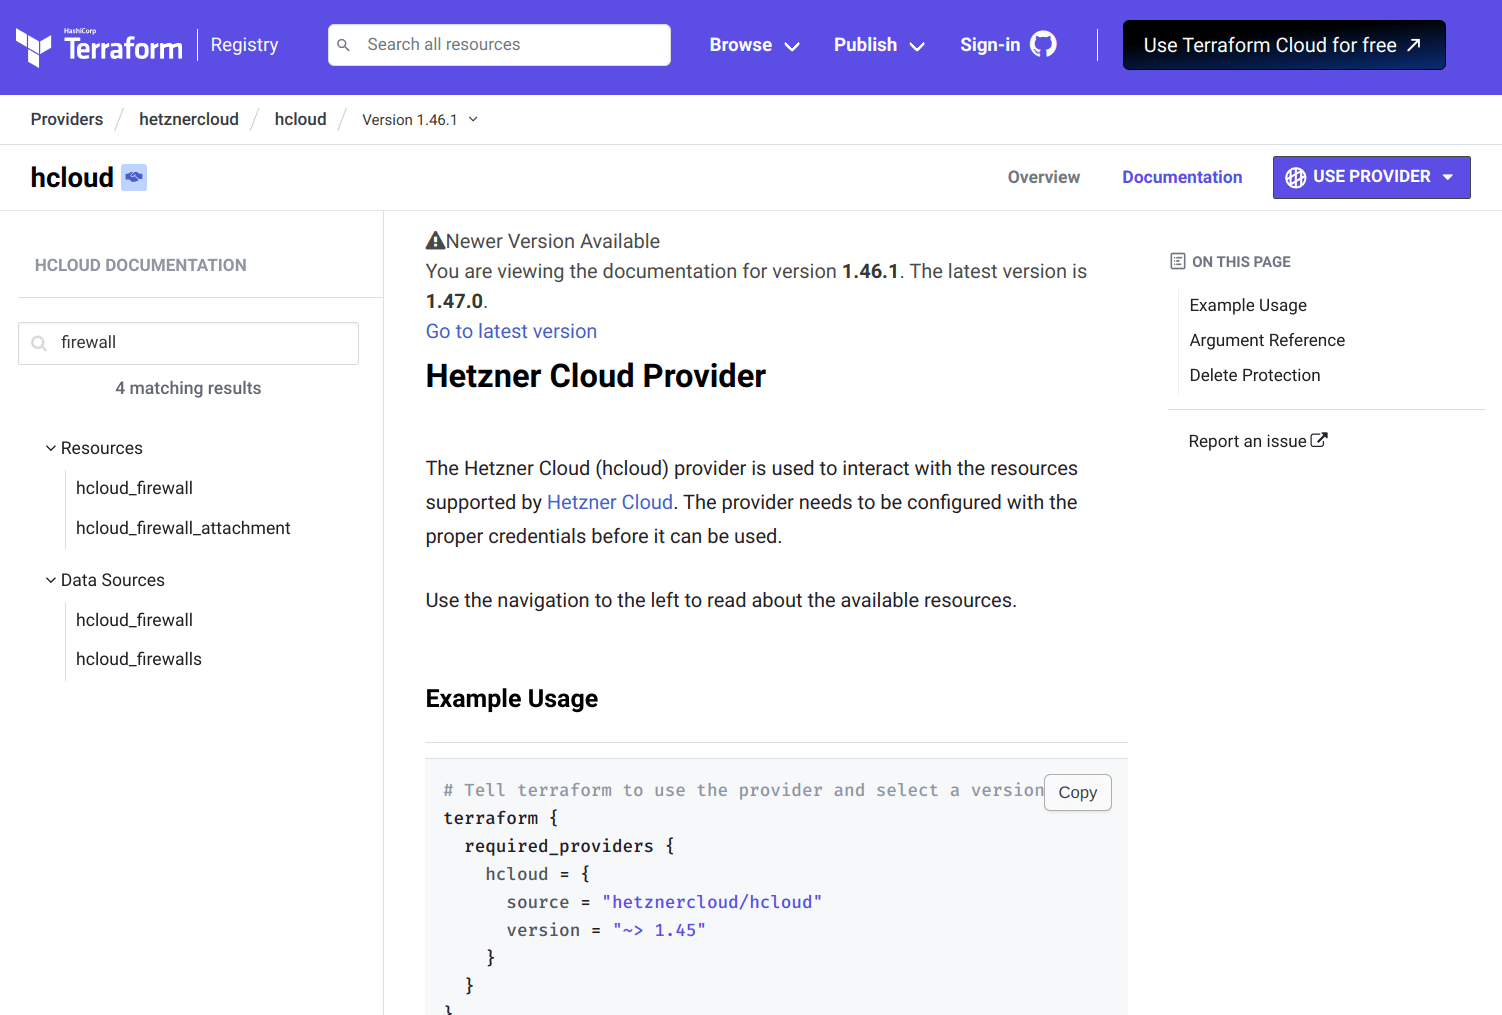
The resource we’ll look at here is the hcloud_firewall resource type. This resource lets us create a firewall on our Hetzner Cloud project. Inside the main.tf file, we can begin configuring this resource by adding the resource block at the end of the file and giving it a proper label since we’ll use it later:
resource "hcloud_firewall" "web_server_and_ssh" {

}
We’ll have to read the documentation for each resource type in Terraform to determine which parameters are required and which optional ones we want to include for our purposes. The hcloud_firewall resource does not require any arguments, but we’ll want to include a few to make the firewall do something useful. The first argument we’ll set is the name to help us identify it in the Hetzner Cloud console.
resource "hcloud_firewall" "web_server_and_ssh" {
  name = "Web Server and SSH"
}
We’ll also want to add some rules to tell the firewall what kind of traffic we want to allow. We’ll set up our first firewall rule to allow traffic on port 80 for non-secure HTTP traffic. We can manage this using the rule argument, a block containing additional configuration. Some of the rule arguments are required, so we’ll have to include those if setting up rules.
The required rule arguments are the following:
direction: This argument defines whether to allow inbound to the server or outbound traffic from it. For this rule, we want to enable HTTP traffic into the server, so the value of this argument is “in”.protocol: This argument defines the protocol for the firewall rule. Since we’ll use this rule to handle web server traffic, we’ll specify the protocol as “tcp.”port: We’ll also need to tell the firewall which port to allow traffic into. For non-secure HTTP traffic, the port is “80”.source_ips: This argument is a list of the IP addresses that the firewall should allow through. Because this is a rule for public inbound traffic, we’ll want any IP address to go through, which is defined using the CIDR “0.0.0.0/0” and “::/0”, since we’ll allow both IPv4 and IPv6 connectivity to the server.
An optional argument we’ll also include for the rule is the description to let us describe it. After setting all these arguments, the resource block for the Hetzner Cloud firewall will contain the following configuration:
resource "hcloud_firewall" "web_server_and_ssh" {
  name = "Web Server and SSH"

  rule {
    description = "Allow HTTP traffic"
    direction   = "in"
    protocol    = "tcp"
    port        = "80"
    source_ips = [
      "0.0.0.0/0",
      "::/0"
    ]
  }
}
We’ll also want to set up similar rules to allow HTTPS and SSH traffic through all IP addresses. We can duplicate the existing rule argument multiple times inside of the resource block, changing the description and port values appropriately:
resource "hcloud_firewall" "web_server_and_ssh" {
  name = "Web Server and SSH"

  rule {
    description = "Allow HTTP traffic"
    direction   = "in"
    protocol    = "tcp"
    port        = "80"
    source_ips = [
      "0.0.0.0/0",
      "::/0"
    ]
  }

  rule {
    description = "Allow HTTPS traffic"
    direction   = "in"
    protocol    = "tcp"
    port        = "443"
    source_ips = [
      "0.0.0.0/0",
      "::/0"
    ]
  }

  rule {
    description = "Allow SSH traffic"
    direction   = "in"
    protocol    = "tcp"
    port        = "22"
    source_ips = [
      "0.0.0.0/0",
      "::/0"
    ]
  }
}
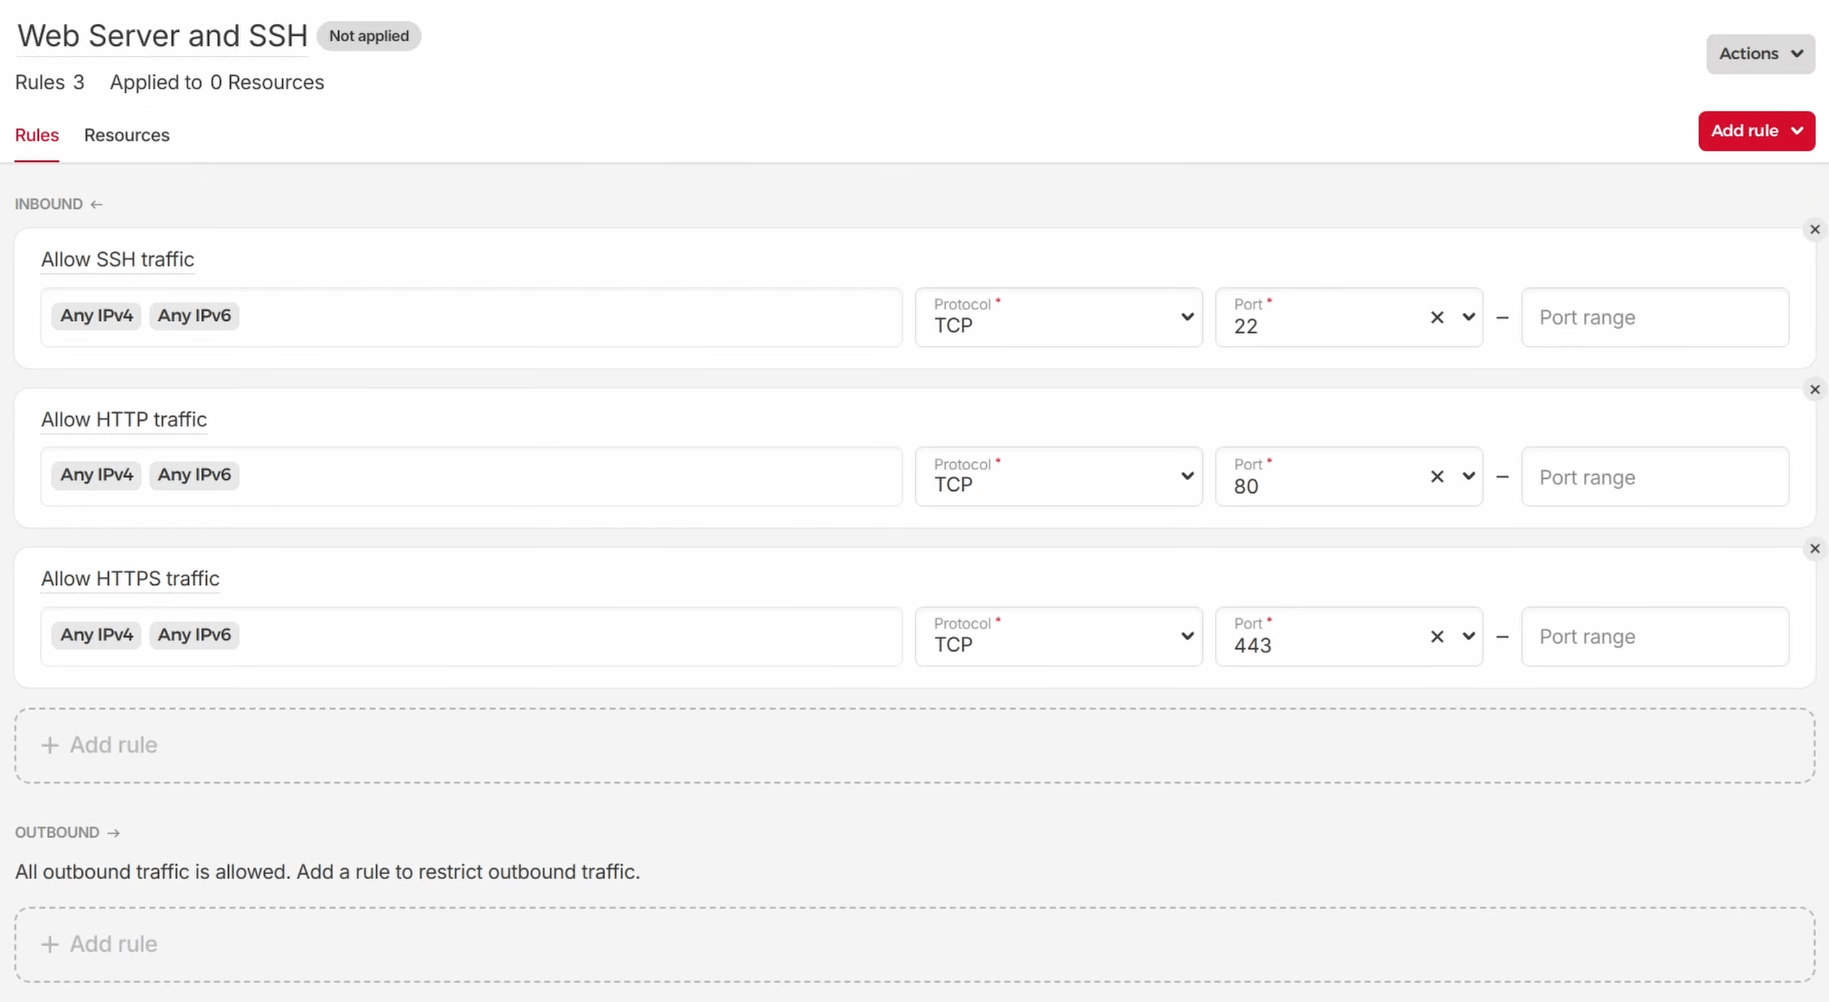
With this, we should now be able to manage our Hetzner Cloud firewall through Terraform. Let’s check that everything is working before adding more resources.
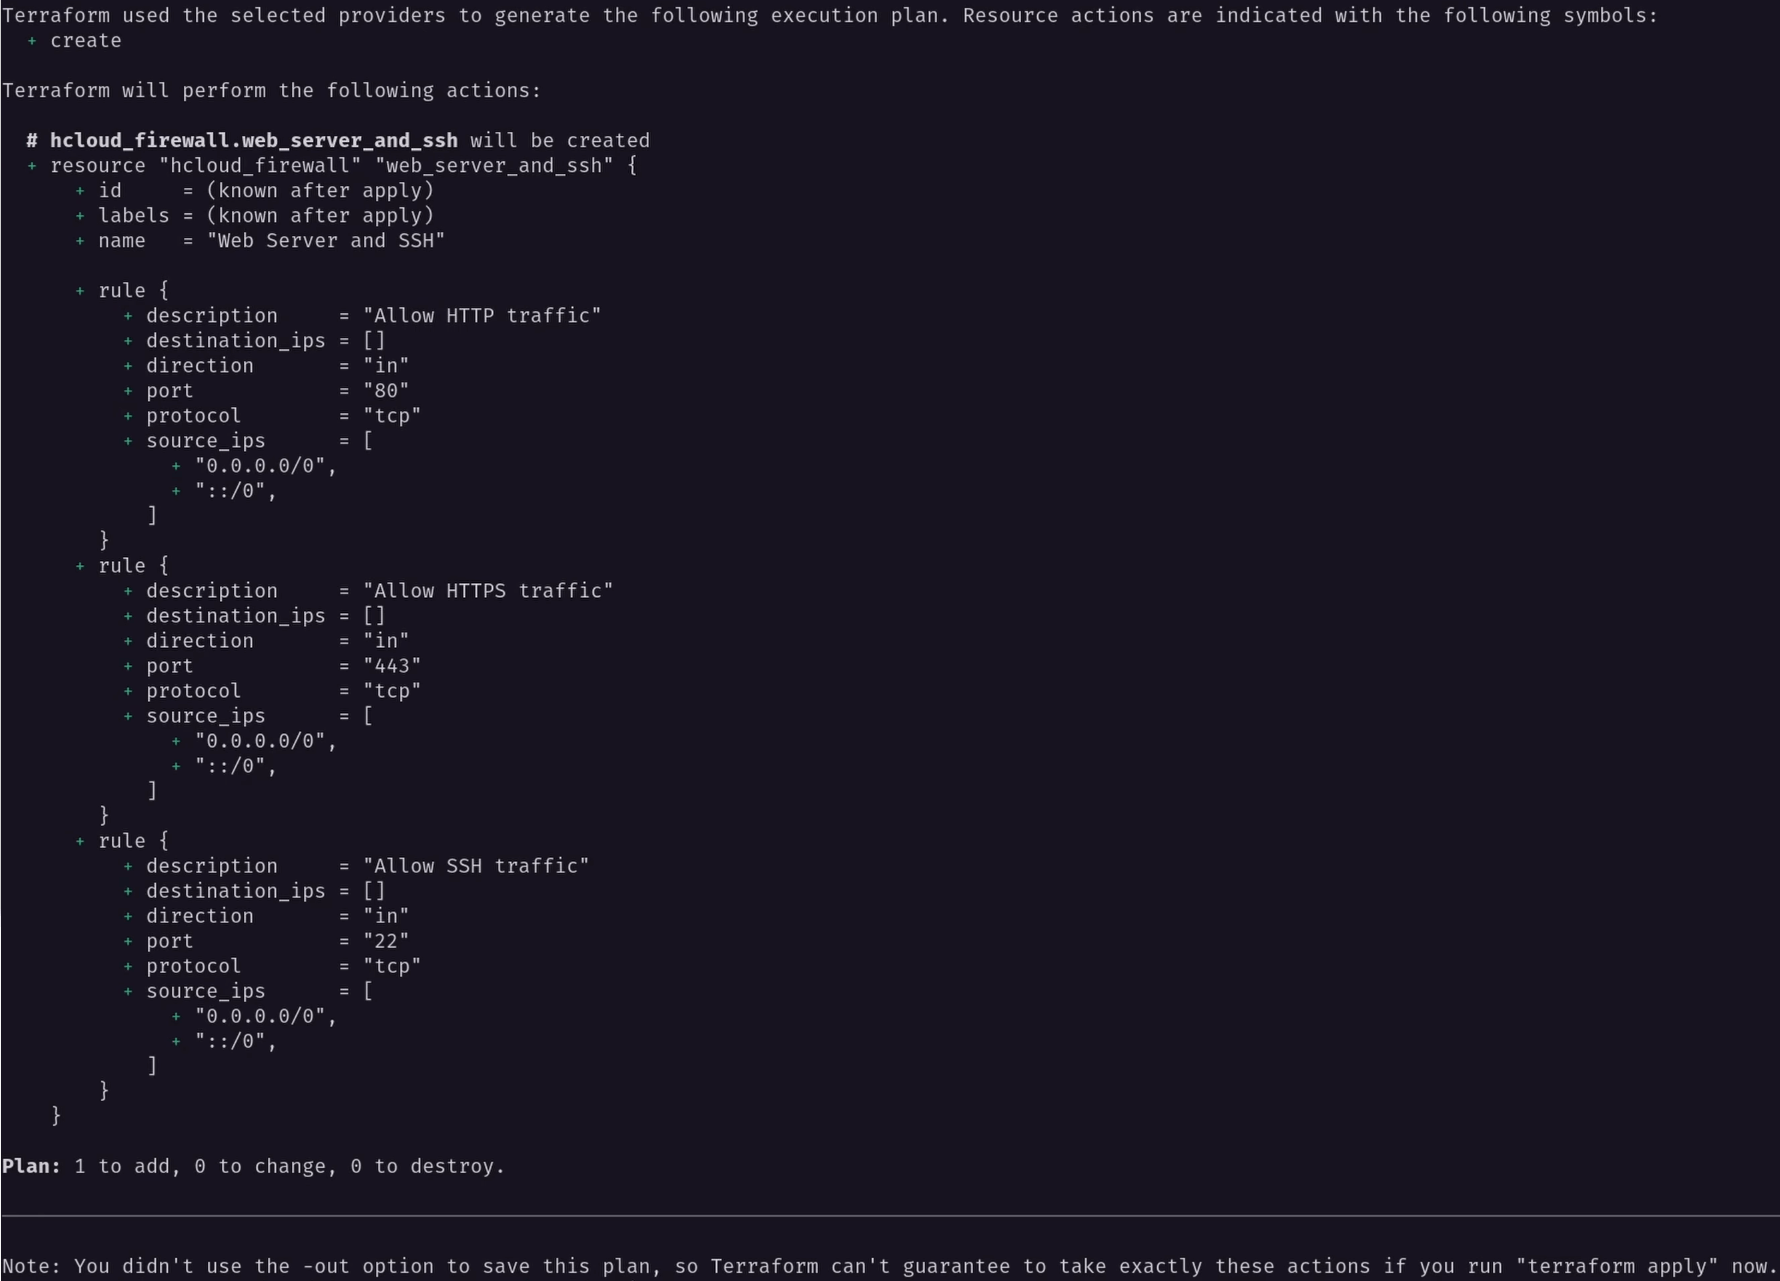
Applying infrastructure changes using Terraform
In the terminal, we’ll run the terraform plan command to check that our configuration is working. This command creates an execution plan, which shows you what changes Terraform will make when applying them to our current infrastructure. Running this command is an excellent safeguard to ensure we don’t mess up our existing infrastructure. Since we don’t have anything in our current state for this Terraform project, Terraform will tell us it will create a new firewall based on our configuration.
This output looks okay, so let’s go ahead and apply it to our Hetzner Cloud account. We’ll run the terraform apply command, which shows the execution plan again and asks if we want to apply it. Typing in “yes” will allow Terraform to create the resource. After a few seconds, we’ll see that the operation completed successfully and generated a new firewall on Hetzner Cloud.

We’ll see our fully configured firewall if we return to the Hetzner Cloud console and go to the Firewalls section.
Creating a private network on Hetzner Cloud
Let’s move on to our next resource. We can jump into creating a new cloud server now if we want, but before that, let’s make a private network to use on our server. This step is entirely optional, and you may not need a private network for your use case. Sometimes, a private network will help secure your applications by not exposing services like databases to the public Internet. We’ll create one to demonstrate how to set them up using Terraform.
The hcloud_network resource type sets up a private network we can attach to a server. Let’s add a new resource block containing the required arguments for it:
resource "hcloud_network" "airport_gap_private_network" {
  name     = "Airport Gap Private Network"
  ip_range = "10.0.0.0/16"
}
The resource type, identified by “airport_gap_private_network”, takes two arguments:
name: A descriptive name for the private network.ip_range: A defined private IPv4 range for our network.
In the example shown above, we’re setting the IP range using the CIDR “10.0.0.0/16”, which is a bit overkill in most cases since it gives us access to IPs between 10.0.0.0 and 10.0.255.255. If desired, you can reduce this range, but we’ll keep it for this demonstration.
This resource block defines our private network, but we must also specify a subnet to allocate IP addresses. We can manage this on Terraform using the hcloud_network_subnet resource type from the Hetzner Cloud provider. This resource contains a few required arguments:
type: Hetzner Cloud offers a few network types, depending on the resource you’ll use with the private network. We’ll use this network on a cloud server, so the value should be “cloud”.network_id: The ID of the private network we created using Terraform. We can reference this ID usinghcloud_network.airport_gap_private_network.id, which contains the resource type, the identifying label, and the attribute for that resource managed by Terraform. You can find these attributes in the provider documentation.network_zone: This argument defines the location of the private network. The value here depends on the location of the cloud servers. Later in this article, we’ll create a server in Hetzner Cloud’s “us-west” network zone.ip_range: Similar to the same argument for thehcloud_networkresource, we’ll define the range of allocated IP addresses to use for the private network. The private network allows us to assign IPs in the 10.0.0.0/16 range. I’ll take a slice of that and allocate addresses using the CIDR notation of “10.0.1.0/24”, which gives us 256 IP addresses from 10.0.1.0 to 10.0.1.255.
We’ll set these arguments in our main.tf file:
resource "hcloud_network_subnet" "airport_gap_private_network_subnet" {
  type         = "cloud"
  network_id   = hcloud_network.airport_gap_private_network.id
  network_zone = "us-west"
  ip_range     = "10.0.1.0/24"
}
These resources will create a private network and give us a batch of IP addresses we can use for our server later. Again, we can ensure everything is configured correctly by going to the terminal and running the terraform plan command to confirm it will only create a private network and subnet. Once we confirm everything is okay, running terraform apply will create the network and subnet, which we can confirm on the Hetzner Cloud console.

We’ve created a firewall and a private network, so it’s time to finally use them on a server. Let’s see how we can make one with Terraform.
Create a new server on Hetzner Cloud using Terraform
The hcloud_server resource type for the Hetzner Cloud provider will manage our cloud server using Terraform. We have many ways to configure a new Hetzner Cloud server, so I encourage you to read their documentation for this resource type to view examples and understand the different options available by the provider.
Like most resource types, the hcloud_server resource type requires a few arguments. The first argument we’ll set up is name, which is the server’s hostname. It must be unique for your project and follow RFC 1123 standards. For this example, we’ll call it “airportgap”.
Next, we’ll configure the server_type argument to define the type of cloud server we’ll spin up. Hetzner Cloud offers a variety of cloud servers with different specs to fit your needs. We can get this information programmatically through the server_types data source, which fetches this information and lets us use it in our Terraform configuration. Handling that is out of the scope of this article. Instead, I’ll find a server from the Hetzner Cloud documentation like the CPX21 server type and use this value in lowercase letters as the value of our argument (“cpx21”).
The last required argument is the image for managing which operating system image we want to use. The Hetzner Cloud documentation contains the existing Linux distributions they maintain. The list of operating systems is available in the hcloud_images data source, but we’ll again set it up directly to keep things simple in this article. For this example, we’ll use Ubuntu 22.04, which we can define in lowercase letters and with a dash replacing the space so that the value will be “ubuntu-22.04”.
The last argument we’ll configure is location, which defines the data center location to provision our server. This argument is optional if we don’t use a specific data center. We can also find this value programmatically with the hcloud_locations data source, but it’s easier to get this in the docs. Earlier, we set up a private network for our server in the “us-west” location, so we’ll want to place our server in the same region. Looking at the current Hetzner Cloud locations, we only have one location in this region (Hillsboro, Oregon) defined as “hil”. We’ll use this value for the location.
That takes care of the required arguments for creating a new server. Here’s how our hcloud_server resource looks for now:
resource "hcloud_server" "airport_gap" {
  name = "airportgap"
  server_type = "cpx21"
  location = "hil"
  image = "ubuntu-22.04"
}
While we can run terraform apply now, we have some optional things to set up.
Setting up the SSH key and firewall for our new server
First, we’ll want to ensure our server has our SSH key when it’s created so we can immediately access it. We can do that by setting up the ssh_keys argument. This argument uses a list of SSH key IDs we set up in our account. We already set up our SSH key on the Hetzner Cloud project earlier, so now we must fetch the ID.
For this value, we’ll fetch it programmatically by using the hcloud_ssh_key data source since we don’t have direct access to it. Setting up a data source in Terraform is similar to setting up resources. We create a new data block with the type of hcloud_ssh_key, and set an identifier of airport_gap_ssh_key. The data source lets us fetch an SSH key from Hetzner Cloud using an ID (which we don’t have), a fingerprint, or other selectors. We’ll fetch the key by name since this information is easily accessible.
The argument we’ll use in this block is name, so we’ll set that here:
data "hcloud_ssh_key" "airport_gap_ssh_key" {
  name = "Airport Gap Deploy Key"
}
We can now use this data source as a reference to get the information we need, similar to how we got the private network ID earlier in this video. Going back to the hcloud_server resource block, we can add the ssh_keys argument, with a list a list containing the ID returned by the data source, which is data.hcloud_ssh_key.airport_gap_ssh_key.id:
resource "hcloud_server" "airport_gap" {
  name = "airportgap"
  server_type = "cpx21"
  location = "hil"
  image = "ubuntu-22.04"
  ssh_keys = [data.hcloud_ssh_key.airport_gap_ssh_key.id]
}
It’s important to note that referring to data sources in Terraform differs slightly from referring to managed resources. We have to use data as part of the identifier for a data source, whereas for resources, you start with the resource type.
The next time we run terraform plan or terraform apply, the Hetzner Cloud provider will fetch the SSH key information from our account and set it up when creating the server. That way, we can log in to the server immediately upon creation.
Another thing we need to set up on our server is the firewall. We can do that using the firewall_ids argument. As the name suggests, it accepts a list of IDs referring to the firewalls we have in our project. We’re using Terraform to manage our firewall for this server, and we can use it as a reference. All we need to do is create a list using the ID from the resource we set up earlier, which is hcloud_firewall.web_server_and_ssh.id:
resource "hcloud_server" "airport_gap" {
  name = "airportgap"
  server_type = "cpx21"
  location = "hil"
  image = "ubuntu-22.04"
  ssh_keys = [data.hcloud_ssh_key.airport_gap_ssh_key.id]
  firewall_ids = [hcloud_firewall.web_server_and_ssh.id]
}
Configuring a private network on a Hetzner Cloud server using Terraform
The last thing we want is to set up our private network so that the newly created server gets a private IP address allocated to it. We can do this with the network block argument inside our resource. The network block requires the network_id argument. Since we’re managing the private network with Terraform, we can get this ID by grabbing the reference from our resource, which is hcloud_network.airport_gap_private_network.id:
resource "hcloud_server" "airport_gap" {
  name = "airportgap"
  server_type = "cpx21"
  location = "hil"
  image = "ubuntu-22.04"
  ssh_keys = [data.hcloud_ssh_key.airport_gap_ssh_key.id]
  firewall_ids = [hcloud_firewall.web_server_and_ssh.id]

  network {
    network_id = hcloud_network.airport_gap_private_network.id
  }
}
The network block also accepts additional arguments like specifying a private IP address, but we’ll let Hetzner Cloud automatically assign one for us.
Now, there’s one hidden gotcha here. When applying changes to your infrastructure, it doesn’t run your configuration sequentially. Terraform is pretty good at automatically inferring the order in which to create the defined resources. It analyzes the configuration, and based on how we’re referencing our resources, it’ll attempt to generate the resources in the correct order based on their dependencies.
For example, in the hcloud_server resource block, we’re referencing the firewall ID and the private network ID. Terraform will read the main.tf file and do its best to get those resources created before attempting to create the server. However, in some cases, this automatic analysis won’t work as expected in all scenarios. Attaching the network to our server is one such situation.
Here, Terraform will create the private network and then proceed with creating the server. However, the server will also need to create the private network subnet before attaching it to the server. Terraform might attempt to generate both resources simultaneously since we’re not explicitly referring to our subnet in the configuration. Applying changes in this order may result in the server creation failing if the subnet isn’t available for the private network.
Terraform provides the depends_on argument to handle these dependencies, which lets us explicitly specify any dependencies a resource needs. When creating a new server on Hetzner Cloud and attaching it to a network, we need to make sure to create the subnet first, so let’s add this to our configuration by creating a new list and setting the subnet resource as a dependency:
resource "hcloud_server" "airport_gap" {
  name = "airportgap"
  server_type = "cpx21"
  location = "hil"
  image = "ubuntu-22.04"
  ssh_keys = [data.hcloud_ssh_key.airport_gap_ssh_key.id]
  firewall_ids = [hcloud_firewall.web_server_and_ssh.id]

  network {
    network_id = hcloud_network.airport_gap_private_network.id
  }

  depends_on = [
    hcloud_network_subnet.airport_gap_private_network_subnet
  ]
}
Note that when setting an explicit dependency using depends_on, we’ll use the resource type and identifier without any attributes like id, as we did earlier in this article when referring to other resources and data sources.
Bring your Hetzner Cloud server to life using Terraform
With this, we have completed our server setup using Terraform. All that’s left is to run terraform plan to check that everything is configured correctly. If there aren’t any errors, we can go ahead and apply these changes with terraform apply. After a short while, we should have a brand new cloud server spun up and ready to use.

Going to the Servers section in the Hetzner Cloud console, we can see the new server and all our information set up correctly.

To ensure the server is active, we can copy the public IP address and access the server through SSH as the root user, which is the default user configured in Hetzner Cloud’s Ubuntu 22.04 servers. Since we configured the SSH key to use in the Terraform configuration, we should have immediate access to the server.
From here, you can begin configuring your brand-new server to meet your needs. Some next steps you can take are to secure the server by disallowing password logins through SSH, creating separate user accounts, and installing any dependencies you need for your applications.
Summary
This article demonstrates how helpful Infrastructure as Code tools like Terraform are for quickly setting up the infrastructure for different environments. At first, it might seem like using these tools is slower than clicking on a few buttons on your cloud provider’s dashboard. Defining your systems as code eliminates guesswork about their operation. It’ll save you a ton of time and make your DevOps processes easier to manage. The time you spend on this configuration is well worth the effort in any organization.
You can find the code used in this article in the dennmart/airport_gap_terraform_demo repository on GitHub.
Looking for help with your DevOps processes?
If you need assistance with your DevOps processes, I’m here to help. As an AWS Certified DevOps Engineer and a Hashicorp Certified Terraform Associate with over 20 years of professional experience working with startups across the globe, I can help your team build and improve your systems for the long haul.
Schedule a time with me today to discuss how we can work together and make your DevOps processes better than ever.
Screencast
If you enjoyed this article or video, please consider subscribing to my YouTube channel for more tips on helping Rails developers ship their code with more confidence, from development to deployment.