One of the downsides of using Kamal for deploying your web applications, compared to using a platform as a service like Heroku, is that you’re now fully responsible for the safety of your application’s data. That means you’ll need to set up processes that’ll help you get back up and running without data loss if something were to happen to your running database—and believe me, disaster can strike at any time.
In a previous article titled Hassle-Free Automated PostgreSQL Backups for Kamal Apps, I showed how to automate backups for your PostgreSQL databases when using Kamal to deploy your apps. The process described in that article takes snapshots of your running database and stores the data dump to an Amazon S3 bucket.
In this article, I’ll cover another method of keeping a copy of your data. When setting up PostgreSQL’s replication functionality, you can have your primary database server automatically copy all its data to another server in real-time, ensuring that you’ll have all your data in separate servers.
Since PostgreSQL is one of the most-widely used databases, it’s essential to know your options to make more informed decisions about backups and restoration for your disaster recovery plan—you do have one, don’t you? If you don’t, then this is a good starting point. Let’s see how we can get replication working in a Kamal deployment.
Example Kamal Configuration Used for This Article
As an example for this article, I’ll use a Ruby on Rails app I built called TeamYap, which is an app to complement my book End-to-End Testing with TestCafe. This application uses Kamal for its deployments.
The configuration set up for my deployments is a fairly typical one for a Rails application:
service: teamyap
image: ghcr.io/dennmart/teamyap

servers:
  web:
    - 123.123.123.123
  worker:
    hosts:
      - 123.123.123.123
    cmd: bundle exec sidekiq -q default -q mailers

proxy:
  ssl: true
  host: teamyap.app

registry:
  server: ghcr.io
  username: dennmart
  password:
    - KAMAL_REGISTRY_PASSWORD

builder:
  arch: amd64

env:
  clear:
    APPLICATION_HOST: teamyap.app
    JEMALLOC_ENABLED: true
  secret:
    - RAILS_MASTER_KEY
    - DATABASE_URL
    - REDIS_URL
    - SENTRY_DSN
    - SENTRY_ENVIRONMENT
    - SIDEKIQ_USERNAME
    - SIDEKIQ_PASSWORD

accessories:
  db:
    image: postgres:17
    host: 123.123.123.124
    port: 10.0.1.2:5432:5432
    env:
      secret:
        - POSTGRES_DB
        - POSTGRES_USER
        - POSTGRES_PASSWORD
    directories:
      - data:/var/lib/postgresql/data

  redis:
    image: redis:7
    host: 123.123.123.123
    port: 10.0.1.1:6379:6379
    directories:
      - data:/data
I have a server running the web application process and a worker process, and I have all my configuration settings for the app set up as environment variables. The configuration also contains a couple of accessories—a database accessory that runs PostgreSQL and a Redis instance for my worker process. The PostgreSQL server is on a separate server to make it easier to manage.
Currently, the Rails application has all its data in a single database instance. I want to update this by setting up a replica database with a standby server in case something goes wrong with my existing database. Let’s get that working through Kamal.
Step 1: Create a Replication Role on the Primary Database
The first thing to do is set up a new database role or user in the primary PostgreSQL database to allow the replica database to connect to it. The role will be a replication role, which, at a high level, is a special type of role that can manage replication slots, allowing PostgreSQL to handle how it copies data between replica databases.
Because the replication role is highly privileged since it has access to your entire database, I’ll set up the role details as Kamal secrets to access them in the container.
In the env section of the existing database accessory, I’ll add two new environment variables and set up the values for these in the .kamal/secrets file:
REPLICATION_USERREPLICATION_PASSWORD
accessories:
  db:
    image: postgres:17
    host: 123.123.123.124
    port: 10.0.1.2:5432:5432
    env:
      secret:
        - POSTGRES_DB
        - POSTGRES_USER
        - POSTGRES_PASSWORD
        - REPLICATION_USER
        - REPLICATION_PASSWORD
    directories:
      - data:/var/lib/postgresql/data
Once the environment variables and secrets are ready, I’ll reboot the database instance with kamal accessory reboot db to place those values in the container.
Next, I’ll manually log into the container’s shell to create the replication role with a SQL query. Ideally, we’d run SQL queries through an initialization script or some other automated way. However, since this is an already-running database, I’ll show how to do it manually for this example.
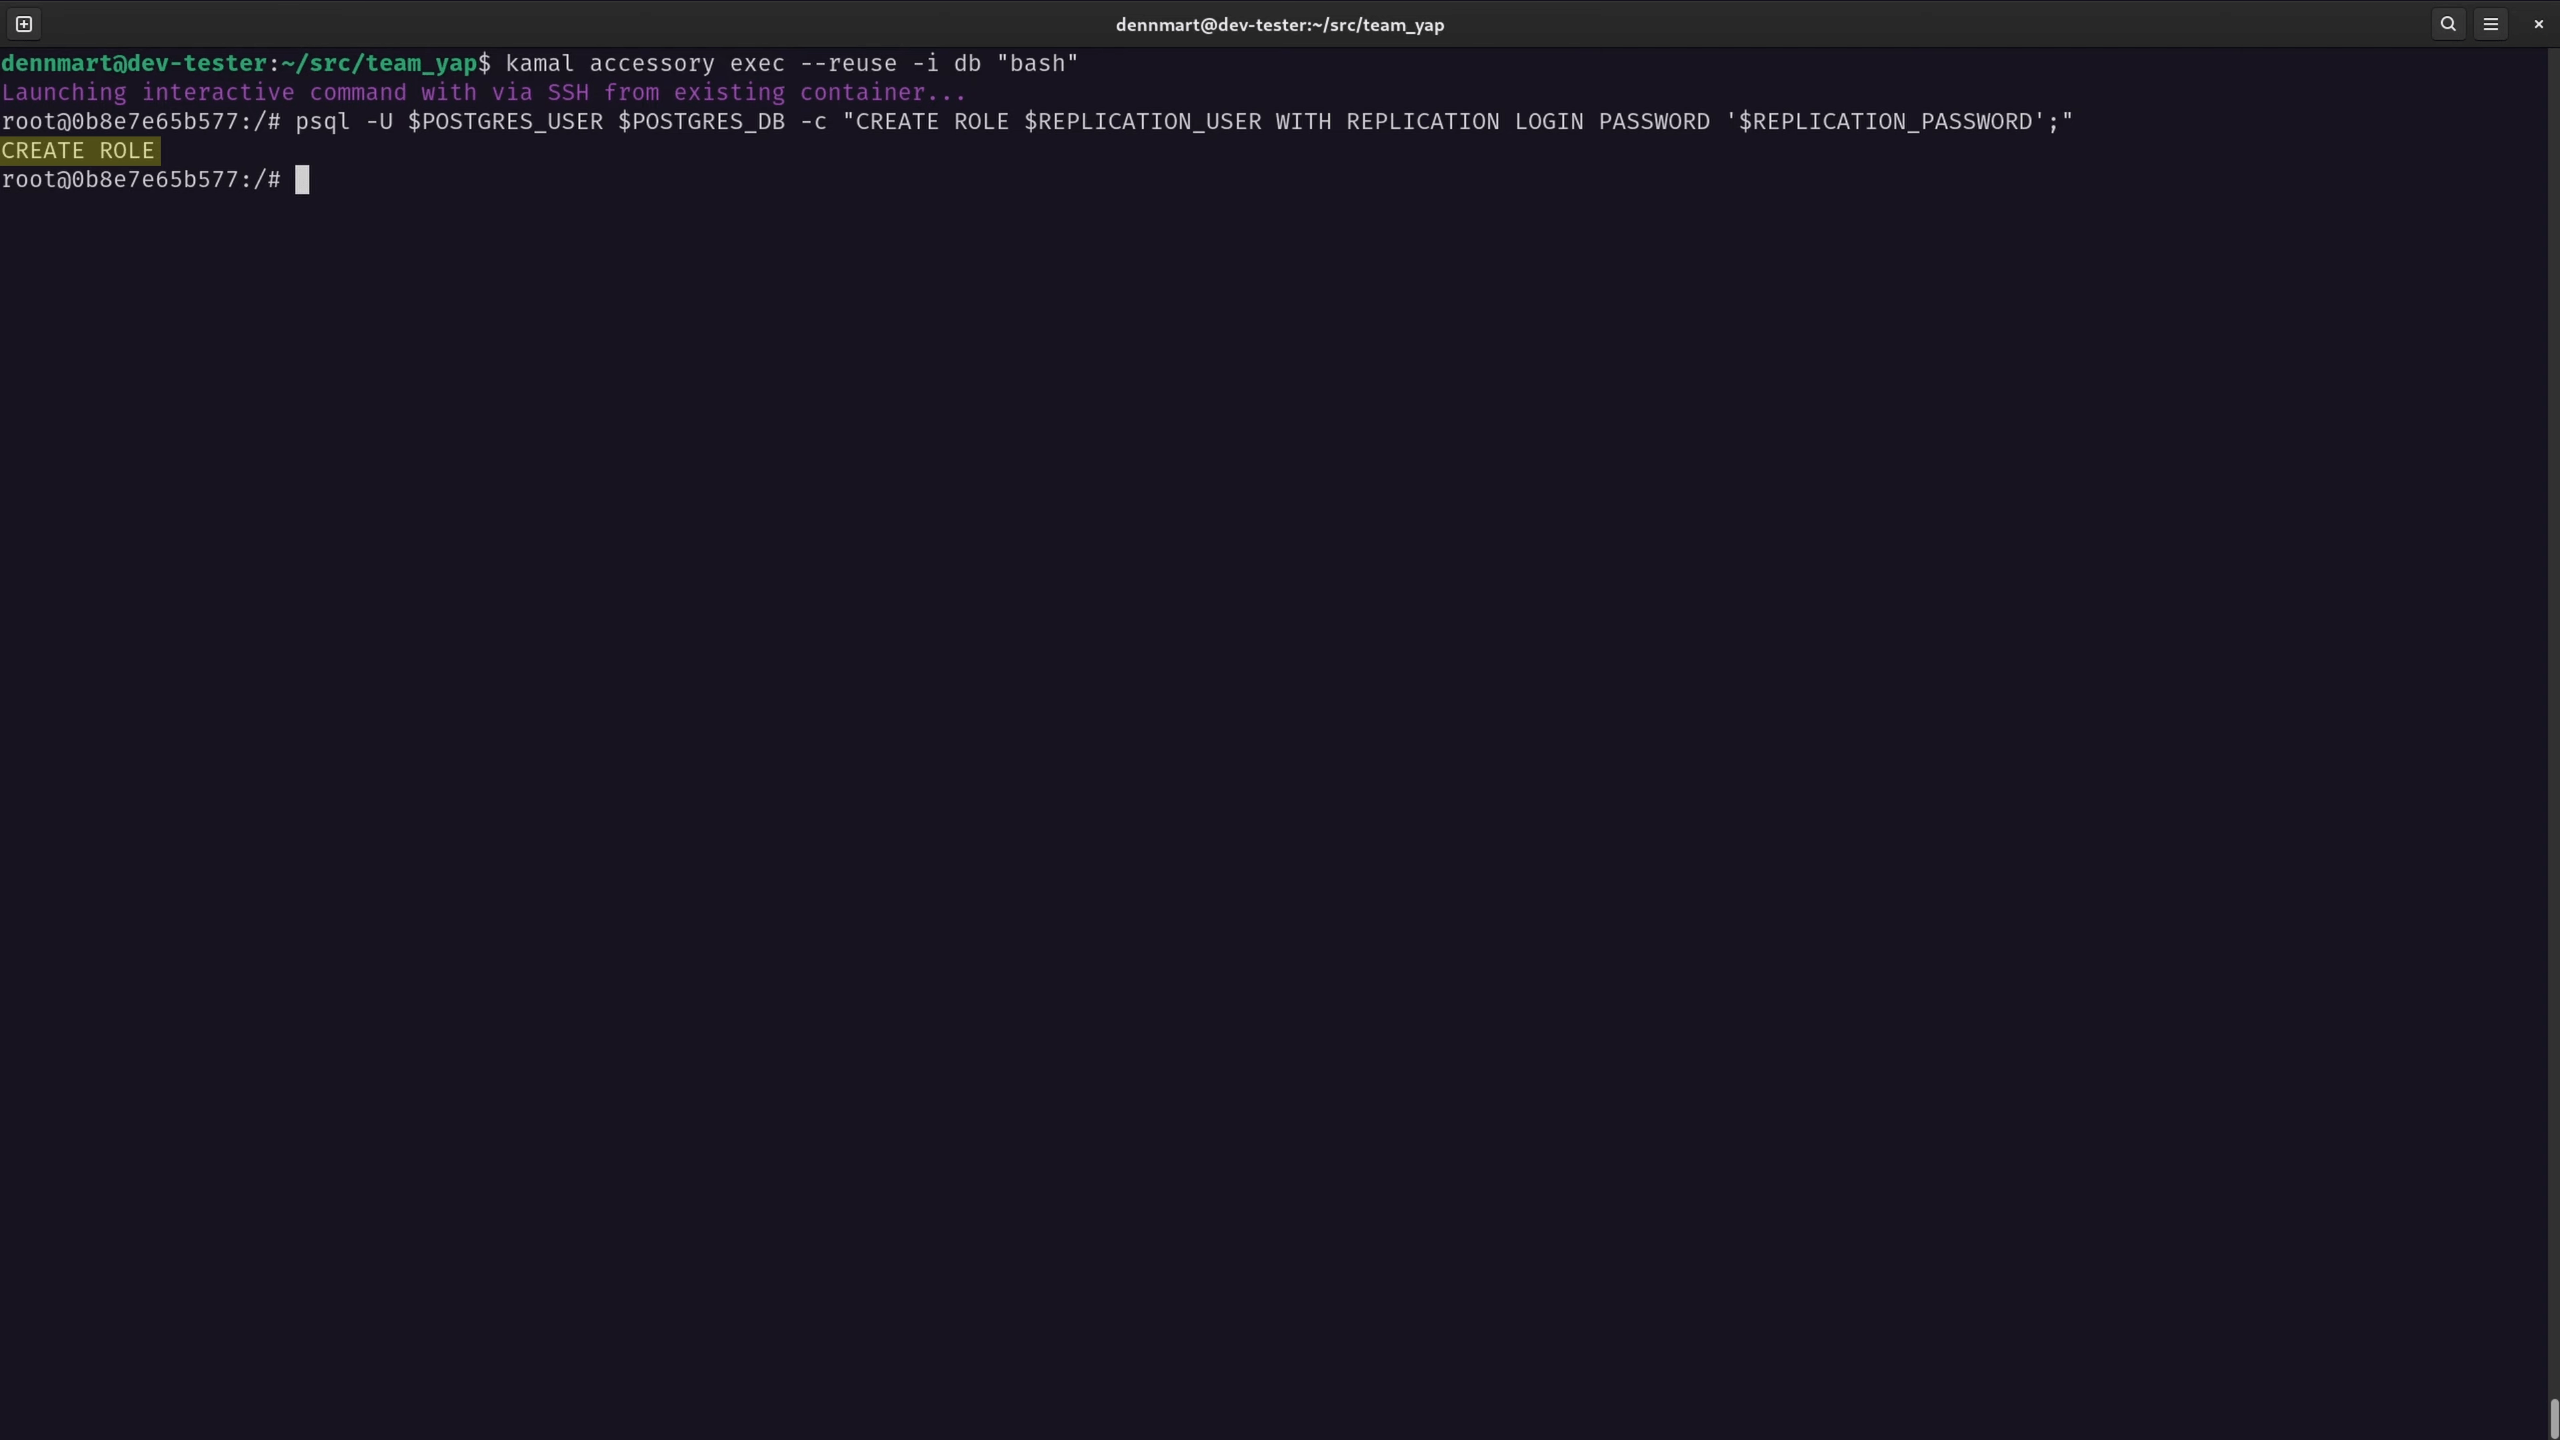
We can access the container’s shell by running kamal accessory exec --reuse -u db "bash", making sure to use the --reuseflag so it doesn’t spin up a separate container, and the`-i’ flag to run the command in interactive mode.
In the container’s shell, I’ll run the following command to execute the query and create the new role:
psql -U $POSTGRES_USER $POSTGRES_DB \
  -c "CREATE ROLE $REPLICATION_USER WITH REPLICATION LOGIN PASSWORD '$REPLICATION_PASSWORD';"
The psql command is PostgreSQL’s client that connects to the local database server. I’ll log in with the superuser account created when the PostgreSQL Docker container spins up and set in the Kamal deployment through the POSTGRES_USER environment variable. We can access the value set for the environment variable when specifying the -U flag. I’ll also connect to the database for our application using the value of the POSTGRES_DB environment variable, which I also set up through Kamal.
We don’t need a password here since the PostgreSQL Docker container sets up trust authentication when accessing the database server locally. I’ll briefly talk about this later in the article.
The -c flag indicates that I want to execute a SQL query. The reason I’m using the -c flag to execute the query instead of doing it after logging in to the database server using the psql client is that I want to use the environment variables I set up in Kamal for the replication role. I can grab these values when running a command from the shell but not from the PostgreSQL client utility.
I’ll break down the SQL query used in this example (CREATE ROLE $REPLICATION_USER WITH REPLICATION LOGIN PASSWORD '$REPLICATION_PASSWORD';):
CREATE ROLE $REPLICATION_USERindicates that we want to create a new role on the PostgreSQL server using the specified name. I’m grabbing the value set in theREPLICATION_USERenvironment variable.WITH REPLICATIONspecifies that we’re setting up the new role for replication, which is vital to allow replica databases to access the primary database server.LOGINsimply tells PostgreSQL that we’re allowed to log in to the server using this role.PASSWORD '$REPLICATION_PASSWORD'sets up the password for the role to use for authentication. I’m grabbing this value through theREPLICATION_PASSWORDenvironment variable and enclosing the value in single quotes.
The semi-colon at the end of the query is optional, but it’s a good practice to include when executing SQL queries. Also, remember to close the entire SQL query in double quotes for the -c flag to work correctly in this command. If the command is correct, I’ll get a CREATE ROLE response from the PostgreSQL server, meaning that the query was successful and the replication role is now ready.
Step 2: Allow the Replica Database to Connect to the Primary Server
I now have a new role for replication, but I’ll need to grant access to my replica database server to connect to the primary database. In PostgreSQL, authentication is managed by a configuration file called pg_hba.conf, usually located in PostgreSQL’s data directory in the server’s file system. This file controls which IP addresses can access the database server, which users are allowed, the authentication method, and more.
The PostgreSQL Docker container sets up this file in /var/lib/postgresql/data/pg_hba.conf. Here are the default contents of the file in the container (minus the explanatory comments at the beginning of the file):
# TYPE  DATABASE        USER            ADDRESS                 METHOD

# "local" is for Unix domain socket connections only
local   all             all                                     trust
# IPv4 local connections:
host    all             all             127.0.0.1/32            trust
# IPv6 local connections:
host    all             all             ::1/128                 trust
# Allow replication connections from localhost, by a user with the
# replication privilege.
local   replication     all                                     trust
host    replication     all             127.0.0.1/32            trust
host    replication     all             ::1/128                 trust

host all all all scram-sha-256
By default, the container sets up various rules, mostly allowing all users local access to the entire database without needing a password. These rules are why I was able to execute the CREATE ROLE query earlier by only specifying the superuser account generated by the Docker container when initialized for the first time.
This file also has one rule towards the very bottom that allows access to any user from any IP address with a password using the scram-sha-256 password authentication method. While this rule seems like it would work to allow the replica database to connect with the role I just created, it won’t since the connection we’ll make from the secondary database server is for replication purposes.
If you notice in this file, a couple of rules are already in place to deal with replication connectivity, but they’re all for local connections. I’ll use a separate server for the replica, so I want to create a new rule that will only allow a replication role to connect from that specific server to keep it secure.
I’ll run another command inside the container’s shell to append a new rule inside the /var/lib/postgresql/data/pg_hba.conf configuration file:
echo "host replication $REPLICATION_USER 10.0.1.3/32 scram-sha-256" >> \
  /var/lib/postgresql/data/pg_hba.conf
Let’s go through each segment of the new rule I’m appending to the configuration file (host replication $REPLICATION_USER 10.0.1.3/32 scram-sha-256):
hostis the type of connection I want to allow, indicating it’s for a TCP/IP connection instead of a local one.replicationis a special keyword that tells PostgreSQL that the connection to allow here is for physical replication connections.$REPLICATION_USERgrabs the value I set as the replication role earlier, so PostgreSQL can allow logging in with this specific role.10.0.1.3/32specifies this rule’s IP address and subnet. As mentioned, the replication role can access everything in a database, so I’m locking down connectivity to this role from only one IP address, which is where my replica database lives.scram-sha-256is the password authentication method I want to use. It’s currently the most secure password authentication option, so this method is recommended when logging in via password is necessary.
Once I execute this command, the new rule is appended to the pg_hba.conf configuration file, allowing my replica database to log in to the primary database server through the recently created replication role.
Configuration file persistence in Docker
One thing to point out is that the changes made to the pg_hba.conf file through the container’s shell, as I did in this example, are persistent only as long as this container exists. If the database container is removed and recreated, it will reset this configuration file to its default, and any modifications made will be lost.
Kamal accessories are typically long-lived containers that aren’t normally deleted and recreated, but there’s a possibility that you’ll need to recreate the database container from scratch. There are a few ways to make sure that any modifications made to PostgreSQL configuration files are present when recreating a container, like mounting the file in a volume or creating an initialization script. I won’t cover how to do that in this article but keep in mind if following these steps in a production environment.
Step 3: Update the Primary Database Accessory Command in Kamal
Before setting up the replica database, there’s one last thing we need to do with the primary database: run the database process with a few configuration flags to set it up for replication.
The default command that this Docker container runs when spinning up is postgres, without any additional parameters. I want to override this default command with a few parameters set via flags. In Kamal, we can override the default commands for accessories using the cmd setting:
accessories:
  db:
    image: postgres:17
    host: 123.123.123.124
    port: 10.0.1.2:5432:5432
    env:
      secret:
        - POSTGRES_DB
        - POSTGRES_USER
        - POSTGRES_PASSWORD
    directories:
      - data:/var/lib/postgresql/data
    cmd: postgres -c wal_level=replica -c max_wal_senders=5 -c max_replication_slots=5 -c wal_keep_size=64
I’ll run the same postgres command that the container uses, but append a few runtime parameters along with it. The -c flag accepts the name of a configuration setting and its value to use, and we can use it multiple times to set different parameters.
Using the -c flag overrides any settings in the PostgreSQL configuration files, and while I can modify the configuration file as I did with the pg_hba.conf file earlier, I prefer to set these overrides explicitly in the Kamal configuration so anyone checking how I deployed the application to production knows that the database is set up for replication.
Below are explanations of each runtime parameter I’m setting in this command.
wal_level=replica
The wal in wal_level means “Write-Ahead Logging”, which PostgreSQL uses to log all changes made before being applied to the data files stored on the server, which PostgreSQL uses for replication and backups. The wal_level parameter tells PostgreSQL how much information to write in these logs for different purposes.
By setting the value of replica, I’m specifying that these logs are going for replication. replica is the default value for this parameter, but it’s best to set it to ensure the setting isn’t overridden anywhere else.
max_wal_senders=5
This parameter configures the number of maximum background processes, or write-ahead logging senders, that can stream the changes from the logs to any connected replica databases. The more replica databases you have, the higher this number should be to keep replication performance working well.
The number of senders to configure depends on the CPU and memory usage on your primary database server since each one will consume some resources on the system, so depending on your infrastructure, you’ll need to play around with this number. I’m setting it to five as a somewhat conservative number for this demo.
max_replication_slots=5
To explain this setting, I need to explain how the primary database server manages write-ahead logs. Write-ahead logs are temporary log files that the primary database cleans up after a while so they don’t accumulate on the server. That means we need to ensure the replica databases access these logs before they’re gone so they can remain synced.
A replication slot is a mechanism that PostgreSQL uses to manage the write-ahead logs needed for replicas to read from them. Each replica will consume a replication slot so the primary database knows that it’s consuming these logs, and the primary database will keep the logs until the replica confirms it has them all. This function guarantees that the replicas will always have all the data needed to synchronize with the primary database server, even if there’s a temporary disconnect between the primary and replica servers.
The default value for this parameter is 10, but the recommendation is to set this to about double the number of replicas you expect to have. I only have one for this demo, so five is more than enough.
wal_keep_size=64
This parameter specifies the minimum size of the write-ahead log files that the primary database should keep on the server. The number “64” here means “64 megabytes”. As mentioned, the primary database server removes old write-ahead logs so they don’t keep ballooning in size. Setting a minimum size for these logs ensures that the replicas have enough of a buffer to read from in case something goes wrong. So, this serves as somewhat of a backup for replicas.
The default value for this setting is zero, meaning the primary database server won’t keep a buffer on standby, which should be okay under normal operation. But setting a value for this parameter helps ensure that the replica servers can deal with any lapse in replication without needing a full re-sync.
With the runtime parameters in place, my primary database is now ready for replication. To activate these settings, I’ll restart the database accessory using kamal accessory restart db so the changes to the pg_hba.conf file can take effect, and the database starts up with the replication parameters I set for it.
Always validate the changes made to your accessories
Whenever you make changes requiring a restart to Kamal accessories, I highly recommend immediately checking the accessory logs with kamal accessory logs <name> to make sure things are still working as expected. It’s easy to make minor mistakes that will cause the accessory to not boot. Also, monitor any changes you make to the database server to ensure it’s not consuming too many resources that can affect its performance.
Step 4: Spin Up the Replica Database Accessory
I’ll copy my existing PostgreSQL accessory in my Kamal configuration file to create a new one. I’ll use a different accessory name (db-replica), modify the server host IP and private network IP addresses to use the replica server’s database, and skip the cmd setting since I’ll configure this database through other methods.
accessories:
  db:
    image: postgres:17
    host: 123.123.123.124
    port: 10.0.1.2:5432:5432
    env:
      secret:
        - POSTGRES_DB
        - POSTGRES_USER
        - POSTGRES_PASSWORD
        - REPLICATION_USER
        - REPLICATION_PASSWORD
    directories:
      - data:/var/lib/postgresql/data

  db-replica:
    image: postgres:17
    host: 123.123.123.125
    port: 10.0.1.3:5432:5432
    env:
      secret:
        - POSTGRES_DB
        - POSTGRES_USER
        - POSTGRES_PASSWORD
        - REPLICATION_USER
        - REPLICATION_PASSWORD
    directories:
      - data:/var/lib/postgresql/data
Setting up Docker on a new server
Remember that Kamal sets up accessories using Docker, so the host server needs it installed for it to work. If you spun up a new server that doesn’t have Docker installed yet, you could have Kamal set it up for you using kamal server bootstrap --hosts <IP>.
Step 5: Creating an Initialization Script for the Replica Database
Before I boot up the new replica database accessory, I’ll need to initialize the container to set things up so it knows it’s a replica database. Specifically, I’ll make sure the primary database is ready and accepting connections using the replication role I set up. If that’s working well, I’ll grab a copy of the data from the primary database to use as my starting point for replication before starting up PostgreSQL.
I can do all the required steps with an initialization script. The PostgreSQL Docker image executes any SQL or shell scripts placed in the /docker-entrypoint-initdb.d directory inside the container. These scripts run when the PostgreSQL data directory is empty, which usually happens on the first boot only since the Docker container creates a database, so it’s important to create the initialization script before spinning up the database server for the first time.
For this example, I’ll create a shell script in the root of my repository called init-replica.sh with the following contents:
#!/bin/bash
set -e

export PGPASSWORD=$REPLICATION_PASSWORD

until pg_isready -h 10.0.1.2 -p 5432 -U $REPLICATION_USER -d $POSTGRES_DB; do
  echo "Waiting for the primary database to be ready."
  sleep 2
done

rm -rf /var/lib/postgresql/data/*
pg_basebackup -h 10.0.1.2 -D /var/lib/postgresql/data -U $REPLICATION_USER -v -P -R
postgres
The script opens with the #!/bin/bash shebang to indicate this is a shell script and uses the set -e argument to exit the script immediately if something fails inside.
Next, I’ll export an environment variable called PGPASSWORD, which the PostgreSQL client uses as the password when attempting to connect to a database server. I’ll need this for the PostgreSQL commands I’ll execute in this script so they can connect to the primary database server without user intervention. I’ll use the replication role’s password, which I set in the $REPLICATION_PASSWORD environment variable.
Now, I want to make sure the primary database is available and accepting the replication role’s login credentials from the replica database server. I’ll open up an until loop to execute a command until it exits successfully, which I can close with do and done. The command to verify is pg_isready, which is a utility provided by PostgreSQL to check the connection status of a database server.
This command needs a couple of flags:
- The
-hflag specifies the database server I want to connect to. I’ll use the private network’s IP address of the primary database server here. - The
-pflag specifies the port. I don’t need to set this flag since5432is the default PostgreSQL port, but I’ll make sure it’s in this script just to be clear. - The
-Uflag sets the user I want to use to test connectivity to the primary database. I’ll use the$REPLICATION_USERenvironment variable since it’ll be set up in this container when I spin it up. - The
-d'flag indicates the database name for testing. The$POSTGRES_DBenvironment variable that we also set up for this accessory contains the database name we’re using for the application.
Inside the do loop, I’ll echo a message to indicate that we’re waiting for the primary database to be ready, so if the pg_isready command fails due to the primary database being inaccessible, we’ll see this message in the container logs as it retries connecting to the server. I also have a sleep command to give the script a few seconds to retry the pg_isready command.
If we can connect to the primary database in the until loop, we can grab a database backup to use as our starting point. Another utility provided by PostgreSQL called pg_basebackup does just that. This command pulls in the data from a specified database server and places it in a given data directory. It also helps us set up the database for replication.
However, we need to make sure the directory where we place the data is empty before grabbing the backup. When starting the PostgreSQL Docker container for the first time, it initializes a database and places its data files in the /var/lib/postgresql/data directory, which is the default directory used by the PostgreSQL server process, so we need to set our data in here.
Since the pg_basebackup command requires that the directory where we place the backup data files is empty, I’ll set the rm command before getting the backup to clear everything inside the /var/lib/postgresql/data/* directory, using the the -rf flags to force-remove everything inside the data directory recursively.
With the default data directory cleaned up, I can then grab the database backup using pg_basebackup. Like all other PostgreSQL-related commands, we’ll set a couple of parameters here. Similar to the pg_isready commands, I’ll use the -h and -U flags to specify the host and user name to connect to the primary database, respectively. I’ll also use a few new flags:
- The
-Dflag indicates the target data directory we’ll use to place the data files for the backup. As mentioned above, the PostgreSQL Docker container looks in the/var/lib/postgresql/datadirectory, so I’ll set that up as this flag’s value. - The
-vflag prints out additional information so I can see what’s going on in the container logs while this script runs. - The
-Pflag prints out progress details of the backup process. This flag is nice to have if your primary database is large since transferring a copy of the data between servers can take some time. - The
-Rflag is the key ingredient of this command, indicating that this backup is for replication purposes.
How the -R flag works in pg_basebackup
PostgreSQL determines if a database is a replica by checking the presence of a file called standby.signal. The -R flag creates this file when pulling in the data backup, along with an additional configuration file containing the connection settings and other details.
Without these files set by the -R flag, any running instance of PostgreSQL in this container will work like a normal database without replication functionality, so it’s the key ingredient for setting up replication.
After getting the data from the primary server, the last thing to do in the initialization script is to start up the PostgreSQL server. Typically, the Docker container handles this through its entrypoint, but because we’re modifying the data directory in this script, we’ll need to explicitly start it here. I can do that by simply running the postgres command.
Step 6: Copying the Initialization Script and Booting Up the Accessory
Back in the config/deploy.yml Kamal configuration file, I’ll update the replica database accessory to copy the initialization script into the container, which I can do with the files setting:
accessories:
  # Omitting primary database settings...

  db-replica:
    image: postgres:17
    host: 123.123.123.125
    port: 10.0.1.3:5432:5432
    env:
      secret:
        - POSTGRES_DB
        - POSTGRES_USER
        - POSTGRES_PASSWORD
        - REPLICATION_USER
        - REPLICATION_PASSWORD
    directories:
      - data:/var/lib/postgresql/data
    files:
      - ./init-replica.sh:/docker-entrypoint-initdb.d/init-replica.sh
The files setting accepts a list of files to copy from the local filesystem into the container’s filesystem. In this example, I’m copying the init-replica.sh file located in the root of my repository (where I’ll run the kamal commands to manage this accessory) and place it in the container under /docker-entrypoint-initdb.d/init-replica.sh. By placing the shell script at this location, the PostgreSQL Docker container will execute it the first time we boot up the accessory.
With the initialization script in place and the Kamal configuration finished, it’s time to spin up the replica database. I’ll boot up the server using kamal accessory boot db-replica. If everything goes well and the database server starts without errors, I’ll check the accessory logs for the replica (kamal accessory logs db-replica) to verify everything is working as expected.
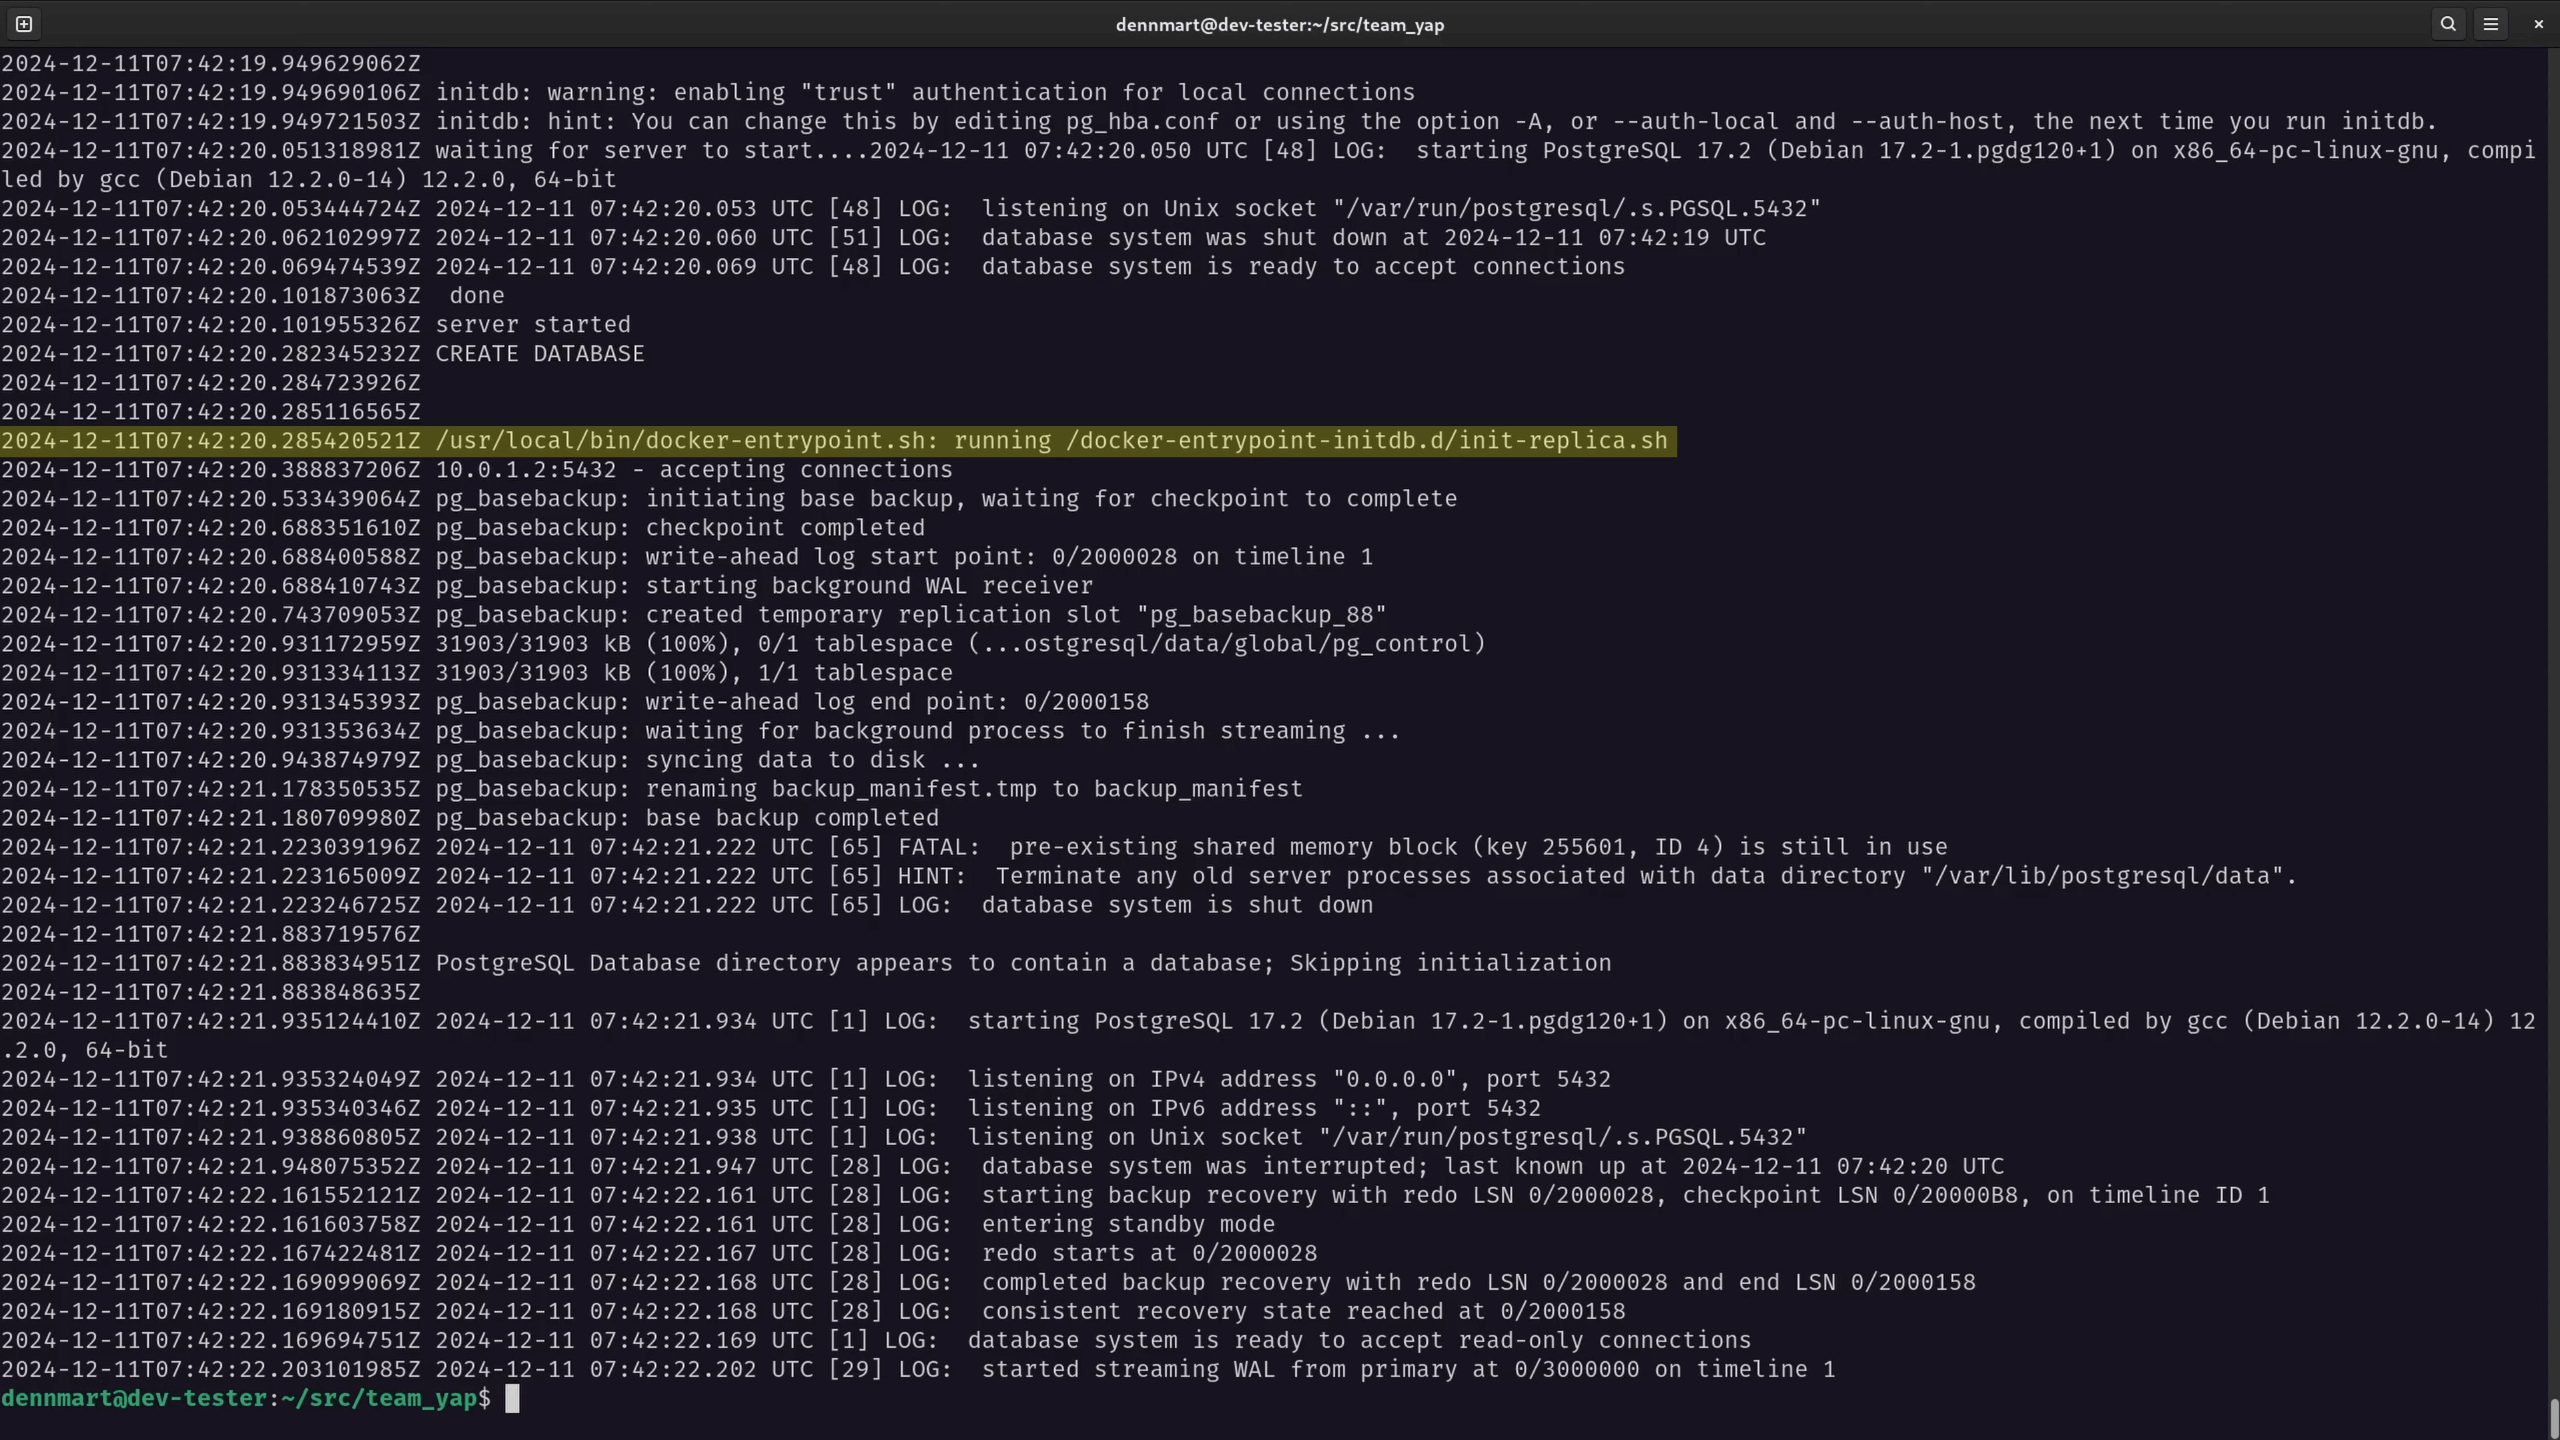
In the logs, I can see that it ran the init-replica.sh script copied over to the container. The pg_isready command confirmed that it could connect to the primary database server, and then the pg_basebackup command pulled the data from it. Finally, it started up the PostgreSQL server in read-only replication mode.
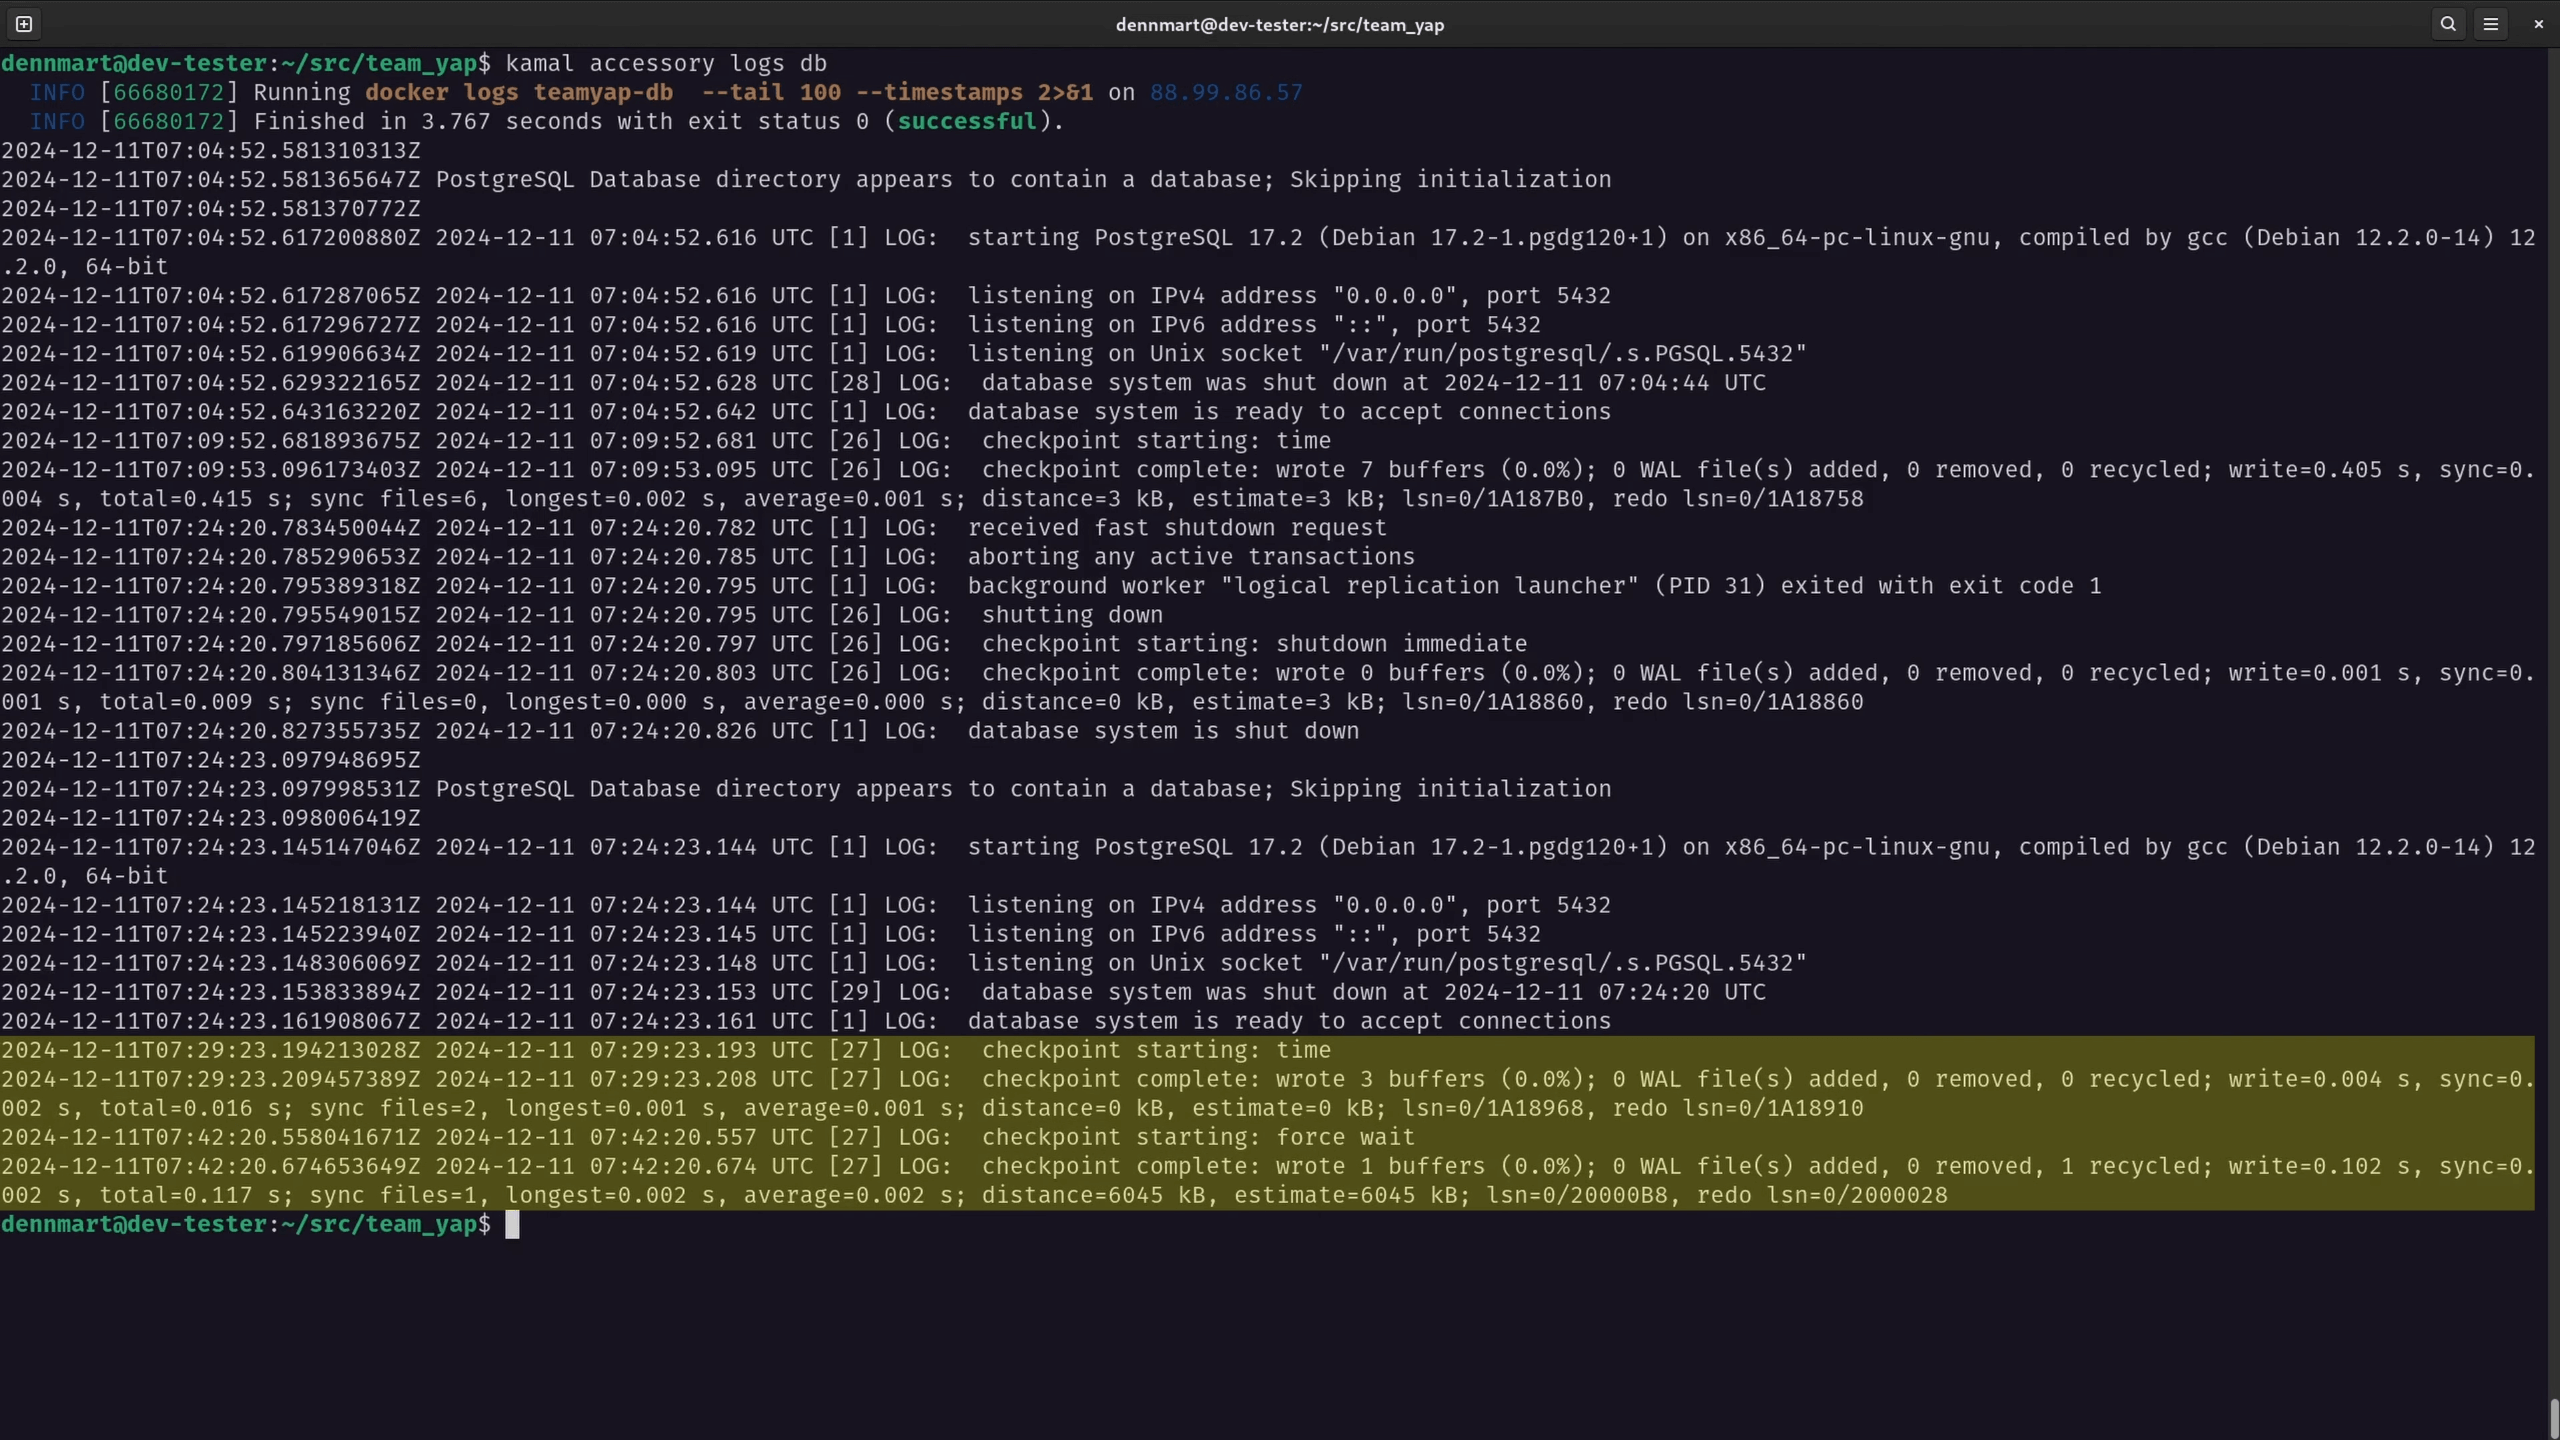
I can also check the logs on the primary database server (kamal accessory logs db) and see that it’s generating the write-ahead logs for the replication process.
Step 7: Verifying Database Replication
To make sure that the replica database is automatically receiving data from the primary server, I’ll log in to the shell of both database accessories and connect to each server using psql -U $POSTGRES_USER $POSTGRES_DB, as I did when creating the replication role earlier.
On both databases, I’ll run a simple query to fetch the first user in the database (SELECT * FROM users WHERE id = 1;). Sure enough, both databases have the same information:
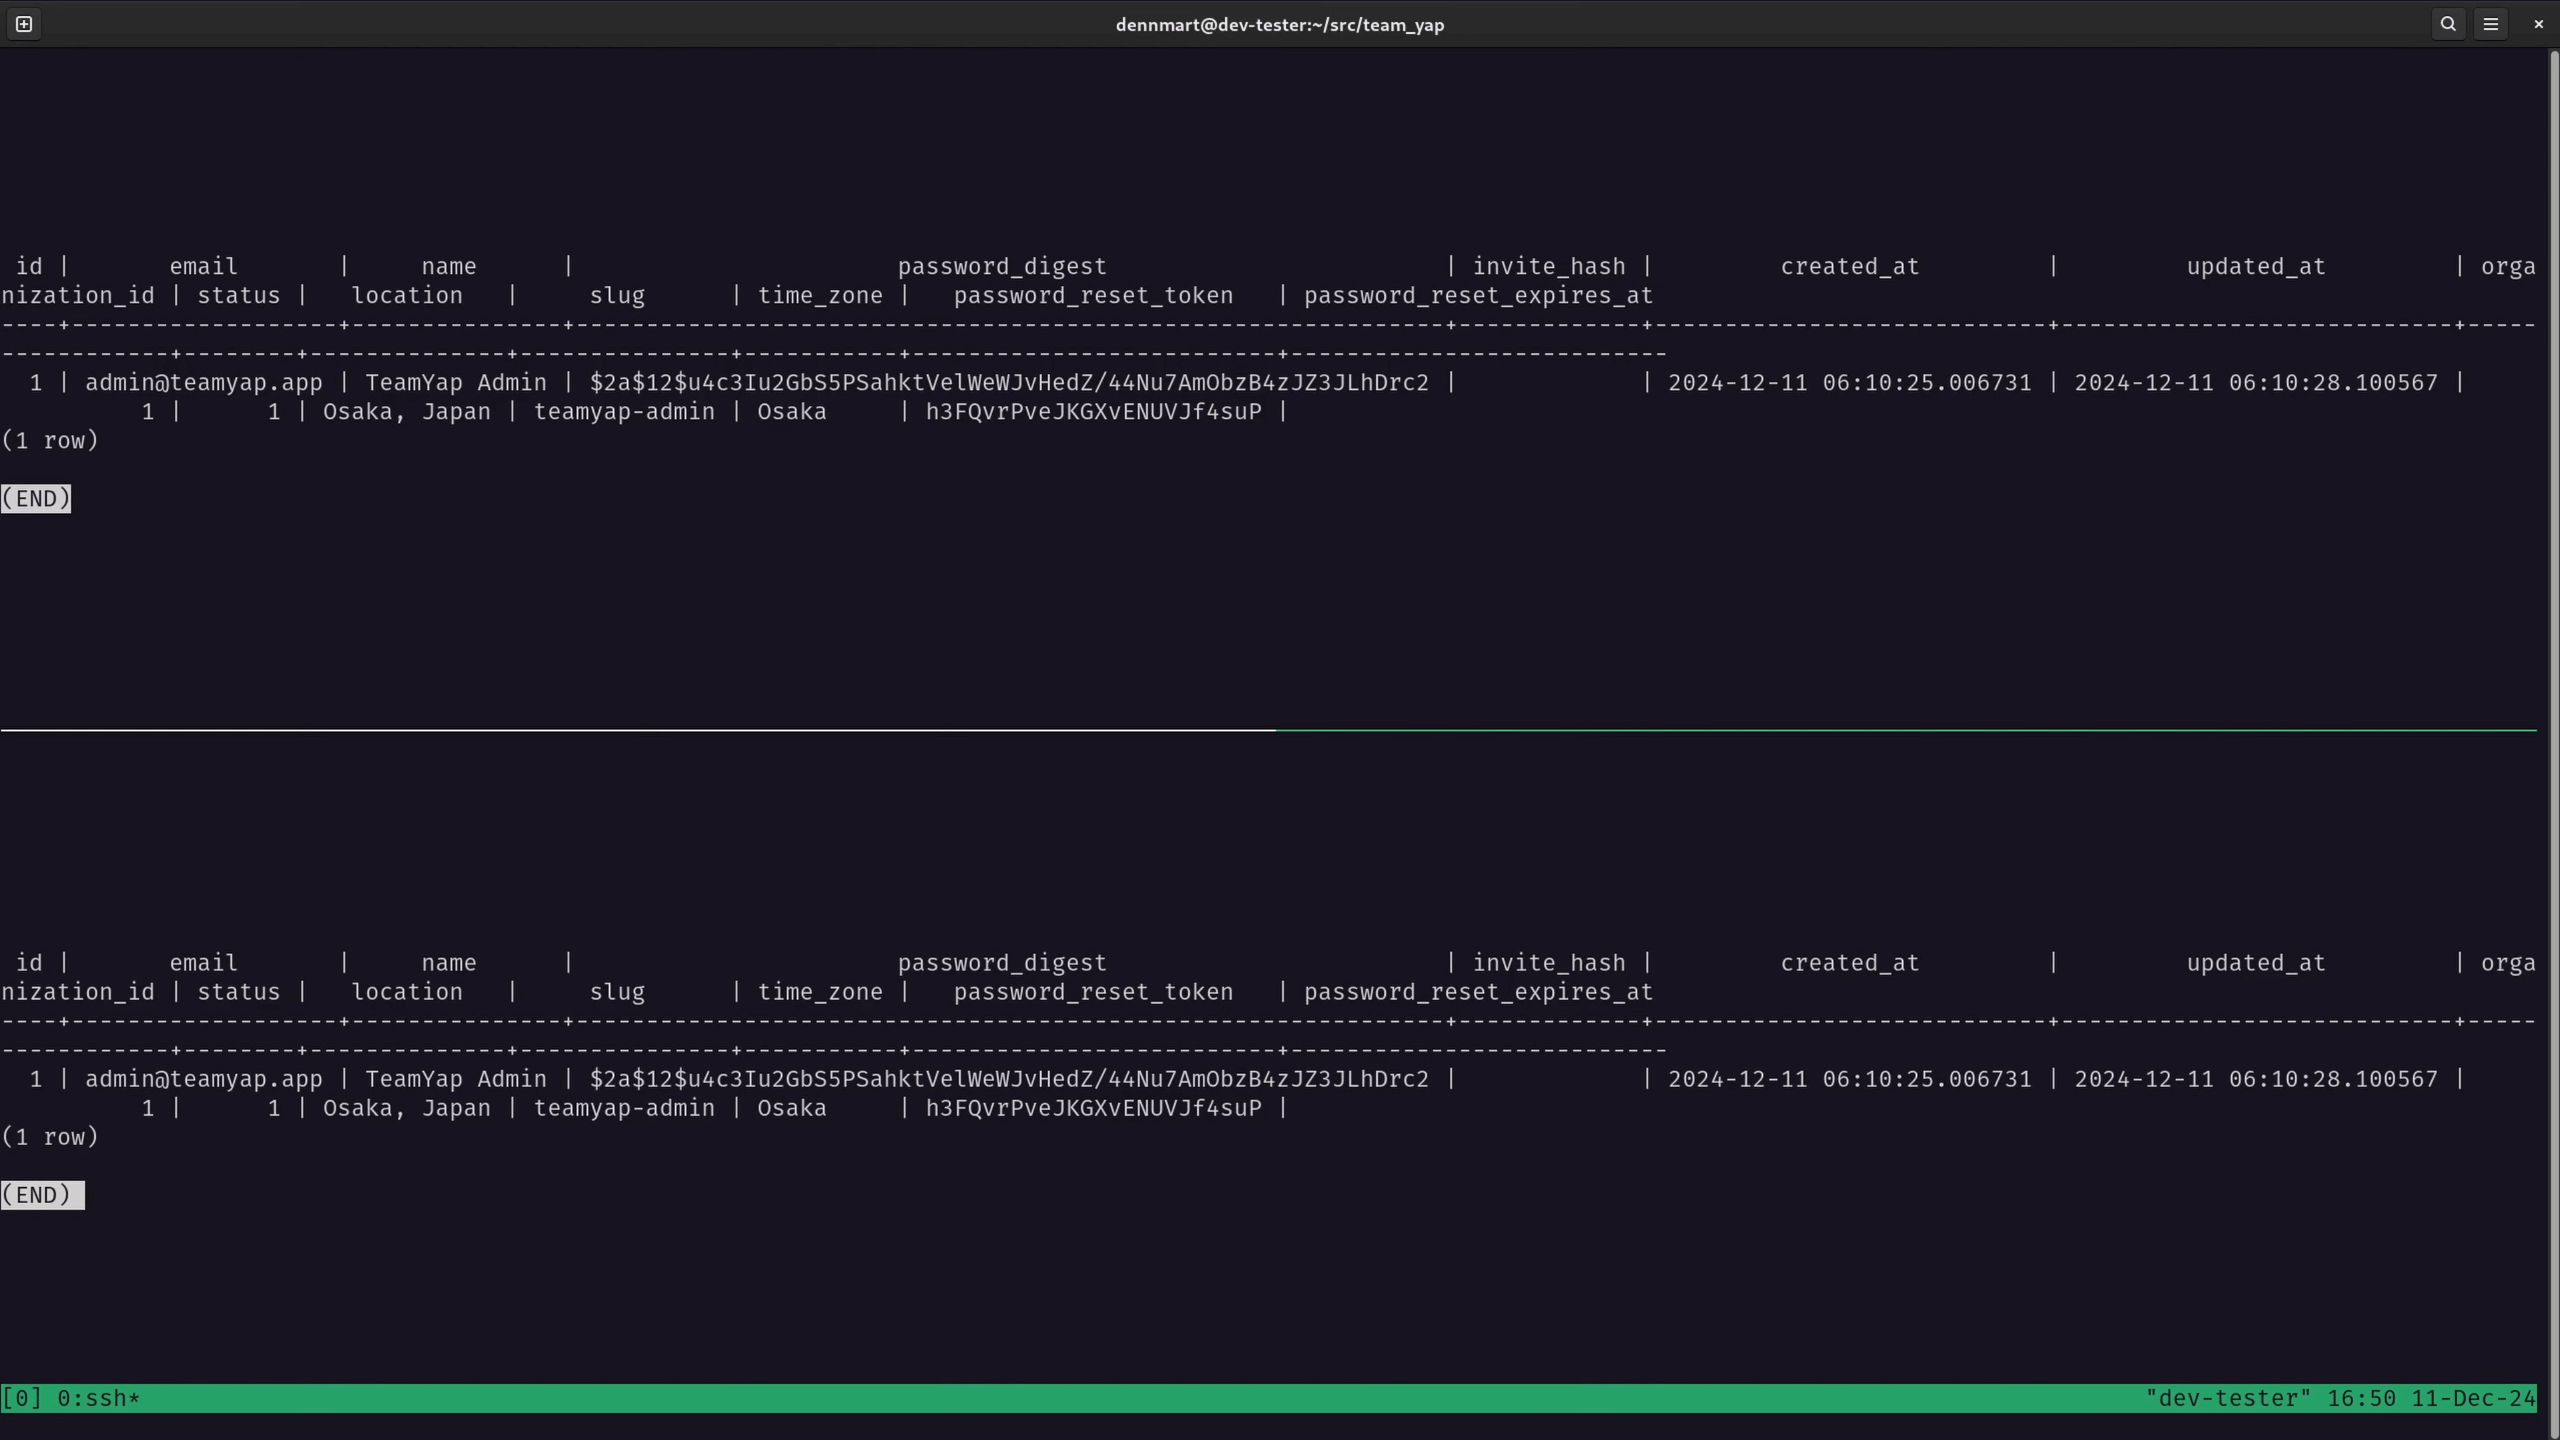
When initializing the accessory, this information is already on the replica database from the backup pulled from the primary database server. I’ll also need to ensure that both databases are syncing automatically.
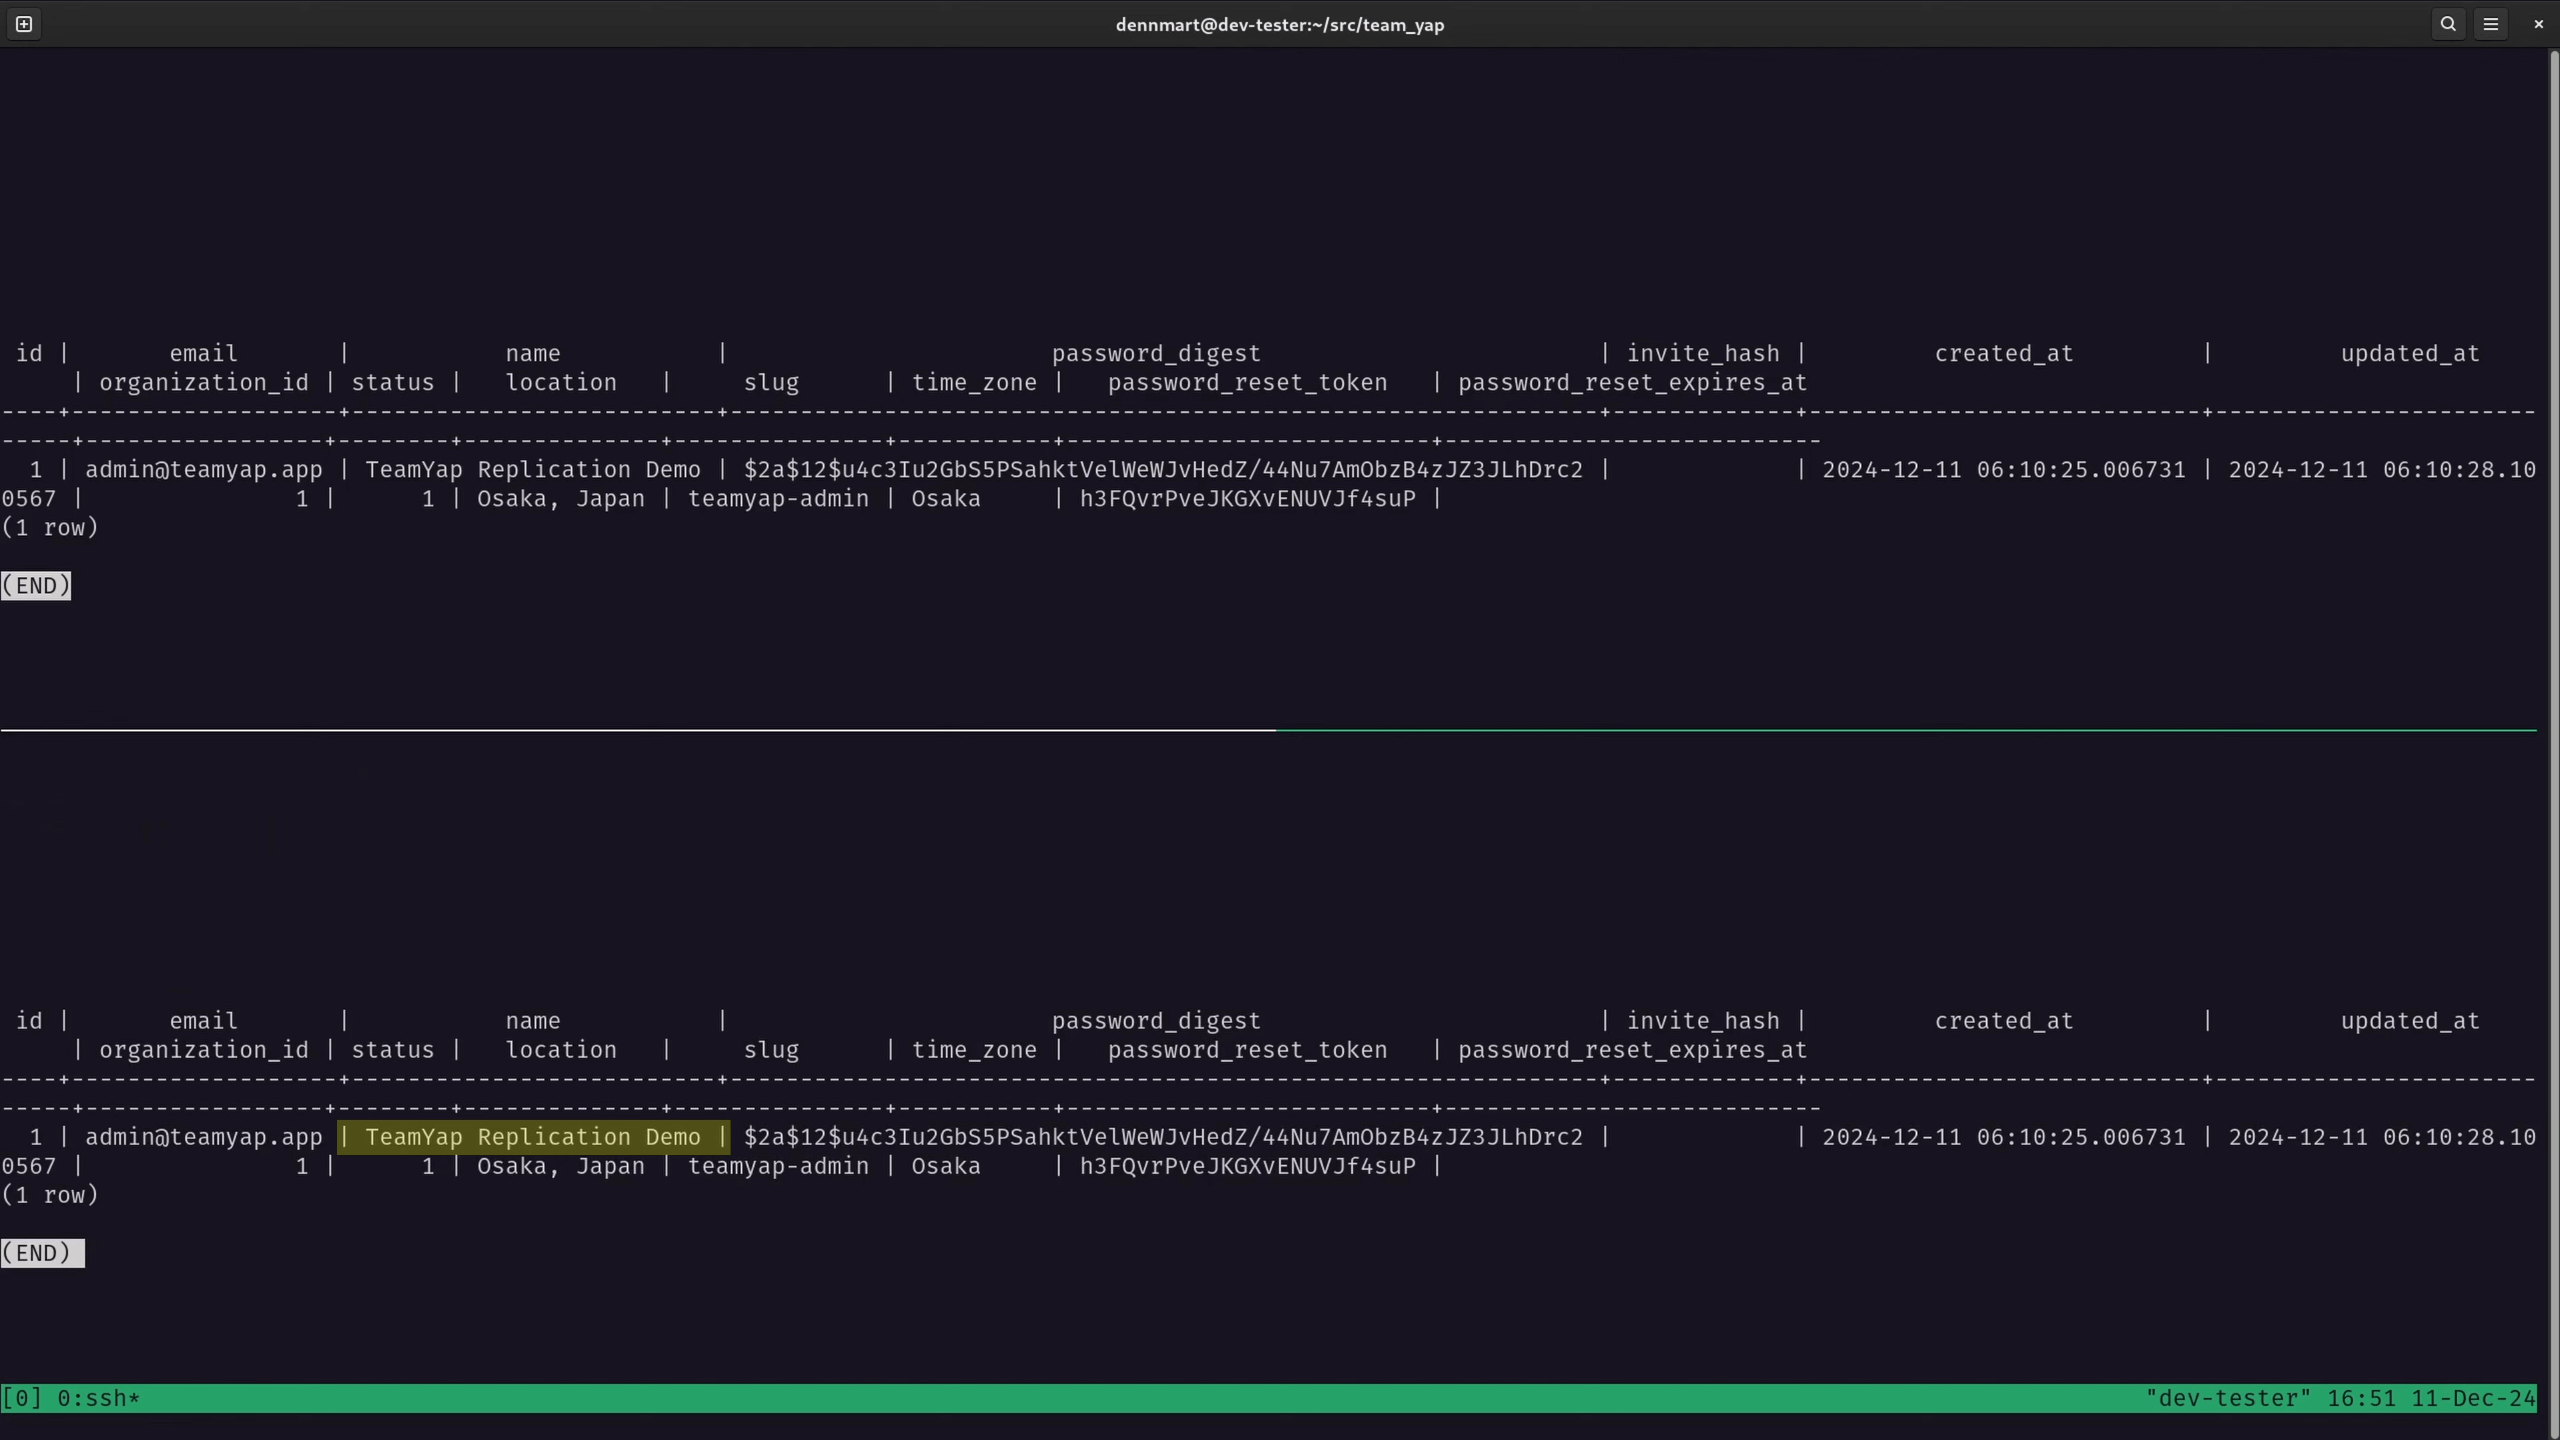
In the primary database server, I’ll update the user record I fetched in the previous example, running the SQL query UPDATE users SET name = 'TeamYap Replication Demo' WHERE id = 1;. This query will update the name field for the first user in the database. If I run the SELECT query on the replica database after the update, I’ll see that the changes have synced automatically:
If I attempt to run the same UPDATE query on the replica database, I’ll receive an error indicating that the server is in read-only mode, which is how it should work:
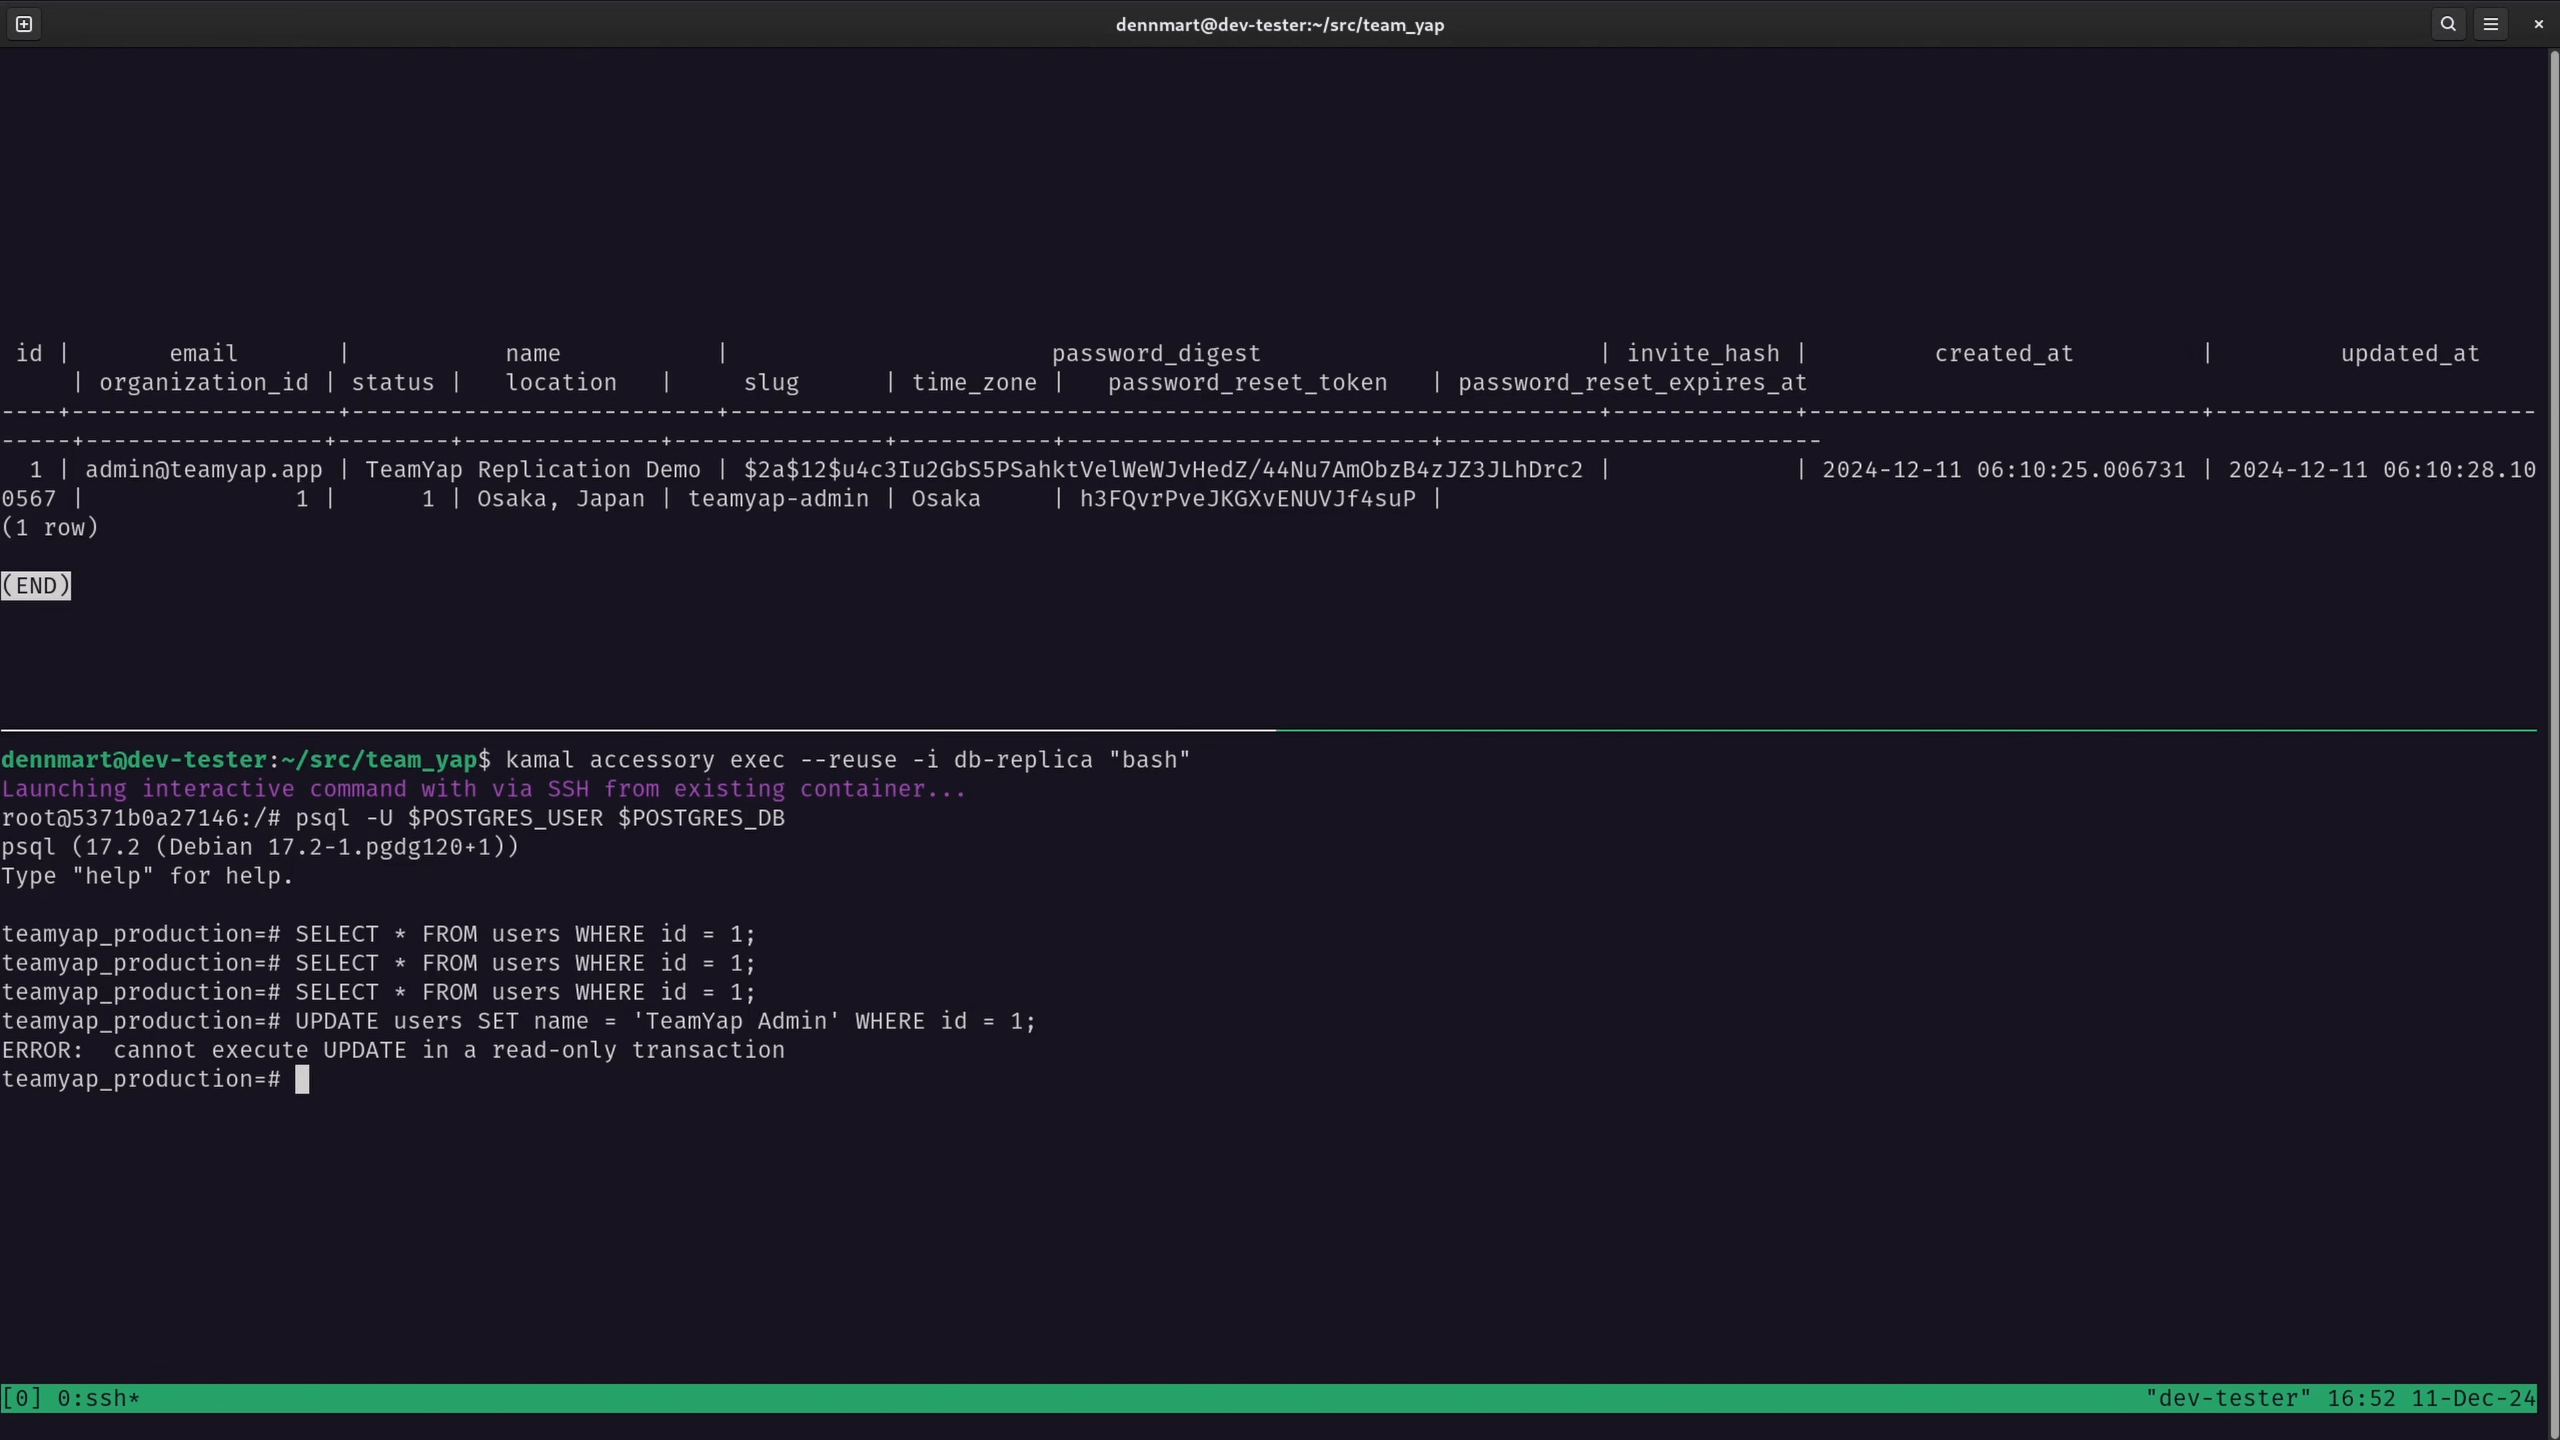
These steps confirm that our replication is working successfully, and the databases should remain synchronized. From here, you can use the replica for read-only operations or switch over if the primary database server runs into problems.
Wrap-up
This video showed how simple it is to spin up a replica of your PostgreSQL database if you’re using Kamal to deploy your web application. With a bit of additional setup in your existing configuration, you can have a standby database ready to go at any time without needing to rebuild a new server and restore the data from a database dump, which can be outdated by the time you use it.
It’s always a good idea to have different ways to recover from data loss in your apps, especially when managing deployments on your own. Using database replication is one way to ensure that you’ll always have an up-to-date copy of your data in case it’s needed, which usually happens when you least expect it.
Need help protecting your data when using Kamal?
If you or your team are stuck configuring database replication when deploying your applications with Kamal or need assistance with any other Kamal or Rails-related setup, I'm here to help. Send me a message explaining where you're stuck, and let's start a conversation.
Screencast
If this article or video helped you understand how to set up PostgreSQL database replication for your Kamal-deployed web applications, consider subscribing to my YouTube channel for similar videos containing tips on helping Rails developers ship their code with more confidence, from development to deployment.

