A client I worked with recently had an automated system that generated a proprietary file within AWS and stored it in a private Amazon S3 bucket. Their team generates this file daily and uses it as part of a distributed application consisting of dozens of servers outside the AWS ecosystem. They wanted other systems outside their organization to access the file. However, they also wanted to avoid the hassles of setting up IAM users or policies for their existing and future systems. The client also wanted a simple authentication mechanism and an audit trail to keep track of download requests.
Using Amazon S3 to store and share files publicly is effortless. As long as you have the permissions to put an object inside of an S3 bucket and set its read permissions to “public”, you’re good to go. But once you have to limit access, the situation becomes more complex. You’ll need to take extra steps when you need private files to remain private except for specific users or systems, which involves an extra layer of complexity.
The Complications of Using IAM
By default, Amazon S3 will set all files in an S3 bucket to private unless specifically told to make them public before or after uploading. This default setting helps with security but will require you to evaluate how to share those files outside the AWS ecosystem if necessary.
The ideal way to provide access to non-public files on Amazon S3 is by using IAM users and setting policies that grant them access to the required resources. AWS is robust with its permissions, allowing you to set various options for who can access a bucket through IAM. But dealing with IAM comes with some drawbacks.
Not everyone has an AWS account, and if you need to share a non-public file from S3 with multiple users or systems, it’s tedious to create users and policies for each of them as needed. Sometimes, it’s not feasible due to the amount of IAM users you’ll need to set up for each system. You can technically share an IAM user account across multiple systems, but more recommended and secure ways exist to handle these actions.
Going Serverless for Quick and Secure Access to S3
Their team didn’t need a complex solution that required much time and effort to implement and wanted to avoid adding any additional complexity to their infrastructure. To handle this, I opted to go serverless within the AWS ecosystem with the following services:
- An Amazon API Gateway endpoint for making requests to download the file with an API key for basic authentication via Lambda proxy integration.
- An AWS Lambda function with permissions to access the private file on Amazon S3 that returns the details on where to download the file to the API Gateway endpoint.
- An Amazon CloudWatch log group to keep track of the IP addresses that have requested the file.
Using these services is a simple way to provide access to a non-public file on Amazon S3 without creating IAM users, setting up policies, or spinning up any infrastructure. The intent for this task was to set up a simple environment with few moving parts that would accommodate any users or systems without an AWS account.
Setting up a Serverless Application With Terraform
Setting up your serverless architecture using tools such as Terraform, AWS Serverless Application Model (SAM), or Serverless Framework will help keep track of your infrastructure and shorten deployment cycles as you build the environment. This article will use Terraform to set up the serverless environment discussed earlier. While we won’t go into the details for each created resource, we’ll go through the Infrastructure as Code setup for this type of serverless project.
The recommended way to structure Terraform projects is by using modules. Even if you don’t plan on reusing these modules in other projects, it’s a good practice to organize your IaC code in a composable manner to group related resources and make it easier to understand and maintain in the long run. This article will follow Terraform’s standard module structure, with each module containing the main entry point (main.tf), variable declarations (variables.tf), and outputs (outputs.tf).
Before writing any code, we first need to consider the required resources for this project. Let’s begin by thinking about how to group our resources so we can start defining our modules better.
- We’ll need to define at least one IAM role and attach policies to use in the other resources we’ll need so we can have a module to handle IAM resources.
- We’ll have a Lambda function for providing the file download details, so we can also define a module to contain what Lambda requires.
- We’ll need a secure API Gateway endpoint to invoke the Lambda functionality, which another module can handle.
- Finally, we’ll set up a CloudWatch log group to audit API Gateway, so we’ll create one more module for this.
Besides our modules, our project will also contain a Lambda function and the primary entry point for Terraform. We also want to provide some output for essential details of our generated resources, like the API Gateway endpoint URL and the generated API key for authentication.
The directory structure for our Terraform project will look like this:
/
├── functions
│ ├── file_download
│ │ ├── function.js
├── modules
│ ├── iam
│ │ ├── main.tf
│ │ ├── variables.tf
│ │ └── outputs.tf
│ ├── lambda
│ │ ├── main.tf
│ │ ├── variables.tf
│ │ └── outputs.tf
│ ├── api_gateway
│ │ ├── main.tf
│ │ ├── variables.tf
│ │ └── outputs.tf
│ └── cloudwatch
│ │ ├── main.tf
│ │ ├── variables.tf
│ │ └── outputs.tf
├── main.tf
└── outputs.tf
With our directory structure defined, let’s begin creating these resources.
Setting up IAM roles and policies
The first module will create the IAM role and policies needed throughout our planned serverless architecture. The IAM role will be associated with other resources we’ll provision later on, so we need to ensure we have the correct policies in place. Here’s what the module will manage:
- An IAM role.
- An IAM policy to attach to the role.
- Policy attachments for allowing the role to interact with other services on AWS.
Our role will need to allow Lambda and API Gateway to interact with other services, so we’ll set an assume role policy for each of those services. The IAM role will also need access to the private file on Amazon S3, so we can attach a policy that grants the role permission to access the private object. This policy is a crucial element for the security we want since we can limit access to a specific file without exposing it to the outside world beyond our other resources within AWS using this role. In our project, we’ll have our Lambda function access the file.
Since we want API Gateway to log any time someone accesses the endpoint we’ll set up later, one last policy we need is to allow the role to push logs to CloudWatch. To handle this, we can attach the AmazonAPIGatewayPushToCloudWatchLogs managed policy to the IAM role. When setting up our API Gateway endpoint, our role will allow it to send its logs to CloudWatch.
Setting up the IAM role and policies described above in our modules/iam/main.tf file, we’ll have the following:
data "aws_iam_policy_document" "assume_role" {
  statement {
    effect = "Allow"

    principals {
      type = "Service"
      identifiers = [
        "lambda.amazonaws.com",
        "apigateway.amazonaws.com"
      ]
    }

    actions = ["sts:AssumeRole"]
  }
}

data "aws_s3_bucket" "bucket" {
  bucket = var.s3_bucket_name
}

data "aws_iam_policy_document" "s3_policy_document" {
  statement {
    effect = "Allow"
    actions = [
      "s3:GetObject"
    ]
    resources = [
      "${data.aws_s3_bucket.bucket.arn}/${var.s3_object}"
    ]
  }
}

resource "aws_iam_role" "role" {
  name               = var.role_name
  assume_role_policy = data.aws_iam_policy_document.assume_role.json
}

resource "aws_iam_policy" "s3_role_policy" {
  name   = var.role_policy_name
  policy = data.aws_iam_policy_document.s3_policy_document.json
}

resource "aws_iam_role_policy_attachment" "attach_s3_policy" {
  role       = aws_iam_role.role.name
  policy_arn = aws_iam_policy.s3_role_policy.arn
}

resource "aws_iam_role_policy_attachment" "attach_cloudwatch_role_policy" {
  role       = aws_iam_role.role.name
  policy_arn = "arn:aws:iam::aws:policy/service-role/AmazonAPIGatewayPushToCloudWatchLogs"
}
We’ll have a few variables we need to pass into the module, which we’ll declare in modules/iam/variables.tf:
variable "s3_bucket_name" {
  description = "The name of the S3 bucket containing the private file"
  type        = string
}

variable "s3_object" {
  description = "The name of the private S3 object"
  type        = string
}

variable "role_name" {
  description = "The name of the role for Lambda to access the private S3 object and API Gateway to write logs to CloudWatch"
  type        = string
}

variable "role_policy_name" {
  description = "The name of the policy to attach to the Lambda/API Gateway role"
  type        = string
}
We also need to make some of the details of our IAM resources available to other modules, so we’ll need to define them in modules/iam/outputs.tf:
output "role_arn" {
  description = "The ARN of the role for Lambda to access the private S3 object and API Gateway to write logs to CloudWatch"
  value       = aws_iam_role.role.arn
}
We now have the role and policies needed to access what we want in the project securely. We can now proceed with generating the remaining resources that require the role.
Setting up our AWS Lambda function
Our Lambda module will consist of two resources:
- The Lambda function to upload to AWS.
- Permissions to allow API Gateway to invoke the Lambda function.
Our Lambda function uses the Node.js 18 runtime and does only one thing—it creates a pre-signed URL that expires in 60 seconds from a specific S3 bucket and object and returns it as its response:
const { S3Client, GetObjectCommand } = require("@aws-sdk/client-s3");
const { getSignedUrl } = require("@aws-sdk/s3-request-presigner");

const s3Client = new S3Client();

exports.handler = async () => {
  const bucketName = process.env.BUCKET_NAME;
  const objectKey = process.env.OBJECT_KEY;

  try {
    const command = new GetObjectCommand({
      Bucket: bucketName,
      Key: objectKey,
    });

    const presignedUrl = await getSignedUrl(s3Client, command, {
      expiresIn: 60,
    });

    return {
      statusCode: 200,
      body: JSON.stringify({ presignedUrl }),
    };
  } catch (error) {
    return {
      statusCode: 500,
      body: JSON.stringify({ error: error.message }),
    };
  }
};
We’re sending a pre-signed URL instead of the actual file itself due to response payload size limitations in both Lambda and API Gateway. The maximum response size for Lambda is 6 MB, and the maximum for API Gateway is 10 MB. If the private file on S3 was smaller than these limits, we could send it directly as part of the response. In this scenario, the file was hundreds of megabytes, limiting us to sending pre-signed URLs instead.
We can upload a single-file Lambda function, as shown above. For this project, we’ll package the function’s directory and any dependencies into a zip file before deploying, making the Lambda function easier to extend in the future. Terraform can handle that with the archive_file data source. The data source lets us specify an archive type, a file or directory to archive, and the output. We’ll use archive_file to create a zip file from the files in our functions directory, which also produces the checksum of the output file that we can use to keep track of future changes.
With the created zip file, we can use Terraform to create the Lambda function on AWS and upload the zip file to use. The function will use our previously defined IAM role as its execution role. We also want to tell Terraform that it should upload a new version of our Lambda function when it changes, so we’ll use the checksum of the output file to detect modifications and trigger any updates when applying changes in the future.
Our Lambda function for this example will need to know the Amazon S3 bucket and object key we want to access. It’s a good practice to avoid hard-coding these values in the Lambda function to make it more flexible. Instead, we’ll define these as environment variables and have Terraform set them up for us.
The last step we need is to tell AWS that the API Gateway service is allowed to invoke this function. Since we want to use API Gateway to invoke the Lambda function, we must specify it in our code.
Let’s codify these resources for our module in modules/lambda/main.tf:
data "archive_file" "file_download_function" {
  type        = "zip"
  source_dir  = "${path.module}/../../functions/s3_presign_url"
  output_path = "${path.module}/../../functions/tmp/s3_presign_url.zip"
}

resource "aws_lambda_function" "file_download_function" {
  filename         = data.archive_file.file_download_function.output_path
  function_name    = var.function_name
  role             = var.role_arn
  handler          = "function.handler"
  runtime          = "nodejs18.x"
  source_code_hash = data.archive_file.file_download_function.output_base64sha256

  environment {
    variables = {
      BUCKET_NAME = var.s3_bucket_name
      OBJECT_KEY  = var.s3_object
    }
  }
}

resource "aws_lambda_permission" "api_gateway_lambda_invoke_permission" {
  action        = "lambda:InvokeFunction"
  function_name = aws_lambda_function.file_download_function.function_name
  principal     = "apigateway.amazonaws.com"
}
Like before, we need to pass some variables to the module, including the ARN for the IAM role, to set up the Lambda function’s execution role. We’ll declare the necessary variables in modules/lambda/variables.tf:
variable "function_name" {
  description = "The name of the Lambda function"
  type        = string
}

variable "role_arn" {
  description = "The ARN of the IAM role to attach to the Lambda function"
  type        = string
}

variable "s3_bucket_name" {
  description = "The name of the S3 bucket containing the private object"
  type        = string
}

variable "s3_object" {
  description = "The name of the private S3 object"
  type        = string
}
We also need to expose some of the details of the Lambda function to set up API Gateway, so we’ll make these available in modules/lambda/outputs.tf:
output "lambda_invoke_arn" {
  description = "The ARN to use for invoking the Lambda function"
  value       = aws_lambda_function.file_download_function.invoke_arn
}

output "lambda_source_code_hash" {
  description = "The hash of the source code of the Lambda function"
  value       = aws_lambda_function.file_download_function.source_code_hash
}
Our Lambda function is ready to go, but it won’t function by itself. We’ll need to set up our API Gateway to put it to work.
Setting up API Gateway
Getting API Gateway requires multiple resources and is the most extensive module due to all the pieces we need to assemble. Here’s a high-level overview of what we need to have a functional and secure API Gateway endpoint:
- A REST API.
- A resource for the REST API.
- A
GETmethod to trigger the resource. - Integration between API Gateway and Lambda.
- A gateway deployment.
- A stage for the REST API.
- An API key.
- A usage plan.
- An association between the API key and a usage plan.
- An IAM role to write logs to Cloudwatch.
It’s a lot of resources to manage. Thankfully, having this set up with Terraform will make the process easier to maintain and keep track of in the future. This article will only go through some of these resources, covering a few vital sections required to successfully integrate Lambda through an API Gateway integration that requires an API key for authentication.
The basics of creating an API Gateway endpoint include a REST API, a gateway resource, and an HTTP method (a GET method, in our case). These resources will give us a URL to set up for invoking our Lambda function. An essential step we must take is to ensure our GET method doesn’t use any form of authorization, such as IAM or Cognito user pools. This configuration may be confusing since we’ll set up basic authorization through an API key, which is a separate setting on Terraform.
Next, we’ll set up the gateway integration between API Gateway and Lambda. Our Terraform configuration will specify that the GET method we will create, along with the REST API and gateway resource, will be a proxy integration with a Lambda function designated by AWS_PROXY. Another potential area of confusion is when specifying an AWS_PROXY integration type, the HTTP method for the integration must be a POST request. Otherwise, the integration won’t work.
Another crucial piece of API Gateway is the REST API deployment, which contains a snapshot of the existing configuration. When managing API Gateway deployments with Terraform, there are a few gotchas you need to be aware of:
- The deployment resource needs to be created after the gateway integration. Terraform typically knows the order in which it needs to provision resources, but sometimes, you need to explicitly specify the ordering of specific resources. In this example, we might create the deployment before the integration, which will cause an error.
- Any time we update the REST API or the Lambda function, we must trigger a new deployment to use the latest modifications. Terraform doesn’t know this, so we’ll set the
triggersargument with aredeploymentkey that checks whether one of the dependencies changed. We must also set thelifecycleargument to recreate the deployment resource using thecreate_before_destroykey to ensure it recreates all required resources correctly.
An API Gateway deployment will need a stage that references the deployment. The stage can use any name to identify it, and teams typically typically “staging”, “qa”, or “prod”. Besides providing the reference to the deployment, the stage will also be responsible for logging requests to the REST API. We’ll specify the destination ARN using the CloudWatch log group we’ll create in a separate module. We’ll also set the format to capture the data we want to audit those requests.
As mentioned earlier, the endpoint should have some form of authentication. As a quick pass, our GET method will use an API key, which we’ll create on AWS. We’ll also need an API Gateway usage plan to use the key, which we’ll associate with the deployment stage and the API key.
The final step is to tell our AWS account to set up a CloudWatch role. This is a region-wide setting, but it’s not active by default. Your API Gateway resources for this region will only log when specifying that we’ll use CloudWatch for a specific stage, which we’ll do in our configuration.
This entire infrastructure will be set up in modules/api_gateway/main.tf:
resource "aws_api_gateway_rest_api" "file_download_rest_api" {
  name = var.rest_api_name
}

resource "aws_api_gateway_resource" "file_download_gateway_resource" {
  rest_api_id = aws_api_gateway_rest_api.file_download_rest_api.id
  parent_id   = aws_api_gateway_rest_api.file_download_rest_api.root_resource_id
  path_part   = var.resource_path_part
}

resource "aws_api_gateway_method" "file_download_gateway_method" {
  rest_api_id      = aws_api_gateway_rest_api.file_download_rest_api.id
  resource_id      = aws_api_gateway_resource.file_download_gateway_resource.id
  http_method      = "GET"
  authorization    = "NONE"
  api_key_required = true
}

resource "aws_api_gateway_integration" "file_download_gateway_integration" {
  rest_api_id = aws_api_gateway_rest_api.file_download_rest_api.id
  resource_id = aws_api_gateway_resource.file_download_gateway_resource.id
  http_method = aws_api_gateway_method.file_download_gateway_method.http_method

  type                    = "AWS_PROXY"
  integration_http_method = "POST"
  uri                     = var.lambda_invoke_arn
}

resource "aws_api_gateway_deployment" "file_download_gateway_deployment" {
  rest_api_id = aws_api_gateway_rest_api.file_download_rest_api.id

  depends_on = [aws_api_gateway_integration.file_download_gateway_integration]

  triggers = {
    redeployment = sha1(jsonencode([
      var.lambda_source_code_hash,
      aws_api_gateway_rest_api.file_download_rest_api
    ]))
  }

  lifecycle {
    create_before_destroy = true
  }
}

resource "aws_api_gateway_stage" "file_download_gateway_stage" {
  stage_name    = var.api_stage_name
  rest_api_id   = aws_api_gateway_rest_api.file_download_rest_api.id
  deployment_id = aws_api_gateway_deployment.file_download_gateway_deployment.id

  access_log_settings {
    destination_arn = var.apigw_log_group_arn

    format = jsonencode({
      requestId      = "$context.requestId"
      ip             = "$context.identity.sourceIp"
      requestTime    = "$context.requestTime"
      httpMethod     = "$context.httpMethod"
      resourcePath   = "$context.resourcePath"
      status         = "$context.status"
      protocol       = "$context.protocol"
      responseLength = "$context.responseLength"
    })
  }
}

resource "aws_api_gateway_api_key" "file_download_api_key" {
  name = var.api_key_name
}

resource "aws_api_gateway_usage_plan" "file_download_usage_plan" {
  name = var.usage_plan_name

  api_stages {
    api_id = aws_api_gateway_rest_api.file_download_rest_api.id
    stage  = aws_api_gateway_stage.file_download_gateway_stage.stage_name
  }
}

resource "aws_api_gateway_usage_plan_key" "file_download_usage_plan_key" {
  key_id        = aws_api_gateway_api_key.file_download_api_key.id
  key_type      = "API_KEY"
  usage_plan_id = aws_api_gateway_usage_plan.file_download_usage_plan.id
}

resource "aws_api_gateway_account" "account" {
  cloudwatch_role_arn = var.apigw_cloudwatch_role_arn
}
As expected, we’ll have to define many variables to configure all the resources in this module. You’ll have these listed out in modules/api_gateway/variables.tf:
variable "rest_api_name" {
  description = "The name of the API Gateway REST API"
  type        = string
}

variable "resource_path_part" {
  description = "The path part of the API Gateway resource which is appended to the REST API endpoint"
  type        = string
}

variable "lambda_source_code_hash" {
  description = "The base64-encoded SHA256 hash of the Lambda function source code"
  type        = string
}

variable "lambda_invoke_arn" {
  description = "The ARN to invoke the Lambda function from the API Gateway resource"
  type        = string
}

variable "api_stage_name" {
  description = "The name of the API Gateway stage for deployment"
  type        = string
}

variable "api_key_name" {
  description = "The name of the API key to use for the API Gateway REST API and deployed stage"
  type        = string
}

variable "usage_plan_name" {
  description = "The name of the usage plan to use for the API Gateway REST API"
  type        = string
}

variable "apigw_cloudwatch_role_arn" {
  description = "The ARN of the IAM role to use for API Gateway CloudWatch logging"
  type        = string
}

variable "apigw_log_group_arn" {
  description = "The ARN of the API Gateway CloudWatch log group"
  type        = string
}
We’ll need to see the API Gateway URL and the API key to use them, which is the purpose of setting up all these resources. We also want the ID of the REST API to log in CloudWatch. We’ll set these in modules/api_gateway/outputs.tf:
output "apigw_url" {
  description = "The URL created for the API Gateway REST API to invoke the Lambda function"
  value       = aws_api_gateway_deployment.file_download_gateway_deployment.invoke_url
}

output "apigw_api_key" {
  description = "The API key created for the API Gateway REST API and deployed stage"
  value       = aws_api_gateway_api_key.file_download_api_key.value
  sensitive   = true
}

output "apigw_id" {
  description = "The ID of the API Gateway REST API"
  value       = aws_api_gateway_rest_api.file_download_rest_api.id
}
At this point, we have a complete serverless project set up. One last piece is missing: our CloudWatch log group for keeping a record of requests.
Setting up CloudWatch log groups
We only have one resource we need to take care of in the CloudWatch module:
- A CloudWatch log group.
The CloudWatch group we’ll set up will contain request and response information made to the stage set up in the API Gateway module. We could also set up a separate log group or use the same one to collect data from the Lambda function, but for simplicity, we’ll only gather details from the REST API.
Setting up a CloudWatch log group with Terraform is simple, only requiring a name and an optional number of days to retain the logs. For this project, we only wanted a one-week window into the requests made so we don’t rack up on the costs for this resource. We’ll configure this resource inside of modules/cloudwatch/main.tf:
resource "aws_cloudwatch_log_group" "apigw_log_group" {
  name              = var.apigw_log_group_name
  retention_in_days = var.apigw_log_group_retention
}
To manage the name and the optional number of days to retain the logs, we’ll pass them as variables as defined in modules/cloudwatch/variables.tf:
variable "apigw_log_group_name" {
  description = "The name of the CloudWatch log group to create for API Gateway"
  type        = string
}

variable "apigw_log_group_retention" {
  description = "The number of days to retain logs in the API Gateway log group"
  type        = number
  default     = 7
}
We’ll need the ARN of the log group to set up on API Gateway, so we’ll make this information accessible outside of our module in modules/cloudwatch/outputs.tf:
output "apigw_log_group_arn" {
  description = "The ARN of the CloudWatch log group for API Gateway"
  value       = aws_cloudwatch_log_group.apigw_log_group.arn
}
Putting the Terraform modules to use
Now that we have all of the required resources for this serverless project defined in separate modules, we can put them to use inside our project’s main entry point. Here’s how the main.tf root module looks like:
terraform {
  required_providers {
    aws = {
      source  = "hashicorp/aws"
      version = "~> 5.14.0"
    }
  }
}

locals {
  s3_bucket_name           = "dennmart-private-bucket"
  s3_object                = "my-private-object.txt"
  apigw_api_stage_name     = "prod"
  apigw_resource_path_part = "download"
}

module "iam" {
  source = "./modules/iam"

  s3_bucket_name   = local.s3_bucket_name
  s3_object        = local.s3_object
  role_name        = "S3PresignerAPIRole"
  role_policy_name = "S3PresignerAPIRolePolicy"
}

module "lambda" {
  source = "./modules/lambda"

  s3_bucket_name = local.s3_bucket_name
  s3_object      = local.s3_object
  function_name  = "S3PresignerAPIFunction"
  role_arn       = module.iam.role_arn
}

module "api_gateway" {
  source = "./modules/api_gateway"

  rest_api_name             = "S3PresignerAPI"
  resource_path_part        = local.apigw_resource_path_part
  lambda_source_code_hash   = module.lambda.lambda_source_code_hash
  lambda_invoke_arn         = module.lambda.lambda_invoke_arn
  api_stage_name            = local.apigw_api_stage_name
  api_key_name              = "S3PresignerAPIKey"
  usage_plan_name           = "S3PresignerAPIUsagePlan"
  apigw_cloudwatch_role_arn = module.iam.role_arn
  apigw_log_group_arn       = module.cloudwatch.apigw_log_group_arn
}

module "cloudwatch" {
  source = "./modules/cloudwatch"

  apigw_log_group_name = "/aws/api-gateway/${module.api_gateway.apigw_id}"
}
We’ll define a few local variables for reusability in our root module. All modules created for our resources are included in this file, with all their required variables defined. For demonstration purposes, the code above contains all the variables set up. Ideally, we would assign these variables outside of the entry point for reusability, such as through environment variables or a .tfvars file.
After applying these changes to AWS, we’ll need two pieces of information from the generated resources - the URL for invoking the Lambda function and receiving the pre-signed URL for downloading the private file and the API key required to make the API request. We’ll define these in the outputs.tf file.
output "api_url" {
  value = "${module.api_gateway.apigw_url}${local.apigw_api_stage_name}/${local.apigw_resource_path_part}"
}

output "api_key" {
  value     = module.api_gateway.apigw_api_key
  sensitive = true
}
You may have observed inside of outputs.tf that we’re marking the API key as a sensitive value by setting the sensitive argument to true. This setting will hide the value of the API key from the console when running terraform plan or terraform apply. However, this doesn’t mean the outputted value is secure—it’s still included in the Terraform state, so anyone with access to the state data can see it. When using Terraform with sensitive data, be aware of this limitation, especially when using the local state as we are in this project.
Provisioning our serverless infrastructure
With the entire Terraform setup in place, it’s time to provision our infrastructure on AWS. First, double-check that everything is set up correctly by previewing the execution plan with terraform plan. Once we’ve confirmed all our resources are set up and prepared to be created we can provision our infrastructure with terraform apply. If everything works without any problems, your serverless application is ready to go after a minute or two:
❯ terraform apply
module.lambda.data.archive_file.file_download_function: Reading...
module.lambda.data.archive_file.file_download_function: Read complete after 0s [id=fad92e8e677aeee749f4292f3b4a8806d4b65cf5]
module.iam.data.aws_iam_policy_document.assume_role: Reading...
module.iam.data.aws_s3_bucket.bucket: Reading...
module.iam.data.aws_iam_policy_document.assume_role: Read complete after 0s [id=669761788]
module.iam.data.aws_s3_bucket.bucket: Read complete after 0s [id=dennmart-private-bucket]
module.iam.data.aws_iam_policy_document.s3_policy_document: Reading...
module.iam.data.aws_iam_policy_document.s3_policy_document: Read complete after 0s [id=3717042757]

Terraform used the selected providers to generate the following execution plan. Resource actions are indicated with the following symbols:
  + create

###################################################
# Resource plan and provisioning cut for brevity...
###################################################

Apply complete! Resources: 17 added, 0 changed, 0 destroyed.

Outputs:

api_key = <sensitive>
api_url = "https://1234567890.execute-api.ap-northeast-1.amazonaws.com/prod/download"
Getting a pre-signed URL from API Gateway and Lambda
On successful deployment, we’ll see the URL generated for API Gateway at the end of Terraform’s output (the above is an example URL). The endpoint requires an API key, so you’ll receive a 403 Forbidden response for requests without a valid key specified in the x-api-key request header. Since we marked our API key as sensitive, Terraform suppresses the value in its output. But since it’s still a part of the Terraform state, we can grab this data using the -raw flag in the terraform output command (terraform output -raw api_key).
With the API endpoint and key in hand, we can now make authenticated requests and receive a pre-signed URL to download our private file from S3 without dealing with IAM roles or any other form of authentication. Here’s an example of accessing this using the awesome HTTPie CLI:
❯ http https://1234567890.execute-api.ap-northeast-1.amazonaws.com/prod/download x-api-key:"private-api-key"
HTTP/1.1 200 OK
Connection: keep-alive
Content-Length: 1427
Content-Type: application/json
Date: Tue, 05 Sep 2023 08:40:43 GMT
Via: 1.1 b19180941ff31a90b2ec56f058340400.cloudfront.net (CloudFront)
X-Amz-Cf-Id: 41QMWlTkzaXXtVwU0ro1R7cZ_N1h6uPFSBZ6ELC8nRWt-C7xIWhF9A==
X-Amz-Cf-Pop: NRT51-C4
X-Amzn-Trace-Id: Root=1-64f6e98b-0066860d36fe9eee2811f1e3;Sampled=0;lineage=88f52900:0
X-Cache: Miss from cloudfront
x-amz-apigw-id: KxltyFNRNjMFt7w=
x-amzn-RequestId: 955ddf3c-8916-4a6b-8567-01fedeaef402

{
    "presignedUrl": "https://dennmart-private-bucket.s3.ap-northeast-1.amazonaws.com/my-private-object.txt?X-Amz-Algorithm=AWS4-HMAC-SHA256&X-Amz-Content-Sha256=UNSIGNED-PAYLOAD&X-Amz-Credential=ASIA4Z3JBOJXQJO2YP43%2F20230905%2Fap-northeast-1%2Fs3%2Faws4_request&X-Amz-Date=20230905T084043Z&X-Amz-Expires=60&X-Amz-Security-Token=IQoJb3JpZ2luX2VjEIH%2F%2F%2F%2F%2F%2F%2F%2F%2F%2FwEaDmFwLW5vcnRoZWFzdC0xIkYwRAIfS54yWmpxUFVipX9jTjmrDQ3u%2FLNpjGCNfGvyquVLjQIhAIQRejKKgbzKidHi%2FU3WEAwxpINAGb9Pxi4KhjvktKZLKoYDCFoQAxoMODgwMTUxNzIwNTU5Igy6k%2BELvNR2130J0jIq4wKwbM49lv7WjhUFbKQ%2FGz9a4OwhJgODYU%2Fe%2Bp4CJAXog7skf7mj6eZ6QrDKFSDn0QUchgXGNPEmm6UvxKA%2FmLe2%2BX4qBzxrFTEfkD3Nl63yY1t111DCMvmo9B9wZluXIuk7jvIjgfIwNbo%2BOyRWsaUASEjFedFHD%2BtTXSQMULbg1MnCuJOTYlJ57zVcbaCmpvxwbJe%2BNP7iAHVBMyegrmehJ5zXVrwu1eMVTHkdvDMHvByU%2B0RokFpHCdzWjmuTzm56xb66RuAgncrdJvXASBkb46hd6IPZSHVm2DCTiI3%2BebOcCy7gbyoojZ3MwFiXBfn6XlTWoIAtnmIit0lFyRnEM%2Bn%2FEAmXWz8KymHisZEboX5AAyvWiQ3vq9MhcWMAa5zNtcPQuE7PIDq62Qp2R5T4%2Bke16%2Fm%2FiFd4M5ZaJthJ7lyEkLXKhpO%2FhRX%2FQTt10ZhdoEsGLVkkS%2BtSIbEe9LKHY%2F%2BgMNLS26cGOp4BZ5S4AL7piaViS6ZSqMzjsXnhsakQS0Al5INbywU%2Fmb6YvGdGFGP8yGZg6wfnQqcsLuaHoNNOek5dH2VY7KpIxMVbhAfh%2FvzM%2FsZlinL%2BOWYoSbyNibiLSlED5FlrGTvuE527YO3TADX75doVGtBtHgo0Avb9%2B%2FjWJrQcKD1M0YSDQZpQyhZTSlFn5LyImK6xkO15GsSOPSX%2FmesY9EM%3D&X-Amz-Signature=b9aca9bbf5bf3d6ee621760019c10aeb7953f730e13363c768ba128a593ebb66&X-Amz-SignedHeaders=host&x-id=GetObject"
}
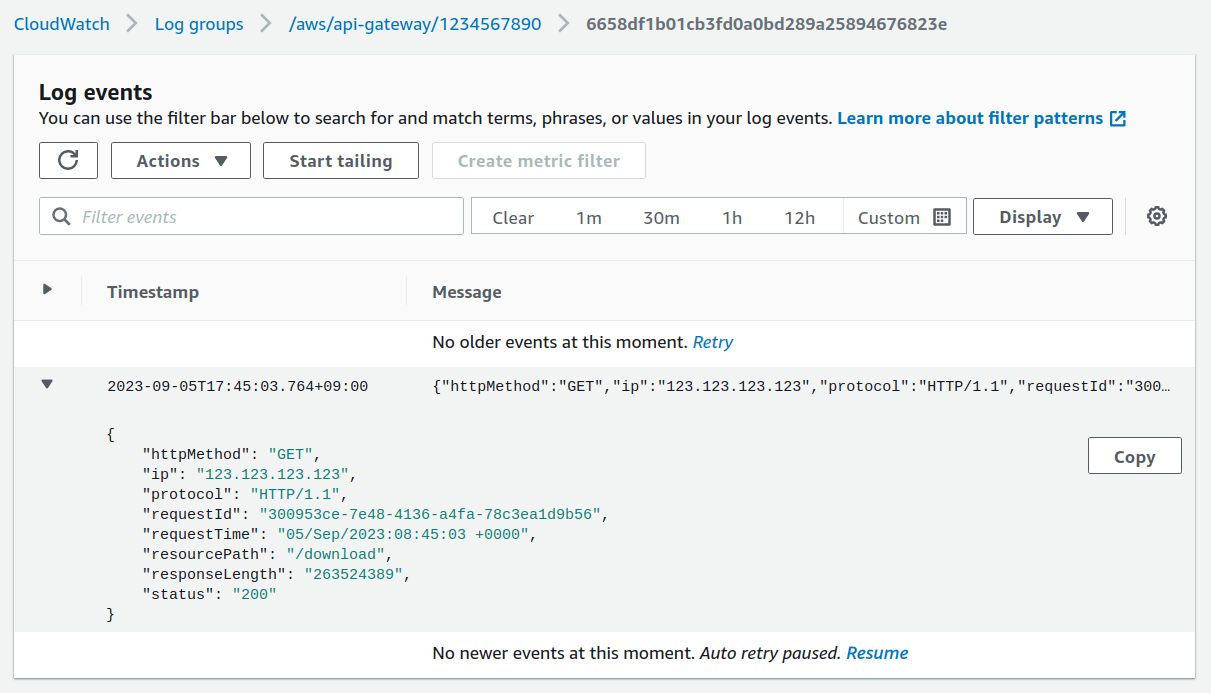
The API returns a JSON response that includes the pre-signed link. If you go to CloudWatch on your AWS account, you’ll be able to see this request come in with additional details about the request:
Summary
Creating a serverless application using API Gateway and Lambda to access private files on Amazon S3 is an effective way to sidestep the typical hassles of setting up access on AWS. Instead of spending time managing IAM users and messing around with roles and policies, you can have a simple and secure setup that allows you to generate temporary pre-signed URLs without exposing non-public files or needing AWS credentials.
Using Terraform to provision and manage this infrastructure makes this process more efficient by setting up the entire architecture and permissions for this project in a codified way. It makes the initial provision easier and helps you maintain and extend the application with just a few changes to your Terraform scripts.
The example in this article is just one way to handle access to private S3 files. It might not be the ultimate solution for all use cases. While more secure and robust methods exist, like using Amazon Cognito instead of API keys, API Gateway and Lambda provide a solid middle ground between ease of use and security.
The complete code for the Terraform project in this article is available on GitHub.
Do you need someone to help with your AWS infrastructure? With over 20 years of professional experience in software and DevOps engineering, I’ve got the expertise to help you manage the complexities of AWS. As an AWS Certified DevOps Professional, I can help your organization maximize its cloud investment. Ready to take the next step? Let’s talk—contact me to discuss how we can work together.