I’m a huge fan of Kamal for deploying my web applications. I love that it gives me more control over how and where I host my web apps, letting me choose more powerful cloud server providers at a cheaper cost without sacrificing ease of use. I’ve been updating my personal projects to use Kamal for deployments, and I couldn’t be happier with how smooth it’s been for me to migrate to better hardware for less money.
However, I admit that I miss plenty of things from “the old way” of deploying applications on a Platform as a Service like Heroku. One thing I miss quite a bit is review apps. A review app is a temporary environment based from a branch or pull request that’s automatically provisioned with your application’s infrastructure and allows you to test changes before merging them into your main branch. I’ve used Heroku for years (and still do in client work), and review apps are one of the more useful features these services provide.
After migrating some applications to deploy with Kamal, I dearly missed having a review app to test new features when I opened a pull request. As the saying goes, you don’t know what you got ’til it’s gone. But using Kamal for deployments doesn’t mean we get to miss out on review apps forever. Using a couple of tools, we can recreate the automatic provisioning and deployment of a web app for preview purposes.
In this and future articles, I’ll go through a process I set up for one of my projects that uses Kamal for deployments, where opening a pull request creates the cloud infrastructure needed to run my app, uses Kamal to deploy the application, keeps it up to date as the branch gets updated, and cleans everything up once I merge or close the pull request. This entire sequence replicates what Heroku and similar services do to set up review apps, with the benefit of using your preferred systems.
Process Overview
I’ll use one of my projects called TeamYap for this series. TeamYap is a Ruby on Rails application deployed with Kamal on a Hetzner Cloud server. The application architecture is straightforward: a single server running the web application and a worker process for asynchronous jobs, along with a PostgreSQL database and Redis on the same server instance. My Hetzner Cloud environment also has a firewall allowing only HTTP and SSH connections to the server.
I want to replicate this environment to deploy my application’s code from a given branch whenever I open a pull request on GitHub, where the TeamYap code lives, and I’d like to automate the process entirely. I can do this with a couple of tools that I’m already using:
- Terraform for provisioning new servers.
- Kamal for deploying the application.
- GitHub Actions to trigger workflows based on pull request events.
This article will cover the automated cloud infrastructure provisioning using Terraform and GitHub Actions, and a follow-up article will cover how to deploy the application to the newly-provisioned server using Kamal.
Prerequisites for Hetzner Cloud
Before using Terraform and GitHub Actions, there are a few prerequisites to handle on the Hetzner Cloud account.
Generate an API token
You’ll need an API token to connect Terraform with your Hetzner Cloud account. You can generate one by logging in to the Hetzner Cloud console, clicking on the project where you’ll provision your servers, going to your desired project, then visiting the Security page and going to the API tokens section. The API token needs read and write permissions, so make sure to check that option. Remember to save the API token in a secure location, as it’s only shown once after generation.
Set up your SSH keys
You’ll also need to set up SSH keys on the Hetzner Cloud project to access any new provisioned servers. This step will allow you to log in to any server to debug any issues when using a review app. You can add a public SSH key using Terraform through the hcloud_ssh_key resource for the Hetzner Cloud provider, or on the Hetzner Cloud console by going to the SSH keys section under the Security page in the Hetzner Cloud project. You can also use the same key to deploy with Kamal, but in the following article, I’ll cover generating a separate SSH key for deployment purposes to keep your personal keys secure.
Create a firewall for your review apps
All review app servers can share the same firewall on Hetzner Cloud to allow HTTP and SSH connectivity without creating new ones with the same rules. You can set up the firewall with Terraform and the hcloud_firewall resource for the Hetzner Cloud provider. If you prefer the web console, go to your project and select Firewalls. At a minimum, set up your firewall to allow all outbound traffic and allow inbound traffic only on the following ports for any IPv4 and IPv6 request:
- Port 22 (SSH)
- Port 80 (HTTP)
- Port 443 (HTTPS)
Setting up Terraform to Provision New Servers
The first step is to define the infrastructure we want to provision using Terraform. In a previous article titled “Get Started With Hetzner Cloud and Terraform for Easy Deployments”, I cover the entire process of spinning up a server on Hetzner Cloud using Terraform, so I won’t go into too much detail in setting up the Terraform project here. If you’re new to Terraform, I encourage you to check out that article first since it covers everything you need to know.
To simplify the whole review app generation process, I will store the Terraform scripts in the Rails repository so I don’t have to deal with pulling these in from an external source. I could create modules stored in a separate repository, but since the infrastructure needed to run the app isn’t complex, storing it alongside the codebase is easier. I’ll start by creating a directory in my Rails repository called infrastructure, and the first file I’ll create is the main configuration file called main.tf.
I’ll begin setting up this file by defining the Hetzner Cloud provider for Terraform:
terraform {
  required_providers {
    hcloud = {
      source  = "hetznercloud/hcloud"
      version = "1.49.1"
    }
  }
}

provider "hcloud" {}
The Hetzner Cloud provider requires an API token to provision resources in your account, which can be set in the provider block here or with the HCLOUD_TOKEN environment variable. I’ll leave the provider without any additional configuration since I plan to set up the API token as a secret later when setting up the GitHub Actions workflow so I can then use it as an environment variable.
Next, I want to set up two data sources to refer to when defining the server resource in this script. The first one is the SSH key I set up in my Hetzner Cloud account, which I’ll look up by name:
data "hcloud_ssh_key" "review_app_ssh_key" {
  name = "Review App Deploy Key"
}
The other data source I need is for the firewall that all my review apps will share, also looked up by name:
data "hcloud_firewall" "review_app_firewall" {
  name = "Review App Firewall"
}
To wrap up the Hetzner Cloud provisioning, I only need to spin up a cloud server for each review app when opening a pull request, so I’ll define that at the end of the script. The server I plan to use for the review apps is an Ubuntu 24.04 server in the Ashburn, Virginia datacenter, and it’s the CPX11 type (an AMD server with two vCPUs and 2 GB of memory—enough for our review apps). It will also contain references to the SSH key and firewall so the server gets provisioned with these set up.
resource "hcloud_server" "review_app_server" {
  name         = var.server_name
  server_type  = "cpx11"
  location     = "ash"
  image        = "ubuntu-24.04"
  ssh_keys     = [data.hcloud_ssh_key.review_app_ssh_key.id]
  firewall_ids = [data.hcloud_firewall.review_app_firewall.id]
}
You might notice that the name attribute for the server is a variable. Each server name in a Hetzner Cloud project must have a unique name, so when running the provisioning step, we’ll have to specify a name for each one. I’ll handle setting the name on the GitHub Actions workflow later, but I’ll need to declare the input variable so Terraform can let me define it through the command line or environment variables.
I’ll create a new file under the infrastructure directory called variables.tf, and here I’ll set the variable declaration, which is all I’ll need.
variable "server_name" {
  type = string
}
Before going any further, let me test this initial pass of the server provisioning. I’ll initialize the project by going into the infrastructure directory in the command line and running terraform init. This command will pull down the Hetzner Cloud provider and get everything ready for us in this project.
Next, I’ll run terraform plan to ensure I have a valid API token and that Terraform can retrieve the SSH key and firewall data sources. I’ll set the API token using the HCLOUD_TOKEN environment variable as part of the command and set the value of the server_name variable using the -var command line option:
HCLOUD_TOKEN=<API Token> terraform plan -var="server_name=review-app-server-1"
If I set everything up correctly, I should see the execution plan for this server:
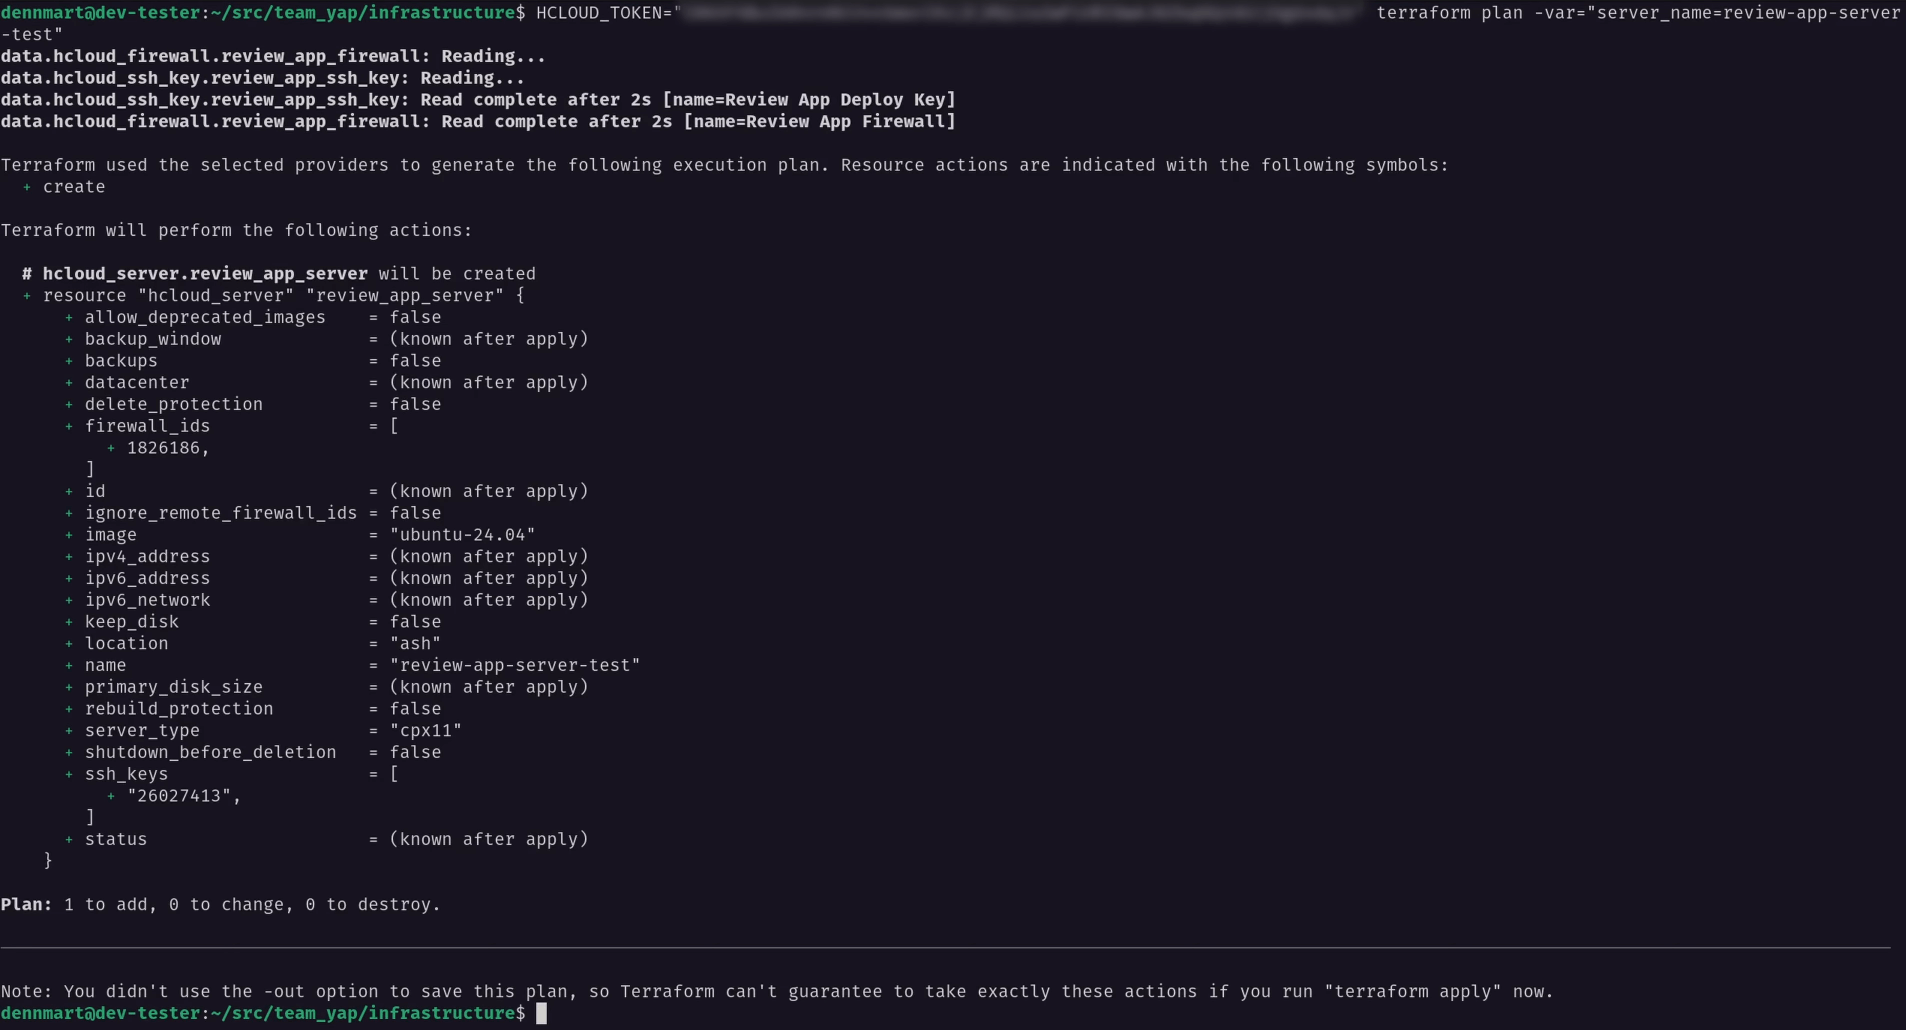
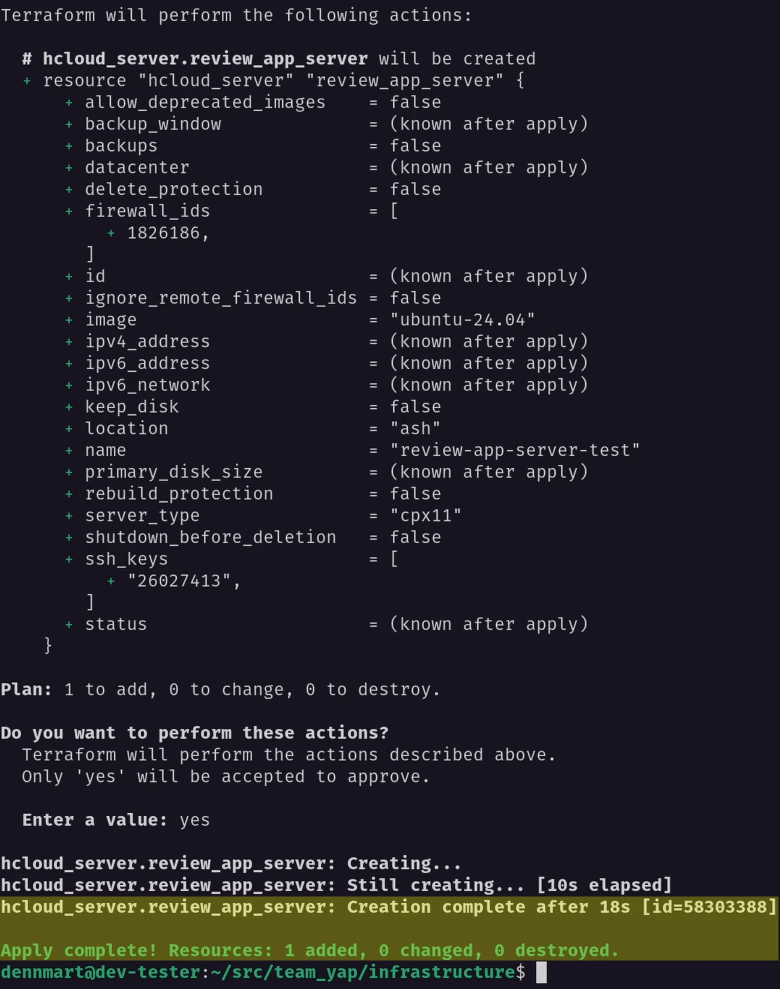
I’ll go ahead and apply these changes to double-check that the variable is working as expected and a server gets spun up using terraform apply:
HCLOUD_TOKEN=<API Token> terraform apply -var="server_name=review-app-server-1"
Again, if everything is correct, we’ll have a brand-new server created on Hetzner Cloud in under a minute:
Now that I know the server provisioning is working as expected, the last thing I’ll do is set up an output value to retrieve the new server’s IP address. We’ll need this later to know where to deploy and access the review application.
Under infrastructure, I’ll create another new file called output.tf and declare the output value for the server’s IPv4 address:
output "ipv4_address" {
  value = hcloud_server.review_app_server.ipv4_address
}
When I save this file and re-run the terraform apply command again, it won’t provision a server since we’ll have it in our local state from the previous terraform apply command, but it will show the IP address for the new server, so we’ll have it available to use:
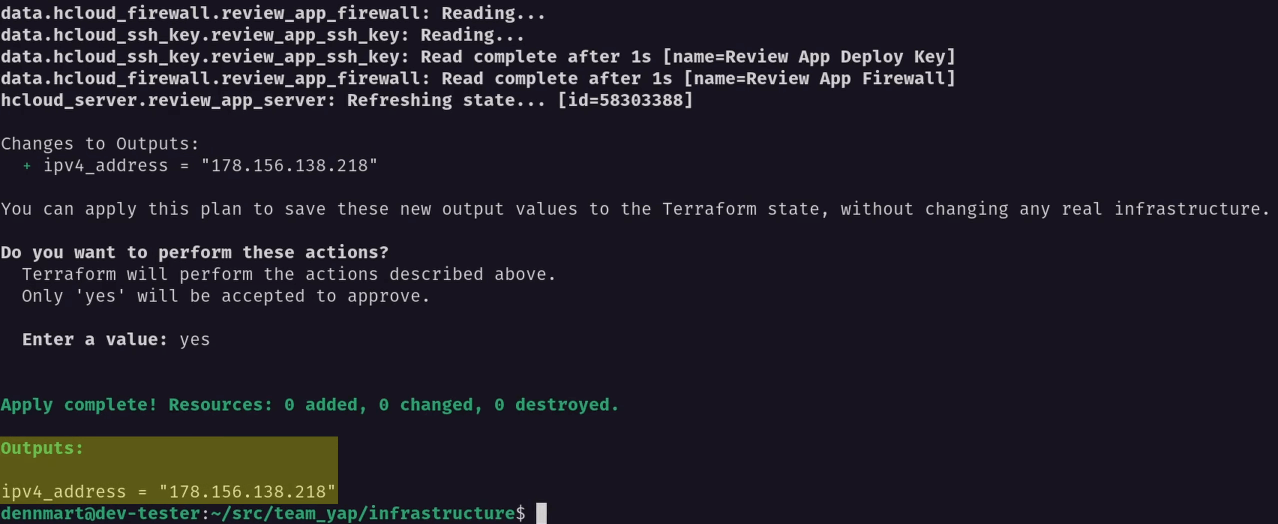
Everything looks like it’s working as expected, so I’ll clean up things by tearing down the test server using terraform destroy (still using -var to match the server name from the local state):
HCLOUD_TOKEN=<API Token> terraform destroy -var="server_name=review-app-server-1"
Configuring a Terraform Backend to Save State Remotely
Earlier, I mentioned Terraform’s state when running terraform apply. Running the example above works fine as a test, but since the plan is to use Terraform on GitHub Actions, we can’t store our state locally since it will be lost every time we run the workflow. Not having the state means we won’t know whether the Hetzner Cloud server for the review app already exists, and the workflow will always try to create new infrastructure when updating a pull request branch or not shut down any existing servers when closing a pull request.
GitHub Actions allows caching files and directories through the cache action, but this approach isn’t ideal since it deletes cache entries if not accessed in a week. We’ll need a more durable place to store the state, and that’s where Terraform’s backends come into play.
A backend handles where Terraform stores its state. This setting helps us set the state where anyone with access to the backend store can have the latest information of the managed infrastructure, which we’ll need when using Terraform on a continuous integration service like GitHub Actions.
Terraform offers a few different backends out of the box. For this example, I’m going with the s3 backend, which stores its backend on an Amazon S3 bucket and also gives the option to lock the state using DynamoDB to prevent it from being overwritten while another operation is in progress.
To define the s3 backend in Terraform, the only thing needed is to specify the backend block inside the top-level terraform section in main.tf with the name of the backend:
terraform {
  required_providers {
    hcloud = {
      source  = "hetznercloud/hcloud"
      version = "1.49.1"
    }
  }

  # Set up the S3 backend.
  backend "s3" {}
}
The block also accepts a few configuration settings, like setting the keys to access the S3 bucket, the bucket name, the state file name, and more. For this example, I’ll configure the backend through the GitHub Actions workflow using a combination of environment variables and generating a configuration file so I can leave this block empty.
One important note about using the s3 backend is that it requires AWS IAM permissions to read and write to the S3 bucket that will hold the Terraform state. If using the optional state-locking functionality (as I’ll do in this example), some access to the DynamoDB table that tracks any ongoing Terraform operations is also needed. For details on the IAM permissions needed, read the s3 backend documentation on Terraform’s website.
Updating .gitignore for Terraform
One last thing to do before proceeding is to update the .gitignore file in the repo to make sure we don’t commit any unnecessary files or sensitive data related to Terraform. The easiest way to do this is to go to GitHub’s gitignore repository, which contains an extensive collection of templates for all kinds of tools, and copy the contents of the Terraform.gitignore template to the repo’s .gitignore file.
Pasting the entire template will work correctly to ensure the repo has what it needs for the Terraform provisioning to work. However, take the time to review each entry and tweak it as necessary before committing the new files. Never mindlessly copy and paste anything from the Internet into your codebase, even from a reputable source.
Setting up the Github Actions Workflows
I’ve now set up the Terraform project to provision a new server and save its state remotely, so let’s create a GitHub Actions workflow to begin testing it out. I’ll create two separate workflows—one to provision and deploy the infrastructure when opening or updating a pull request and one to tear down the infrastructure when closing a pull request. I can set up both of these in a single workflow and use conditional statements based on the event, but I’ll keep them in separate workflows to simplify the explanation for this article.
I’ll create a new file for the first workflow under the .github/workflows directory called review-app-deploy.yml in my repo. You can name the file anything you want, as long as it’s a YAML file under the .github/workflows directory. This workflow will eventually contain the complete process of creating a new server and using Kamal to deploy the Rails application to the server. In this article, I’ll only cover the provisioning steps.
The GitHub Actions workflow to use the Terraform project in the repo is as follows:
name: Review app deployment

on:
  pull_request:
    types:
      - opened
      - reopened
      - synchronize

jobs:
  provision:
    runs-on: ubuntu-latest

    defaults:
      run:
        working-directory: ./terraform

    env:
      HCLOUD_TOKEN: ${{ secrets.HCLOUD_TOKEN }}
      AWS_ACCESS_KEY_ID: ${{ secrets.AWS_ACCESS_KEY_ID }}
      AWS_SECRET_ACCESS_KEY: ${{ secrets.AWS_SECRET_ACCESS_KEY }}
      TF_VAR_server_name: "team-yap-review-${{ github.event.pull_request.number }}"

    steps:
      - name: Checkout repository
        uses: actions/checkout@v4

      - name: Setup Terraform
        uses: hashicorp/setup-terraform@v3
        with:
          terraform_version: 1.10.3

      - name: Create backend configuration
        run: |
          cat <<EOF > backend.conf
          bucket = "dennmart-terraform"
          region = "ap-northeast-1"
          key = "team-yap-review-${{ github.event.pull_request.number }}/terraform.tfstate"
          use_lockfile = true
          dynamodb_table = "dennmart-terraform-state"
          EOF

      - name: Terraform Init
        run: terraform init -backend-config backend.conf

      - name: Terraform Validate
        run: terraform validate

      - name: Terraform Apply
        run: terraform apply -auto-approve
name
I’m starting this workflow with the name key to set up a descriptive name for the workflow. This key is optional, but it’s a good practice to clearly describe the workflow for debugging issues and refer to this workflow if you want to use it for others in your project.
on
The on key specifies which events we want to trigger this workflow on GitHub. As mentioned, I want to activate this workflow when opening or updating a pull request. We can accomplish this by setting the pull_request event type and specifying the types of activities to kick off the process.
The opened activity checks when someone opens a new pull request, the reopened activity happens when reopening a previously closed pull request, and the synchronize activity occurs whenever someone updates the base branch for the pull request. These three activities will take care of provisioning the server and deploying the application for testing.
jobs
Each workflow requires one or more jobs, which defines what we want to execute on GitHub Actions. The first key under jobs is the ID to use, which I set as provision so I can refer to it later. Under the ID, I’ll configure the runs-on setting to use the GitHub-hosted runner for the latest version of Ubuntu (ubuntu-latest) to run the steps I’ll define later in the workflow.
jobs.provision.defaults
The defaults setting under the job ID allows us to define configuration for all steps in a job. I placed my Terraform script in the infrastructure directory in the repo, and I’ll want to execute any Terraform commands while in this directory. Instead of defining it in every individual step, I can use the defaults section, then specify run to apply the settings under here for all commands in the job, and finally set the working-directory: to ./infrastructure, meaning GitHub Actions will execute all our commands in this directory at the root of the checked-out code for our repo.
jobs.provision.env
Before setting up the steps for this provisioning job, I’ll need to define a few environment variables for Terraform. Most of the values for these environment variables are set as secrets in this GitHub repository since I don’t want to expose any sensitive information.
HCLOUD_TOKEN: As mentioned earlier in this article, the Hetzner Cloud Terraform provider checks for the API token in this environment variable if not set in the script. I’ll need to set this up so my Terraform script will work.AWS_ACCESS_KEY_ID/AWS_SECRET_ACCESS_KEY: These environment variables allow thes3backend to authenticate an IAM user that has access to S3 and (optionally) DynamoDB.TF_VAR_server_name: My Terraform script requires theserver_namevariable to provision the server’s name. Terraform allows us to set these values through environment variables. The server name must be unique across a Hetzner Cloud project, so I’ll use the pull request number taken from thegithubcontext to set it dynamically.
jobs.provision.steps
With all the job’s setup out of the way, I can finally begin defining the steps to provision the server. This job contains six steps:
- First, I’ll check out the code from my repo into the runner using the
actions/checkoutaction. - Next, I’ll use the official
hashicorp/setup-terraformaction to set up Terraform’s command line interface in the runner. - I’ll dynamically generate a configuration file to use in the
s3backend, which uses key-value pairs to set up the backend’s settings. In this example, I’ll set up the S3 bucket and region where I plan to save the state, a dynamically generated file to store the state for all servers provisioned by pull requests, and the settings to enable state locking with DynamoDB. - After setting up the configuration file, I’ll initialize the Terraform project using
terraform initwith the-backend-configoption pointing to the file created in the previous step. - I’ll run a quick validation of the Terraform project using
terraform validateto check if I made a mistake with the syntax and fail quickly before attempting to provision the infrastructure. - Finally, I’ll run
terraform applyto provision the server on Hetzner Cloud, using the-auto-approveoption since this step needs to happen without user intervention.
These steps wrap up the provisioning workflow, so let’s get to the teardown workflow when closing a pull request. I’ll create a new file under .github/workflows called review-app-teardown.yml and copy the contents of the provision/deploy workflow, making a few minor revisions:
name: Review app teardown

on:
  pull_request:
    types:
      - closed

jobs:
  provision:
    runs-on: ubuntu-latest

    defaults:
      run:
        working-directory: ./terraform

    env:
      HCLOUD_TOKEN: ${{ secrets.HCLOUD_TOKEN }}
      AWS_ACCESS_KEY_ID: ${{ secrets.AWS_ACCESS_KEY_ID }}
      AWS_SECRET_ACCESS_KEY: ${{ secrets.AWS_SECRET_ACCESS_KEY }}
      TF_VAR_server_name: "team-yap-review-${{ github.event.pull_request.number }}"

    steps:
      - name: Checkout repository
        uses: actions/checkout@v4

      - name: Setup Terraform
        uses: hashicorp/setup-terraform@v3
        with:
          terraform_version: 1.10.3

      - name: Create backend configuration
        run: |
          cat <<EOF > backend.conf
          bucket = "dennmart-terraform"
          region = "ap-northeast-1"
          key = "team-yap-review-${{ github.event.pull_request.number }}/terraform.tfstate"
          use_lockfile = true
          dynamodb_table = "dennmart-terraform-state"
          EOF

      - name: Terraform Init
        run: terraform init -backend-config backend.conf

      - name: Terraform Validate
        run: terraform validate

      - name: Terraform Destroy
        run: terraform destroy -auto-approve
The changes made to this workflow are:
- Updating the
nameof the workflow to reflect what it does. - Adding the
closedactivity type for the events that trigger this workflow, which handles the scenario when someone closes an existing pull request (whether by merging the branch or closing it without a merge). - Replacing the “Terraform Apply” step with “Terraform Destroy”, which runs
terraform destroy -auto-approveto remove all the infrastructure defined in the state without user intervention.
The rest of the workflow will remain the same since we’ll need the same configuration to set up Terraform and access the remote state on Amazon S3. As I mentioned, I can merge this workflow with the provisioning and deployment one, but I’ll keep it separate for simplicity throughout this series.
Putting the Github Actions Workflows to Work
Let’s ensure I correctly set up these workflows, so I’ll save and commit the files to a new branch in my Git repository, then push it to GitHub and create a new pull request.
When I open the pull request, I’ll go to the Actions tab in my repository, and I should see a new workflow run triggered by the opened activity that I set up in the provisioning and deployment workflow. If I set up everything correctly, the workflow will run through each step and provision the new server on my Hetzner Cloud project.

With the provisioning workflow validated, I’ll close the pull request, which should trigger the closed activity and run the teardown workflow. Again, if everything works, the workflow will delete the server from Hetzner Cloud and finish its run successfully.

Wrapping Up
This article sets up the foundation for creating a review app system when using Kamal to deploy your web applications. In this article, I covered how to use GitHub Actions to run a Terraform script that automatically provisions new servers on Hetzner Cloud that we can use to deploy a web application for testing. While the example used here uses tools like Terraform, Hetzner Cloud, and GitHub Actions, you can use these ideas to work on your preferred tools, whether it’s OpenTofu, Digital Ocean, or GitLab.
In the following article, I’ll expand on these GitHub Actions workflows to set up Kamal for deploying your application to the server provisioned by opening a pull request. This step will handle configuring GitHub Actions to allow access for deploying to your server and an easy way of setting up DNS records to easily access the application for testing. Stay tuned!
Need help with your Kamal setup?
If you or your team need some assistance with Kamal, whether it's to replicate Heroku's review app functionality or any other Kamal or Rails-related setup, let's talk. Reach out today so we can start a conversation on how I can help with your projects.
Screencast
If this article or video helped you understand how to set up PostgreSQL database replication for your Kamal-deployed web applications, consider subscribing to my YouTube channel for similar videos containing tips on helping Rails developers ship their code with more confidence, from development to deployment.

