Throughout this series, we’ve set up an automated system to create temporary environments and deploy web applications for review purposes, similar to Heroku’s review apps functionality. The first step consisted of using Terraform to spin up new servers on the cloud when opening a pull request on GitHub, then we set up Kamal to use a new destination for deploying apps to those review environments. In the last article of this series, we finished automating the process of using Kamal to deploy a web application to the new infrastructure.
At this point, we’ll have a fully functional instance of our application ready for validation. The deployed application is available through the server’s IP address, which might not work in all cases. Because we’re using Kamal to deploy our application, accessing the app through the IP address means we can’t take advantage of Kamal Proxy’s automatic SSL certificate generation. This functionality uses Let’s Encrypt to generate the certificate, and it requires a valid hostname, which we don’t have with the existing process.
While we can always manually set up a domain name for the new servers, this series aims to automate the process, including creating a unique URL for each review app we spin up in our repository. In this article, I’ll show you one way to leverage the existing setup we have so far to create new domain names as needed for each new environment spun up by the GitHub Actions workflow.
Catch up with the series
If you want to get up to date with what we’ve covered so far in this series, check out the previous articles before jumping into this one:
Using Terraform to Set Up DNS
At the beginning of this series, we set up a Terraform script to handle the server provisioning for our application. The Terraform configuration used in this example creates a new server on Hetzner Cloud and configures it with what we need to make it available for deployment using Kamal. Using Terraform makes it easy for our continuous integration service (in this example, GitHub Actions) to generate the infrastructure without user intervention.
Besides the benefits of using Terraform to define your infrastructure as code and let you make repeatable deployments, one of its primary strengths is the ability to mix and match different services under one configuration. Many projects nowadays use various systems in their architecture, whether for cost optimization, avoiding vendor lock-in, or better flexibility with the services they need. With Terraform, you can consistently configure everything in a single place.
The core of Terraform consists of providers, which are plugins for interacting with different APIs, systems, and services. You’ll find providers for just about any major cloud or SaaS services, many of which are officially supported by the service or Terraform itself. For this series, we’ve been using the Hetzner Cloud Terraform provider to spin up a new server, set up our deploy keys, and configure the server’s firewall.
Now that we want to set up a domain name for this server, Terraform can help us set it up. The TeamYap application used throughout this series uses Cloudflare to manage its DNS records. Fortunately, Cloudflare officially maintains and supports a Terraform provider to use with its service, meaning I can use it in my existing configuration to add a new DNS record for my review apps and set up a unique URL available as soon as we deploy the application to the new server.
Using other DNS services
While the rest of this article explains how to generate DNS records on Cloudflare through Terraform, you can use the information shown here with a different provider. There are Terraform providers for many popular DNS services like AWS for Route 53, DNSimple, or Bunny.net.
Adding Cloudflare Provider to Existing Terraform Configuration
Our existing Terraform script currently contains the following terraform block for its configuration:
terraform {
  required_providers {
    hcloud = {
      source = "hetznercloud/hcloud"
      version = "1.49.1"
    }
  }

  backend "s3" {}
}

provider "hcloud" {}
The script sets up the Hetzner Cloud provider as a requirement and a provider block, which is empty since we’re authenticating through an environment variable and don’t need to add configuration settings.
We’ll want to add the Cloudflare provider as an additional requirement in our script so we can add the latest version in the required_providers block under terraform:
terraform {
  required_providers {
    hcloud = {
      source = "hetznercloud/hcloud"
      version = "1.49.1"
    }

    # New provider.
    cloudflare = {
      source  = "cloudflare/cloudflare"
      version = "5.2.0"
    }
  }

  backend "s3" {}
}
We’ll also need to add a new provider block in the root of the script to set up the Cloudflare provider and its configuration:
provider "hcloud" {}

# New provider configuration for Cloudflare.
provider "cloudflare" {}
Similar to configuring the Hetzner Cloud provider, we’ll also leave the Cloudflare provider block empty. The only configuration setting we’ll need to set up in this example is an API token for authenticating our Cloudflare account.
Generating an API token on Cloudflare
The Cloudflare provider allows us to set different configuration settings via environment variables, such as CLOUDFLARE_API_TOKEN to set the authentication token. The Cloudflare provider documentation has more information for the configuration settings.
To generate an API token for editing DNS records on Cloudflare, follow the instructions on the “Create API Token” page in Cloudflare’s documentation. You can use the Edit Zone DNS template when creating a new API token, which sets the appropriate permissions (write access to the specified DNS zone). Once created, save the token somewhere secure. We’ll put this value in an environment variable in GitHub Actions later.
Deprecated API keys on Cloudflare
Cloudflare previously supported global keys for using their API. These keys are still supported, and we can use them with the Terraform provider via the CLOUDFLARE_API_KEY environment variable. However, global API keys have various limitations, and Cloudflare recommends using API tokens instead.
With the Cloudflare provider set up, we can add a new resource in our Terraform script to create a new DNS record for our review app server.
Creating DNS Records on Cloudflare Through Terraform
Before setting up the resource to create a new DNS record, we’ll first need to retrieve the identifier of the Cloudflare DNS zone for the root domain name to modify (teamyap.app for my application). To do that, we can use a data source called cloudflare_zone to fetch that information and refer to it in our Terraform script, which I’ll add in my main.tf file:
data "cloudflare_zone" "team_yap_dns_zone" {
  filter = {
    name = "teamyap.app"
  }
}
The cloudflare_zone data source can accept different attributes to filter the DNS zones available to us through the API token generated earlier. The easiest way to get the DNS zone for a specific domain is to use the name attribute with the value of the root domain.
Using this data source, I can now use a new Terraform resource called cloudflare_dns_record to create a brand-new DNS record in the teamyap.app zone. I’ll add this resource at the end of Terraform script, after the data source:
resource "cloudflare_dns_record" "review_app_a_record" {
  zone_id = data.cloudflare_zone.team_yap_dns_zone.zone_id
  type    = "A"
  ttl     = 1
  name    = var.cloudflare_dns_record_name
  content = hcloud_server.review_app_server.ipv4_address
  proxied = false
}
The cloudflare_dns_record resource requires a couple of parameters:
zone_id: The identifier of the Cloudflare DNS zone to use for this resource. Here, we’re using the data source to set the ID.type: The type of DNS record to set for the new resource. In this case, we’ll create anArecord to map the server’s IP address to the domain name generated here.ttl: The Time To Live for the new DNS record. Setting the value of1in this parameter tells Cloudflare to set the value to “Auto”, which will set a default TTL depending on the record type. ForArecords, the default TTL is 4 hours (14,400 seconds).name: This is the name to set for the new domain name (<name>.teamyap.app, for example).Arecords must be unique, so I’ll use a Terraform variable calledcloudflare_dns_record_nameto set this up dynamically through GitHub Actions.
Since I’m setting a new variable in my Terraform configuration, I’ll also need to add the definition to the variables.tf file:
variable "cloudflare_dns_record_name" {
  type = string
  default = ""
}
Notice that we’re setting an empty string as the default value for this variable. We’ll need a default value for this variable so the teardown workflow can work without user intervention. Otherwise, the Terraform script will prompt for a value when running the terraform destroy command, which halts the continuous integration process. Since the teardown doesn’t need to specify the value for the DNS record, we can use a blank string.
Besides the required parameters, we also included two optional parameters. The content parameter sets the value for the DNS record. For A records, the content is the IP address used for it. We’re spinning up the server on this Terraform configuration, meaning we can grab its IP address and use it at the value for this parameter.
The other optional parameter, proxied, changes the default Cloudflare behavior that sets up our DNS record to proxy through their service, which yields benefits like DDoS attack mitigation, hiding your server’s IP address, caching, and more. You can choose to leave out this option, but in this example, I want to make our review apps not rely on Cloudflare for SSL connectivity, so I’ll turn off this functionality by setting proxied to false.
Updating the Kamal Destination Configuration
Let’s return to the Kamal configuration for the review destination created in part 2 of this series. The Kamal Proxy configuration under proxy already has the host defined through the REVIEW_APP_HOST environment variable, so we don’t have to update it here. However, we do want HTTPS connectivity to our review app using this new domain name, so I’ll add the ssl setting and set it to true to let Kamal Proxy handle generating the SSL certificate:
proxy:
  host: <%= ENV["REVIEW_APP_HOST"] %>
  # Tell Kamal to generate an SSL certificate via Let's Encrypt.
  ssl: true
The rest of the configuration for the Kamal destination doesn’t require any modifications, so we’re good to go with this setup.
Updating Github Actions Workflow for Generating DNS Records
The last thing we have to do is update the GitHub Actions workflow to ensure that Terraform has all the information it needs to create the DNS record for the new review app. First, we’ll begin by adding a couple of new environment variables to the provision job:
name: Review app deployment

on:
  pull_request:
    types:
      - opened
      - reopened
      - synchronize

jobs:
  provision:
    # Omitting existing job configuration.

    env:
      HCLOUD_TOKEN: ${{ secrets.HCLOUD_TOKEN }}
      AWS_ACCESS_KEY_ID: ${{ secrets.AWS_ACCESS_KEY_ID }}
      AWS_SECRET_ACCESS_KEY: ${{ secrets.AWS_SECRET_ACCESS_KEY }}
      TF_VAR_server_name: team-yap-review-${{ github.event.pull_request.number }}
      # New environment variables:
      CLOUDFLARE_API_TOKEN: ${{ secrets.CLOUDFLARE_API_TOKEN }}
      TF_VAR_cloudflare_dns_record_name: review-${{ github.event.pull_request.number }}

    # Omitting remaining job configuration and deploy job.
The CLOUDFLARE_API_TOKEN contains the authentication token we generated for the Terraform provider on Cloudflare. The token is a secret in the GitHub repository, similar to the Hetzner Cloud API token and AWS keys set up when we created this workflow in part 1.
We must also specify the variable for the DNS record generated as part of this workflow. The updates made earlier for creating the resource on Cloudflare use a Terraform variable, which we can set as an environment variable starting with TF_VAR_ and the name of the variable (in this case, cloudflare_dns_record_name).
The value for the DNS record must be unique for every app to prevent domain name clashes that will cause the workflow to fail. For this example, I went with something simple, starting with review- and using the workflow’s pull request number as I did for the TF_VAR_server_name environment variable used to set the server name when spinning it up on Hetzner Cloud. For instance, if the pull request triggering the workflow is #123, we’ll have a URL of review-123.teamyap.app, keeping it simple and unique.
With the DNS record created in the provision job, let’s move to the deploy job and update the REVIEW_APP_HOST environment variable we set previously in this workflow to use the desired domain name:
jobs:
  deploy:
    env:
      # Omitting existing job configuration and environment variables.
      REVIEW_APP_HOST: review-${{ github.event.pull_request.number }}.teamyap.app

    # Omitting remaining job configuration.
Using outputs for consistency
Ideally, you’ll want to maintain consistency between jobs using the reported value from Cloudflare. This step can be accomplished by updating the Terraform script to output the value of the DNS record and passing this information between the provision and deploy jobs. In this example, I opted to keep the updates minimum for brevity.
Testing the Updated Workflow
With these changes in place and ensuring that the repository secrets contain the Cloudflare API token, we can push the workflow updates to GitHub and open a new pull request to trigger the workflow on GitHub Actions.
The provision job in the workflow will once again spin up a new server on Hetzner Cloud, but as part of the process, it should also create a brand-new DNS record in Cloudflare using the pull request number as part of the record’s content.
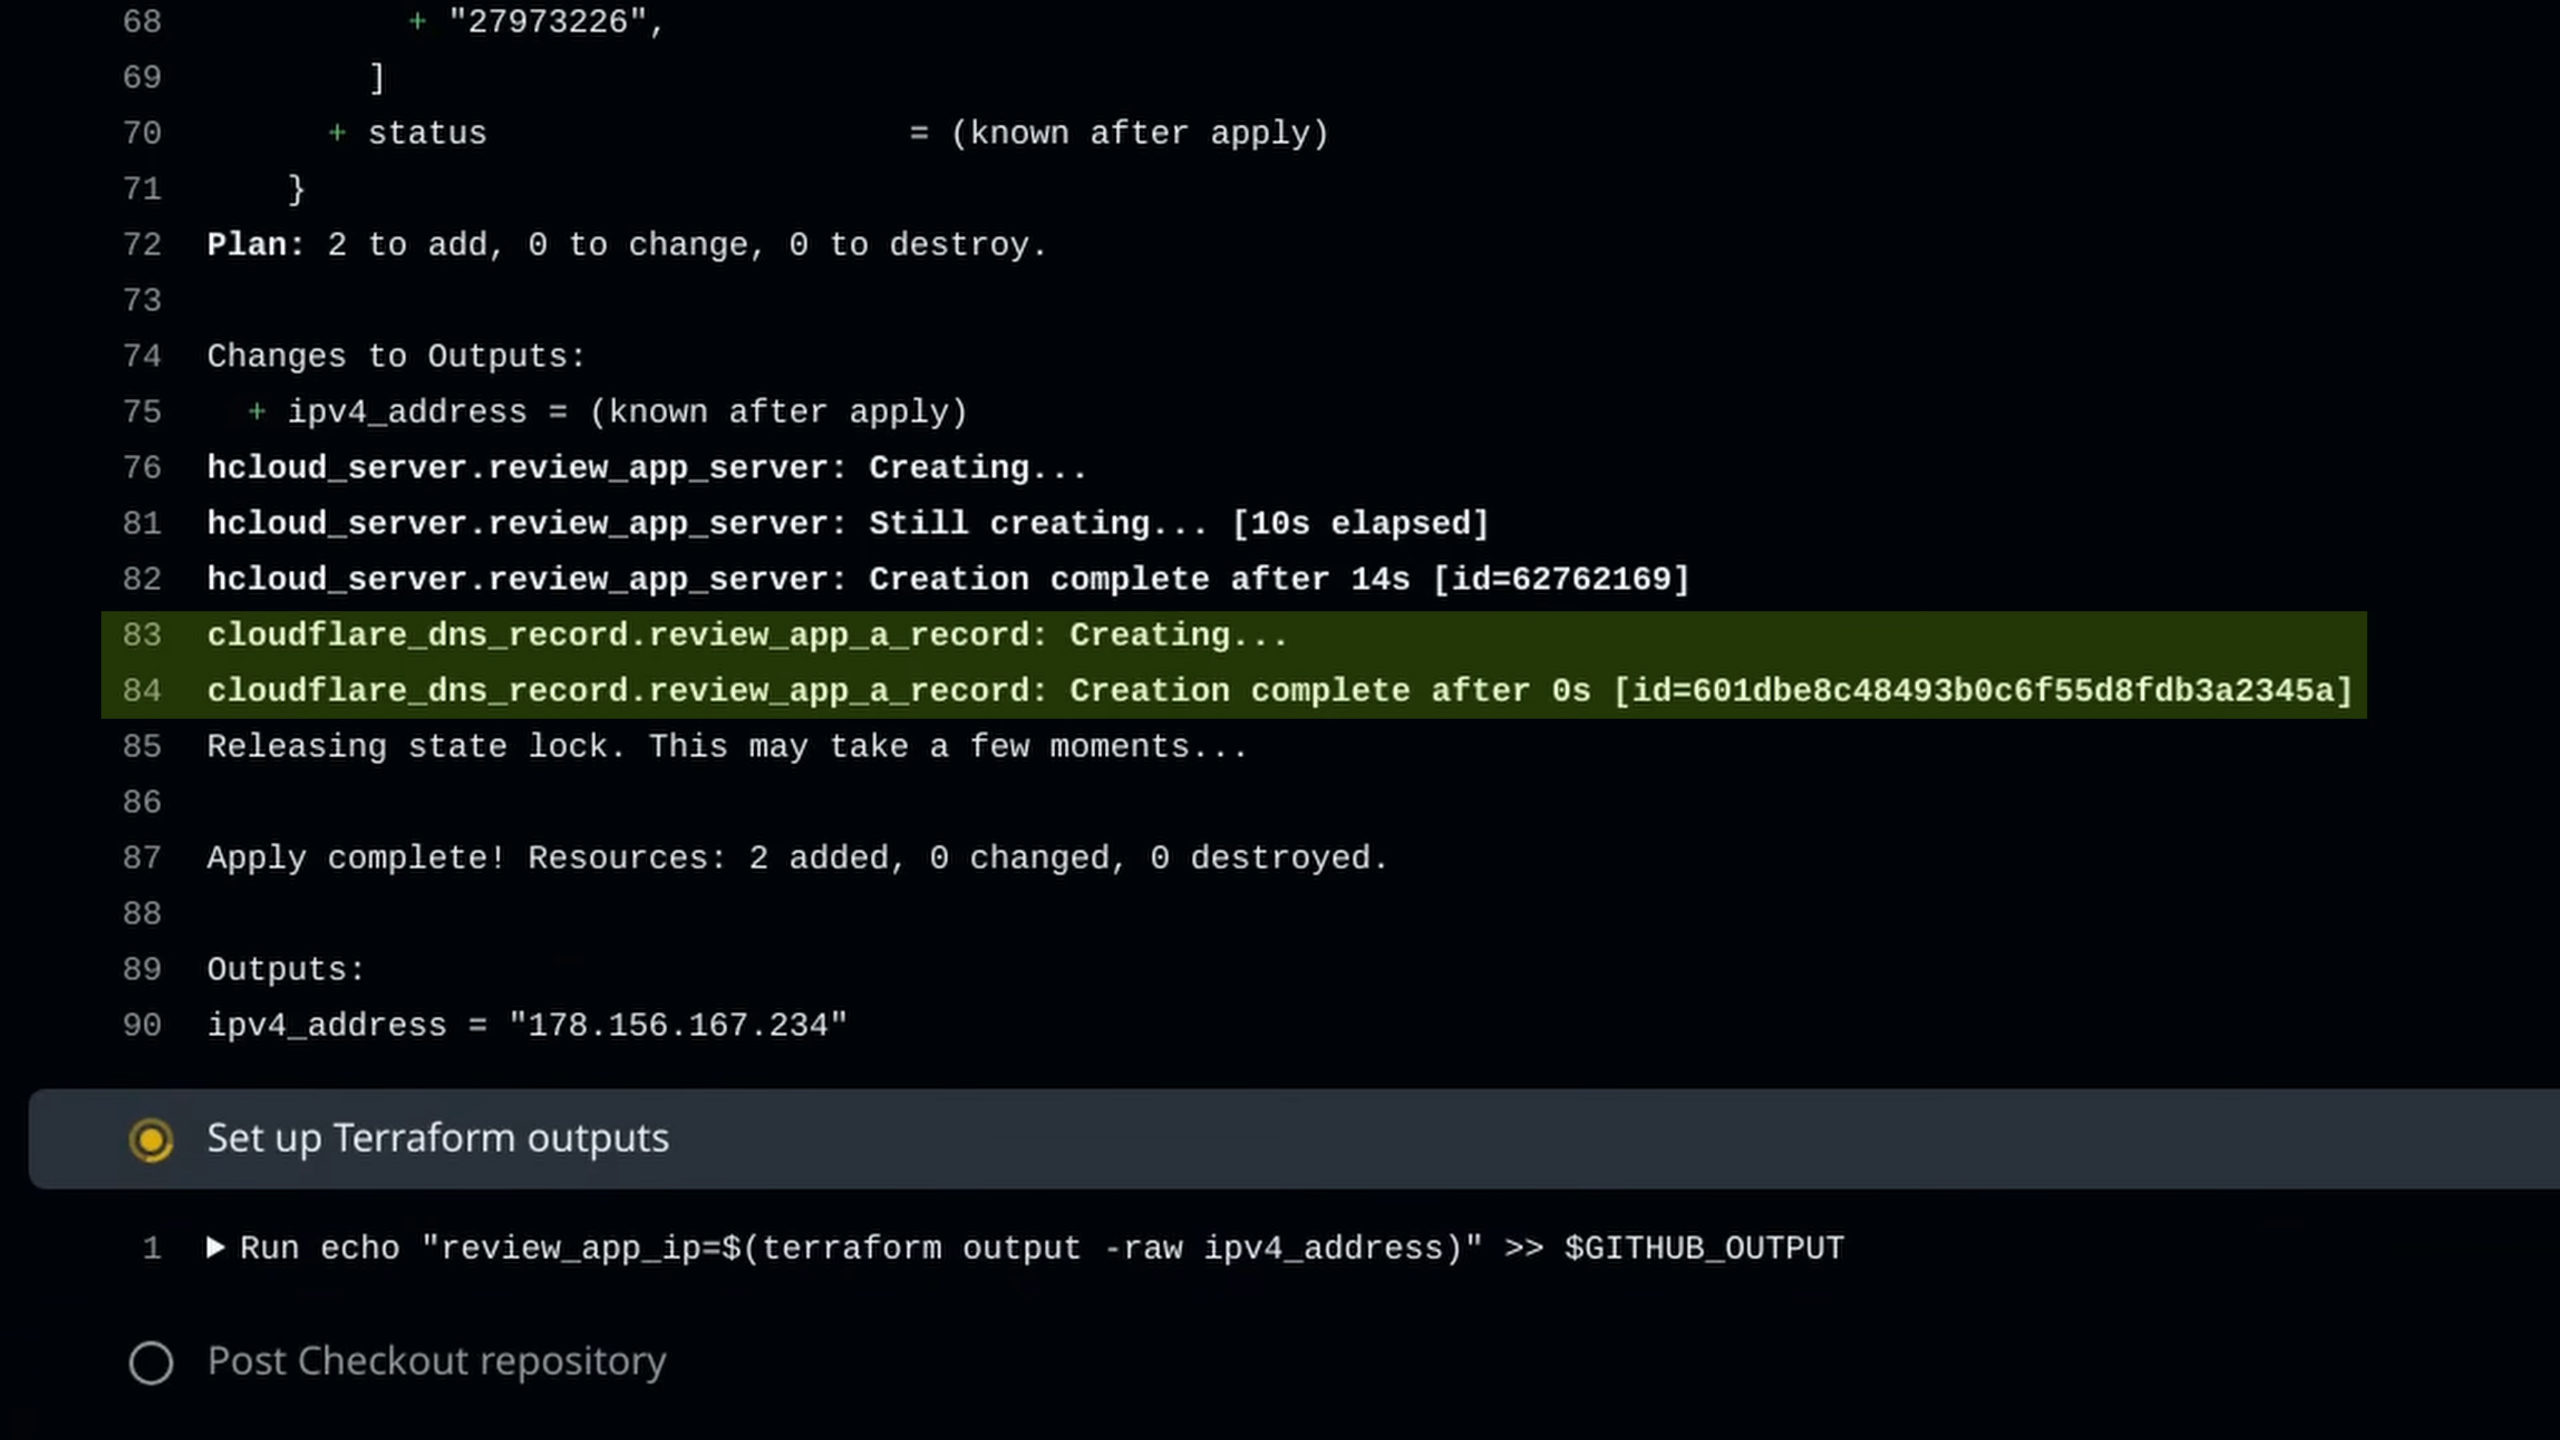
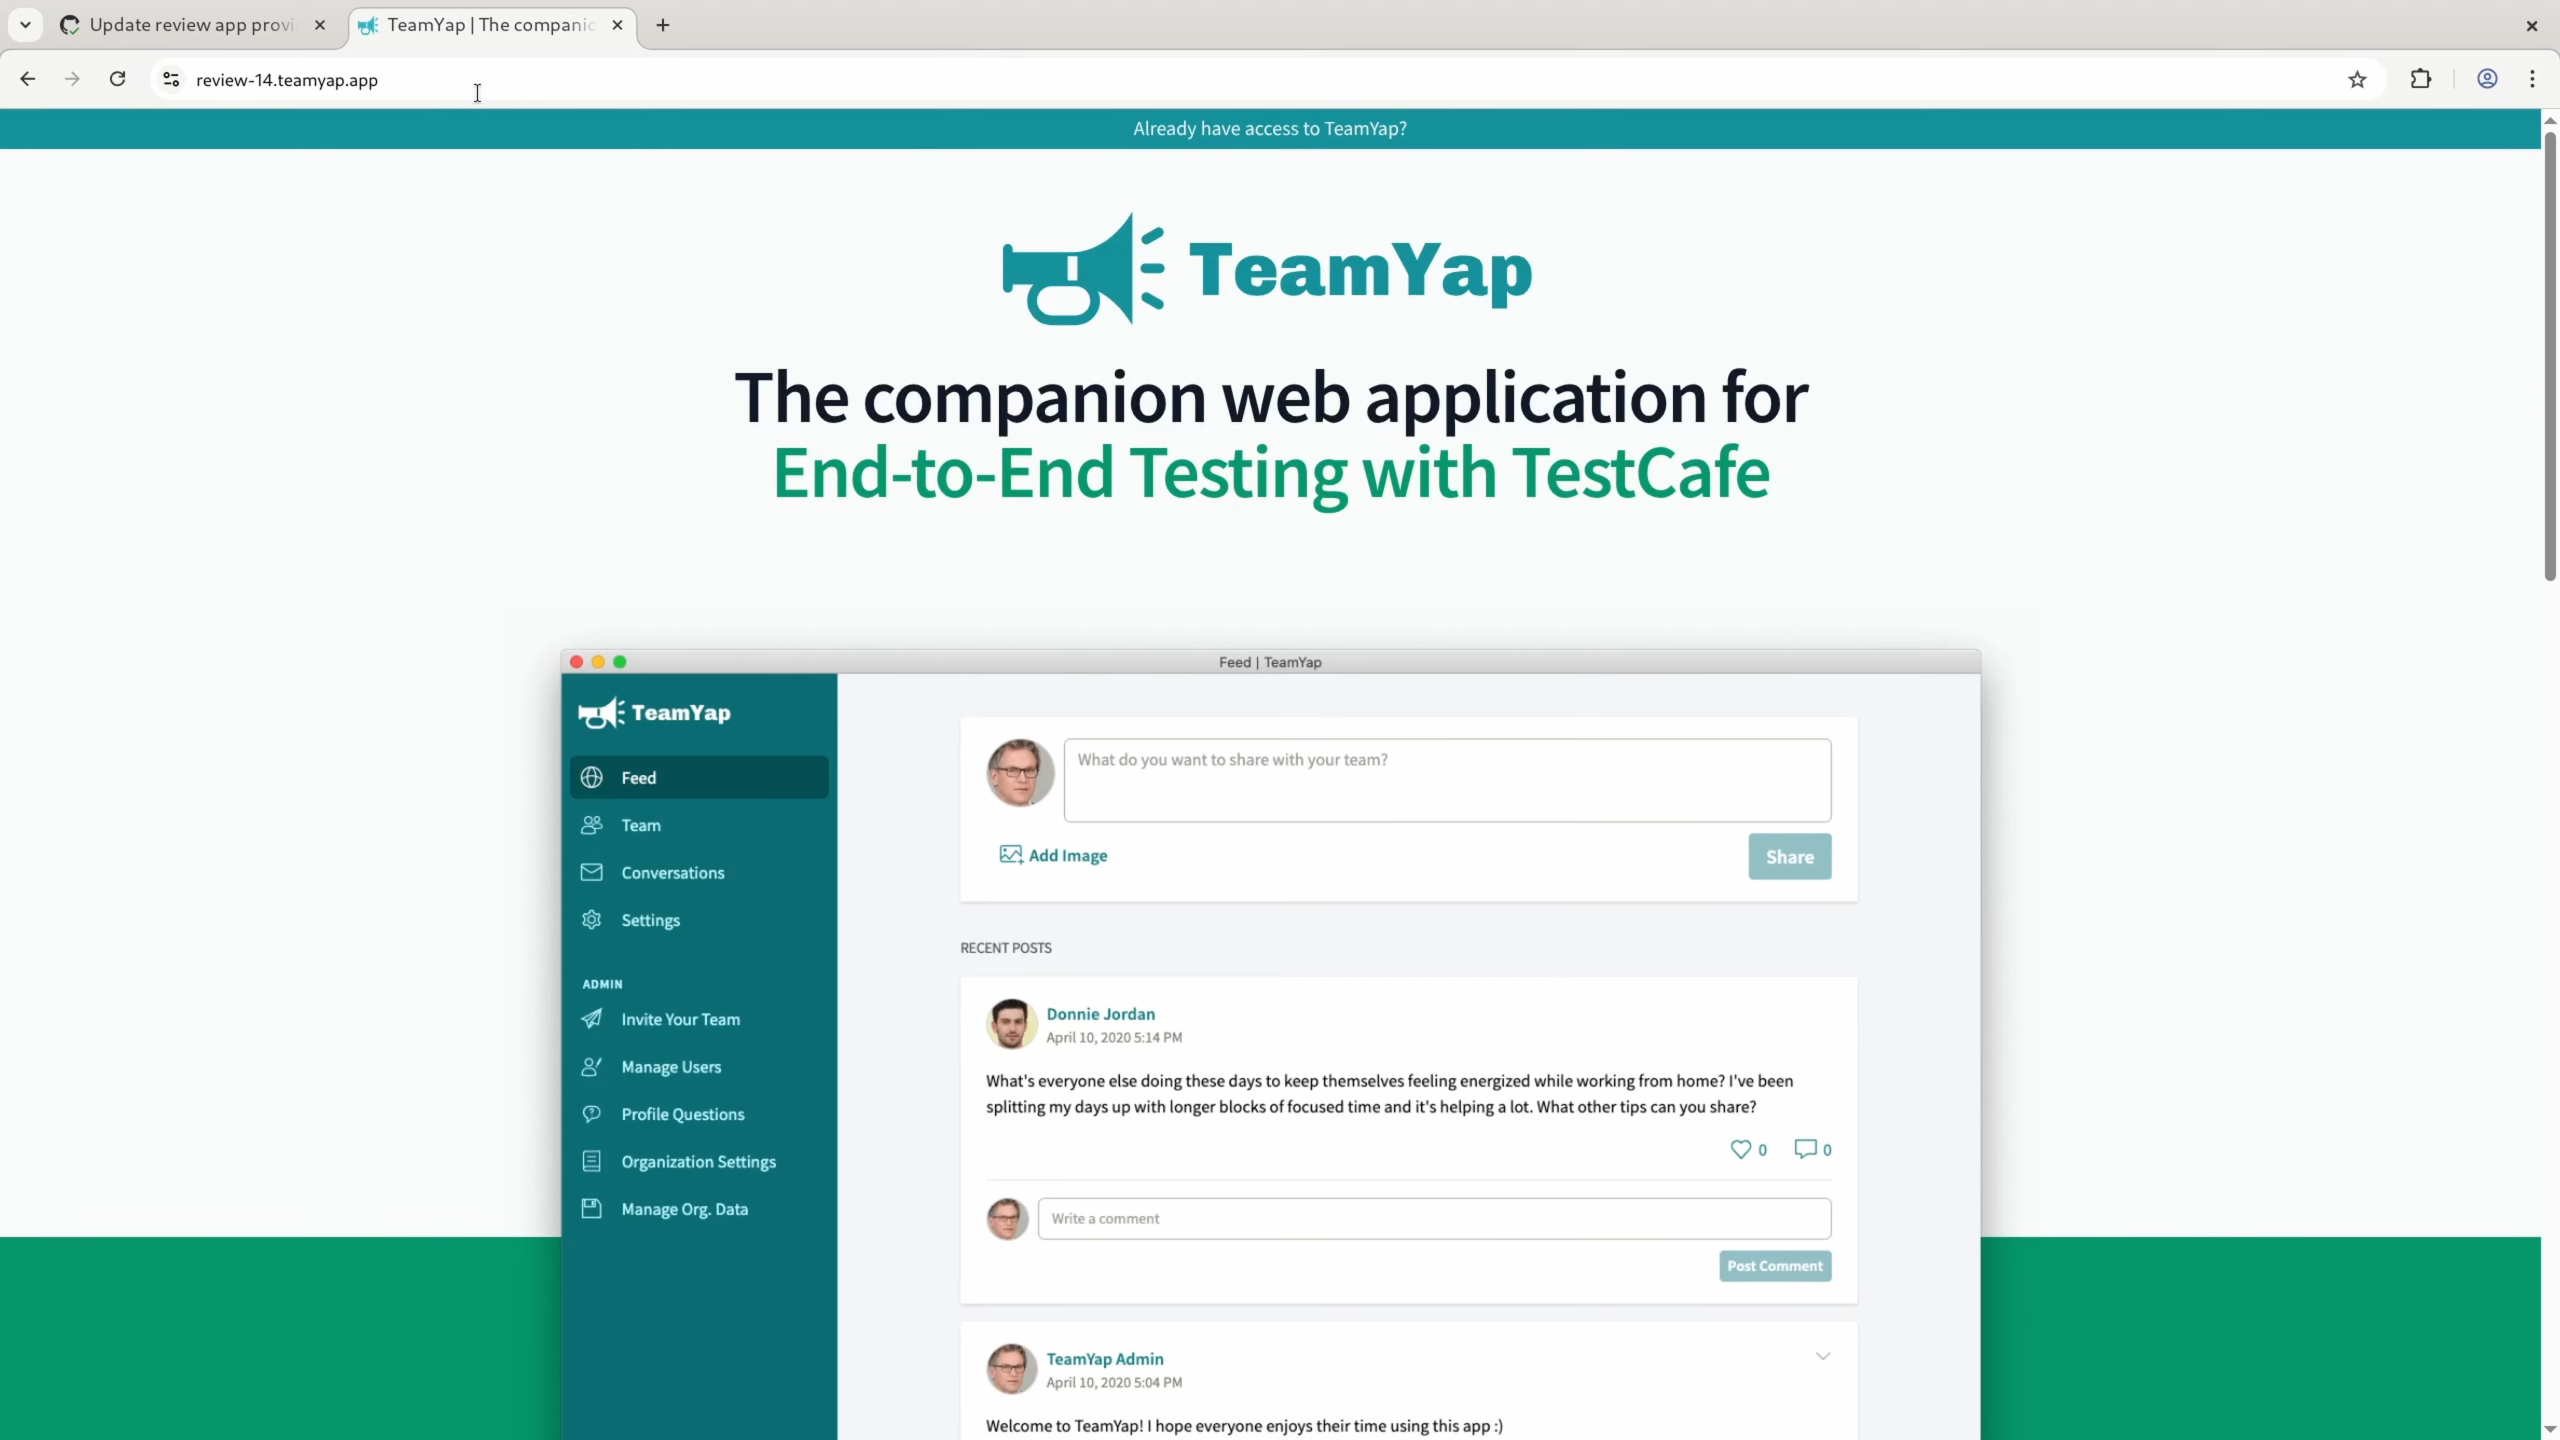
In the deploy job, Kamal will use the newly configured hostname we set in the environment variable. Once Kamal performs the initial setup on the server and has the application up and running, we can access the review app using the URL based on the pull request number, as we set up on Cloudflare.
Updating the Teardown Workflow
Once the pull request is closed or merged, GitHub Actions will remove the server from Hetzner Cloud, as shown throughout this series. But thanks to Terraform, the generated DNS record is also removed from Cloudflare. The only change required in the teardown workflow for this to work is to include the CLOUDFLARE_API_TOKEN environment variable in the workflow configuration. We won’t need any additional modifications to the workflow, which is one of the benefits of using Terraform to handle our testing infrastructure, as it will handle any cleanup automatically for us.
Wrapping Up
Setting up a URL for our review apps simplifies the testing process by providing an easy-to-access location for testers to check out the new changes. This step avoids searching for the IP addresses in these dynamically generated servers, helping teams get started with the QA process as quickly as possible. Also, if your team opens multiple pull requests for testing, having a consistent domain name structure helps avoid confusion about which review app is being tested at a given time.
We’re pretty close to having a fully functional review app workflow, but there’s still one issue to address. In part 3 of this series, we set up two distinct steps to determine whether to perform the initial Kamal setup step or if we need to run a regular deployment. This process is due to how Kamal separates these two steps, and it’s a failure point in our existing process since the initial setup can fail and leave the review app in an invalid state. In the following article, we’ll explore how to overcome this limitation. Be on the lookout for this soon!
Need help with Terraform, Kamal, or Rails and running for your web app?
If you or your team need an expert to help with Terraform, Kamal deployments, or Ruby on Rails, I can help fill that gap. Send me a message and let's talk about how we can collaborate together to get your projects moving forward.
Screencast
If this article or video helped you with automating your deployments on GitHub Actions, consider subscribing to my YouTube channel for similar videos containing tips on helping Rails developers ship their code with more confidence, from development to testing to deployment.