Deploying your applications using platforms such as Heroku can help you get moving quickly at the start. However, as your application grows over time, you might be unpleasantly surprised at how quickly costs can ramp up. These days, we have plenty of options to choose from that are just as easy to deploy on while giving complete control over the infrastructure. Using tools like Kamal, teams can set up a powerful server that costs less per month compared to Heroku.
However, these setups come at a different cost since it means we’re responsible for maintaining the infrastructure running the application. More importantly, we’re now responsible for maintaining the security of that infrastructure.
One of the main attack vectors for any server is through SSH connections. Managing servers typically requires logging in through SSH, and many tools, including Kamal, rely on SSH for performing their duties. Servers on the cloud will have SSH enabled by default, and while they’re typically locked down to only permit specific connectivity such as limiting password authentication, these default settings aren’t enough to keep your server completely secure.
The problem with SSH connectivity
Most cloud services today configure SSH to only allow connections using SSH keys, which bypasses the password authentication issues and are a lot more secure as these connections can’t be brute-forced. But it does introduce other challenges, particularly in managing multiple keys on the servers. As an example, I do most of my work on my home PC but also work from a shared office space using my laptop. That means I need to set up SSH keys for both systems or share a key between them, which is less secure. In a team environment, it’s also a bit of a pain to add and remove SSH keys for different team members as they join or leave the organization.
Having SSH connectivity enabled on your server also means that we need to keep a port open for access. However, the default SSH port (port 22) is a magnet for bad actors running automated scripts to locate potential targets for unauthorized access. Whenever I spin up a new server on any cloud service, it gets slammed almost instantly by bots trying to brute-force their way onto the server. Even when I prohibit logging in through SSH via a password, these connections can still cause issues with servers, especially cheaper servers with fewer available resources.
To mitigate these constant brute-force connections, we can configure the server in different ways, but they still have their fair share of problems. For instance, we can use a different SSH port than the default, which drastically reduces the automated connection attempts but is more of a “security through obscurity” tactic that only hides the problem on the surface. Another thing we can do is configure a service like Fail2Ban, which automatically blocks repeated failed connection attempts, but it only bans by IP address, and these days automated bots can easily switch IPs when needed.
Tailscale as a secure solution for SSH connectivity
My favorite solution for handling these SSH shortcomings is Tailscale. Under the hood, Tailscale builds on top of WireGuard, a fast and highly secure VPN that handles all the complexities of protecting connectivity between systems. Tailscale makes it even simpler by automating most of the WireGuard configuration and creating a secure network, along with adding the management layer and even allowing connections behind firewalls, so you don’t have to expose your servers.
Among the different services Tailscale provides, it includes secure connectivity to servers via SSH, with full access control policies and auditability through their system. There’s no need to expose SSH ports on your server’s firewall or manually manage SSH keys, so Tailscale addresses all the issues for you along with giving you additional observability over who’s connecting to your systems.
One of the best things about Tailscale is that they have one of the most generous free tiers that I’ve seen provided by any service. Tailscale lets you add unlimited devices to your network, set up 6 users and 3 access control list groups, and access almost every single feature that Tailscale provides without having to pay anything.
How Tailscale connectivity actually works
Before moving on with showing how to set up Tailscale, it’s worth taking a moment to look at what’s happening on the network with regular SSH connections and how Tailscale switches things up. The difference between both methods explains why Tailscale offers a more secure alternative to the usual SSH connectivity we’re used to handling.
With regular SSH, your server needs to have a port open to the public Internet. Any client that can access your server’s IP address can attempt a connection, which is why newly provisioned servers are hammered with brute-force attempts as soon as they’re online. Even when these attempts are successfully blocked by prohibiting passwords or using a monitoring service, they still consume resources on your server since the TCP connection and SSH handshake happen before authentication is even attempted.
Once a connection is established, the server checks the client’s credentials against its local configuration. If the SSH service uses password authentication, it opens you up to brute-force attempts that are easy to crack when using weak or common passwords. For public key authentication, the server checks the user’s authorized_keys file and verifies the client can prove ownership by matching it with its private key.
When using Tailscale, your server won’t need public ports exposed for SSH connectivity. Both the client and the server will join a private network (called a tailnet), and Tailscale coordinates the authentication between them. The systems can authenticate using Single Sign-On services like Google, GitHub, or your organization’s identity provider.
After a successful authentication, Tailscale coordinates a direct WireGuard tunnel between the two devices, with access policies determining whether the connection is permitted in the first place. The coordination server itself isn’t part of the data path for SSH traffic between systems, so it stays in a secure peer-to-peer network. In cases where Tailscale can’t establish a direct peer-to-peer connection due to firewalls or restrictive NATs, it will relay the traffic through a DERP server over HTTPS as a fallback.
The result of using Tailscale over normal SSH connections is that any automated bots scanning for servers that have port 22 open won’t have anything to connect to on your servers. There are no passwords to crack or public keys to maintain across servers either, and it’ll work through firewalls and always through a secure line. Only the devices and users you’ve explicitly added to your tailnet’s access control list can even attempt to make an SSH connection.
Setting Up Tailscale
The first step to using Tailscale is to create an account. Head over to Tailscale’s signup page and create a new account if you don’t have one yet using your preferred identity provider. On signup, Tailscale automatically creates a tailnet for you based on the provider used. From there, you’ll have access to Tailscale’s admin console, where you can manage the users and devices on your tailnet, set up access policies, and so on.
Sidenote: Plan assignment on signup
An important note to make during the initial account creation process is that if you sign up using an identity provider with a custom domain, Tailscale automatically signs you up on the Enterprise plan with a 2-week trial. You can change your plan at any time, but to ensure you start on the free Personal plan without needing to switch, sign up using a public domain email account (like @gmail.com). You won’t be charged automatically if you are placed on the Enterprise tier, but it’s an often missed gotcha.
Next, you’ll need to get both your local machine and the server connected to your tailnet to allow Tailscale to handle the connectivity between systems later.
Installing Tailscale on the local client
On the local side, Tailscale offers clients for all major operating systems, both on desktop and mobile devices. The Tailscale downloads page provides the apps and commands needed to get your local system signed in to your Tailscale account, according to the system you want to use on your tailnet.
Once Tailscale is running on the local system, you can connect to your tailnet by running the tailscale up command. The first time you run this command, you’ll get a URL to authenticate the device to your tailnet from the browser. After authenticating the device, it appears in your Tailscale account (under the “Machines” section) and is assigned a unique Carrier-Grade NAT (CGNAT) address to the device, which serves as the IP address for your private Tailscale network. You can also verify this information from the console using the tailscale status command, which lists every device in your tailnet.
Installing Tailscale on the server
The installation process for Tailscale on the server starts the same as installing on the client, using the same downloads or commands to install the Tailscale app. Most web servers run Linux, so the rest of this article will use Linux as the example to follow for installation and configuration. Installing Tailscale on Linux systems can be done easily by running the official install script using curl:
curl -fsSL <https://tailscale.com/install.sh> | sh
To do this, you’ll need to log into the server via SSH, which you’ll need access to until Tailscale’s SSH connectivity is configured.
Generating an auth key
Configuring Tailscale on a server is where things begin to differ. For servers, we’ll want to authenticate the device using a tagged auth key for automatic authentication instead of a user account, which requires you to manually authenticate. Under the Settings section on the Tailscale admin console, go to “Keys” to generate a new auth key for your servers.
There are a few options available when generating an auth key. The option you’ll likely want to toggle on is the Reusable option. This allows you to reuse the same key to authenticate multiple servers and keeps the authenticated devices on your tailnet. You’ll also want to pay attention to the Expiration setting. Auth keys can only be used to authenticate new devices between 1 and 90 days, so set this value according to your intended Tailscale usage.
The other available settings are optional but worth learning. The Ephemeral setting configures the auth key for use on short-lived nodes like CI runners or temporary autoscaled servers, where the device needs to join a tailnet and be removed upon shutdown. This setting should be kept off since you’ll configure a long-lived device like your web server.
The Pre-approved setting will determine if you need to approve any device that uses this key to authenticate. With this setting turned off, you’ll need to manually log in to the Tailscale admin console to approve or reject any devices that use this key, which is recommended for security purposes. Toggling this setting on will automatically add any device to your tailnet without explicit approval.
Finally, you can also toggle the Tags setting to specify tags for the devices using this auth key. Tailscale tags identify non-human devices and allow you to configure access based on the device’s purpose instead of associating it with a specific user. For example, you can have tags for staging and production servers. We’ll see this in action later in the article.
Tagging your servers
While tagging is optional, it’s highly recommended to tag all your servers since it allows you to configure your ACLs for a specific user or group to have access to any tagged resource. Continuing with the example above, you may want to allow developers to access staging servers but only allow a subset of developers or automated systems specified under a deployment group to access production systems.
Before tagging a device when authenticating, we need to grant the correct permissions to allow the tagging to happen. This is done by declaring a tag owner, which is a user or group of users that can apply the tag to any device. Setting a tag owner can be done through the “Access controls” page of the Tailscale admin console and creating a new tag under the “Tags” section. You can set the tag owner as a specific user, or you can use one of the user groups that Tailscale automatically creates, such as “autogroup:admin” which sets all users with the admin role as a tag owner.
Starting up Tailscale on the server
With the auth key generated and configured with a tag, it’s time to add the server to the tailnet. The command is similar to running Tailscale locally, but with a few additional flags:
tailscale up --authkey=<auth key> --ssh
The --authkey flag will set up the device on your tailnet without requiring you to log in as you did locally. If the “re-approved” setting was not turned on when generating the auth key, you’ll need to approve the device on the Tailscale admin console. Otherwise, it’ll be accessible on the tailnet automatically.
The --ssh flag is the “special sauce” for our purposes, enabling Tailscale SSH connectivity on the server, which is the reason we’re setting up Tailscale in the first place for our Kamal deployments. Tailscale doesn’t set this up by default, so it’s important to include this flag when starting up Tailscale on the server.
With this, we now have a direct, secure connection between our local system and our servers without needing to expose an open SSH port on the public Internet.
Disabling device key expiry on the servers
When authenticating a device to a tailnet, Tailscale associates a key to that device, which it uses for authentication purposes. One area to keep in mind with these keys is that the keys expire for security purposes. Tailscale sets a default expiry period of 180 days from the time the device is authenticated, and once it expires, the device will lose access to the tailnet, and you need to reauthenticate again.
While this is an important security measure, we also don’t want to lose SSH access to our servers every six months and have to reauthenticate to resume deploying our apps. Tailscale does allow disabling device key expiration, and it’s recommended to do so on servers to maintain access to the servers. Disabling key expiry is considered safe to do on servers because they’re identified by tags instead of user accounts. Still, you should consider reauthenticating the device periodically to rotate its keys
You can disable the key expiry for a given machine by going to the Machines section in the admin console, locating the server on the list, and selecting Disable key expiry on the menu next to it on the right side of the row.
Setting Up Access Control
After Tailscale is set up on the server to allow SSH connections, the next step is configuring access to the machine. On Tailscale, this is done through Access Control Lists, or ACLs, which let you specify who can access what on the tailnet. Without an ACL defined, Tailscale applies an “Allow all” access policy by default, which is fine for confirming that your setup is working. Once you update your ACL with a rule, Tailscale applies a deny-by-default policy where access is denied unless explicitly configured, which helps prevent leaving open access to your tailnet devices accidentally.
In a team environment, you’ll want to restrict access to your different systems, which is where the ACL comes into play. ACLs are edited using JSON, but many configuration settings can also be set through Tailscale’s admin console. The simplest way to begin setting up your tailnet’s ACL for SSH connectivity is by going to the “Access controls” section in Tailscale’s admin console and then selecting the “Tailscale SSH” sub-menu option on the left-hand side of the page. From there, click on the “Add rule” button to set up a rule. The page will have a few fields:
- Source: The users or devices that will access other devices on the tailnet.
- Destination: The devices to allow the sources to access.
- As destination user: The SSH user account used when connecting to the destination devices.
- Check mode: Determines whether to perform additional authorization checks on the source devices before connecting.
- Note: An optional note to describe the rule and why it’s set up.
The source and destination fields come pre-populated with a list of groups and tags that you have configured in your Tailscale account and automatically generated groups (or autogroups) like an admin autogroup. As mentioned earlier in this article, tagging your devices helps you target a specific group of servers easily instead of having to define them individually when configuring the ACL. Setting up groups helps here as well, as we can create a group to specify different types of users easily and can automatically grant access to new team members as they’re added to these groups.
As an example, the following shows how to configure an SSH access rule that allows users who are placed under a group called developers to connect to any device tagged as staging via SSH as the root user:
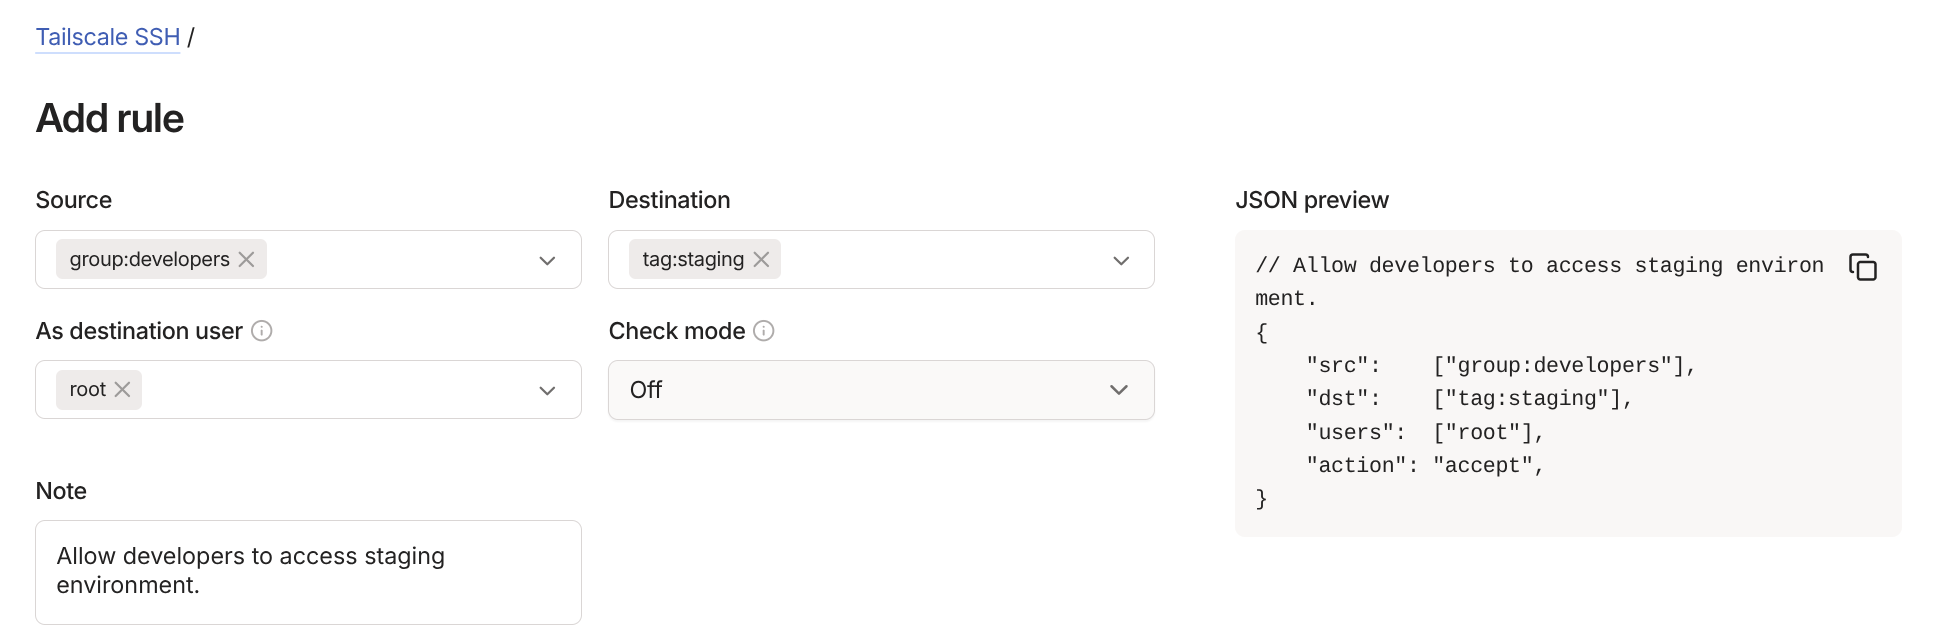
In this example, we’re keeping check mode off, but for access to systems where you want to add an extra layer of security, setting check mode to “On” forces users to re-authenticate before establishing SSH connectivity.
Verifying SSH connectivity
With the ACL in place, we have our Tailscale configuration complete. To verify that everything is working as expected, make sure you’re logged into your tailnet locally with an account that’s defined in the ACL’s source and open an SSH connection to a destination device using the specified user (for example, ssh root@100.110.123.123). Note that you’ll need to connect using the tailnet’s IP address for the device, not the server’s direct IP address. You can find the IP addresses for your tailnet’s devices using tailscale status.
If everything is configured correctly, you should have access to the server. You can also confirm that the ACL is working by removing the rule from your ACL and attempting to connect via SSH again, which should block you from accessing the server. With this, you can use Tailscale to manage access to your servers.
Troubleshooting failed SSH connectivity
Since getting to this point requires a bit of setup, there’s a good chance something will cause SSH connectivity to not work when using Tailscale. Here are a few common areas to check if you can’t connect to your servers through SSH:
- Make sure Tailscale is running on the server using the
--sshflag to allow SSH connectivity. - Check that the server is still on the tailnet and its access key hasn’t expired by disabling key expiry for the device.
- Ensure that you’re logged in to the tailnet on the source device by running
tailscale status. - Use the correct group names and tags when setting up the access rules for SSH.
- Make sure the devices are set properly in the specified groups and tags.
Sidenote: Tailscale's MagicDNS Feature
One of my favorite Tailscale features is MagicDNS. This feature automatically registers the names of your devices on your tailnet and allows you to access them through these names instead of IP addresses. In addition, every tailnet has a unique fully qualified domain name that you can use ending in .ts.net (like deer-cat.ts.net).
What this means is that instead of connecting to a server via SSH using the IP address like ssh root@100.110.123.104 as shown earlier, you can use something like ssh root@staging-server (hostname only) or ssh root@staging-server.deer-cat.ts.net (FQDN) instead, which is a lot easier to refer to and remember compared to IP addresses.
For the remainder of this article, I’ll use IP addresses to avoid confusion around this feature since it’s optional. For more details about the MagicDNS functionality, check out Tailscale’s documentation for this feature.
Updating Kamal to Use Tailscale SSH
The hard work of setting up and configuring Tailscale is complete. The only thing left to do is to update our Kamal configuration to use the tailnet addresses instead of the server’s IP address or domain name. Just change the IP addresses/domains for any hosts defined under the servers section, as well as any accessories you’re deploying. There’s no other configuration that needs to be done.
As long as allowed users have Tailscale installed locally and logged into the tailnet, everything will work the same as before. Now when team members join or leave the organization, you can allow or revoke their access all through Tailscale instead of handling passwords or asking everyone to send over their public keys, making team management much less of a pain.
Potential Drawbacks
While Tailscale offers a ton of functionality and security even on their free tier, it does require additional work to get running and maintain. As shown throughout this article, you’ll need to install Tailscale on all devices that need access to the tailnet. The steps shown here cover the manual setup of a single server, but you can also automate this as part of the server’s bootstrapping and provisioning (typically using cloud-init). This requires additional steps and is out of scope for this article, but I may cover it in a future article.
There are also potential drawbacks to this setup. Adding Tailscale to your infrastructure means adding another dependency that you need to manage and keep up to date. It also requires you to rely on Tailscale having their service up and running smoothly, which is always a risk. Their track record for uptime is solid, but no service is immune to downtime-causing issues and client bugs that can disrupt connectivity, like a recent update that broke MagicDNS for Linux clients and affected my work.
None of these problems are dealbreakers, in my experience. The alternative is managing SSH keys across machines, coordinating who has access to what, and exposing ports that are often targeted by malicious actors. Tailscale removes all of that. You’ll have no public SSH ports to defend and access that lives in a single list you can change in seconds. If you’re deploying with Kamal as a team, it’s the setup I’d reach for.
Stuck getting this working?
Getting Tailscale set up and configured correctly can be a bit tricky, especially if you’re new to the service or have a more complex setup. If you want a second set of eyes on your Kamal and Tailscale setup, or help with DevOps and Rails more broadly, book a call and we'll figure out how I can help.